
Abusing forgotten permissions on computer objects in Active Directory
A while back, I read an interesting blog by Oddvar Moe about Pre-created computer accounts in Active Directory. In the blog, Oddvar also describes the option to configure who can join the computer to the domain after the object is created. This sets an interesting ACL on computer accounts, allowing the principal who gets those rights to reset the computer account password via the “All extended rights” option. That sounded quite interesting, so I did some more digging into this and found there are more ACLs set when you use this option, which not only allows this principal to reset the password but also to configure Resource-Based Constrained Delegation. BloodHound was missing this ACL, and I dug into why, which I’ve written up in this short blog. If an environment is sufficiently large (and/or old), someone at some point likely added a few systems to the domain with this option set to “Everyone” or “Authenticated Users”, allowing all users in the domain to join the computer to the domain. Whoever configured this probably did not realize this would also give everyone specific permissions on the object after it is joined to the domain. The logic to analyze this is now included in the BloodHound.py data gatherer, as well as a Pull Request for SharpHound. If this misconfiguration is present in a domain, it may give you access to servers from any user. This makes for an easy first step in lateral movement. Along the way, I discovered more cases in which these ACEs were present, so in any larger environment, there’s a good chance that unintended users have some lingering permissions on computer objects. This post includes some queries to use in BloodHound, as well as some recommended mitigations.

Background
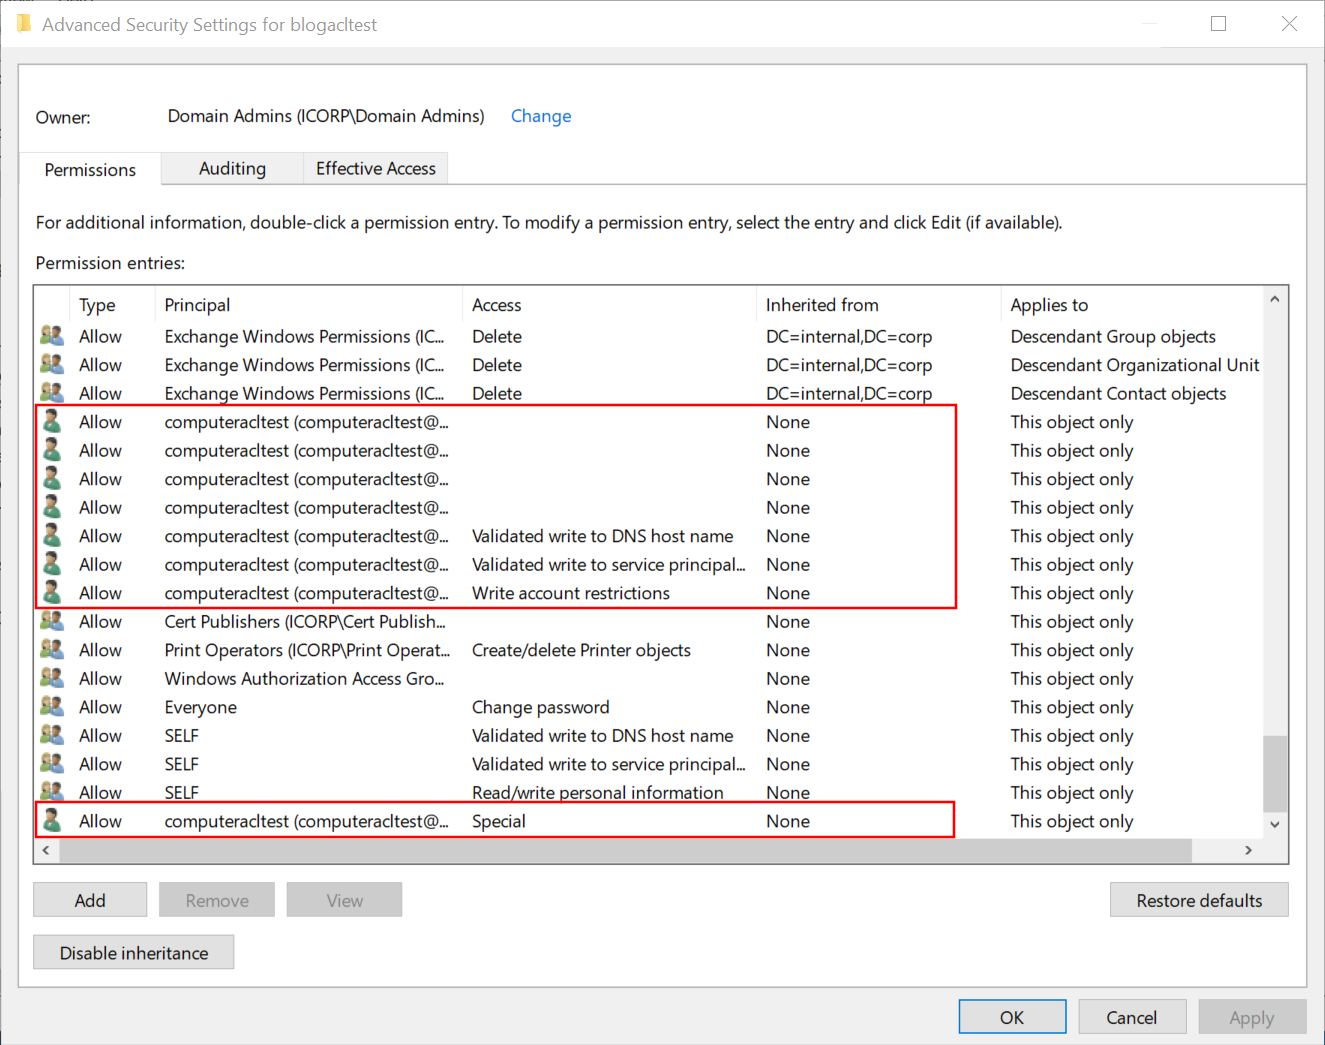
After reading Oddvar’s blog, I wondered what rights are granted to users when the option “The following user or group can join this computer to the domain”. So I did some tests and set this value to a newly created user “computeracltest”. After creating this computer object, we see that various Access Control Entries (ACEs) are set to this new computer, granting rights to the account we chose. As usual, the GUI is not really helpful here since it shows weird blank values and some instances of “special” which are quite ambiguous.
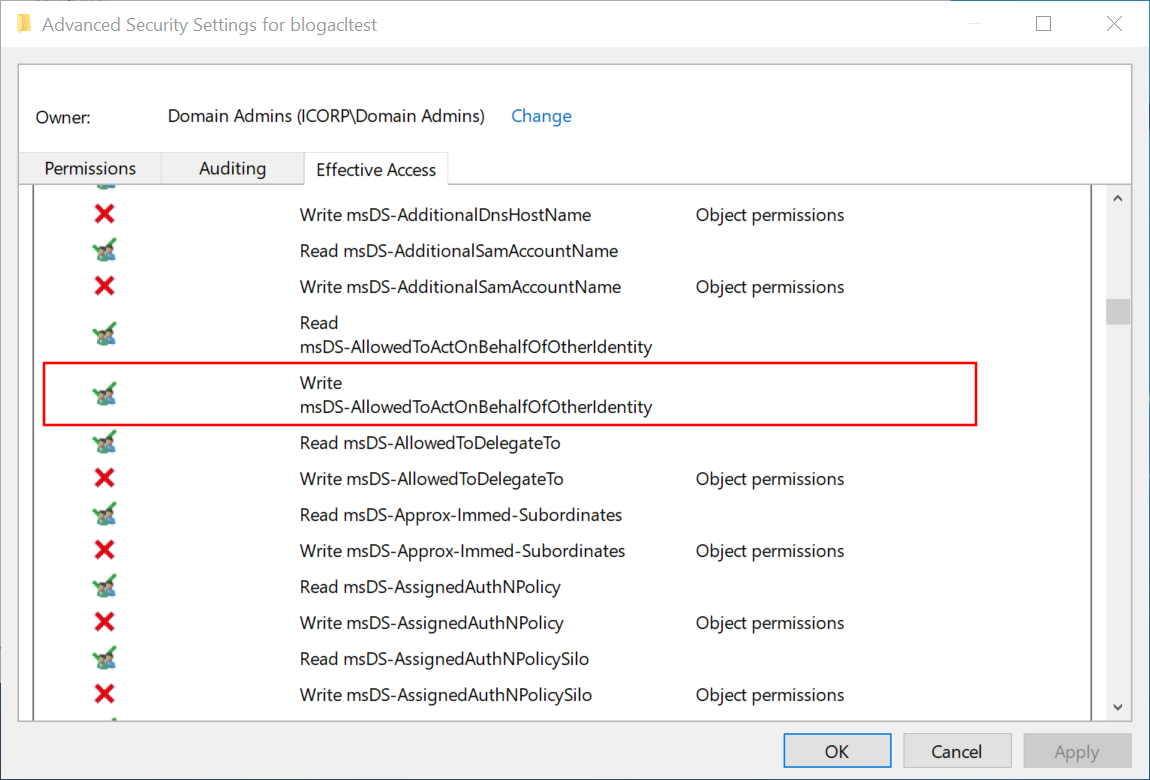
The “effective access” view is more practical and shows us some interesting additional information: the user can write to the msDS-AllowedToActOnBehalfOfOtherIdentity attribute, which is the attribute that gives us access to configure Resource-Based Constrained Delegation.
How we got that access is not quite clear from the ACE view. Some of the ACEs may not be adequately understood by the GUI. So instead, let us look at the raw ACL and what its entries mean. My preferred tool to make these entries readable is the ACL parsing logic of BloodHound.py, which has some extensive parsing logic and debug printing built-in. Because I did this analysis with a newly created user, the only ACEs that matter are those set to that specific user. If we print any ACE we encounter that applies to this user’s SID, which can be done by modifying these lines in BloodHound.py, we can see what ACEs we have.
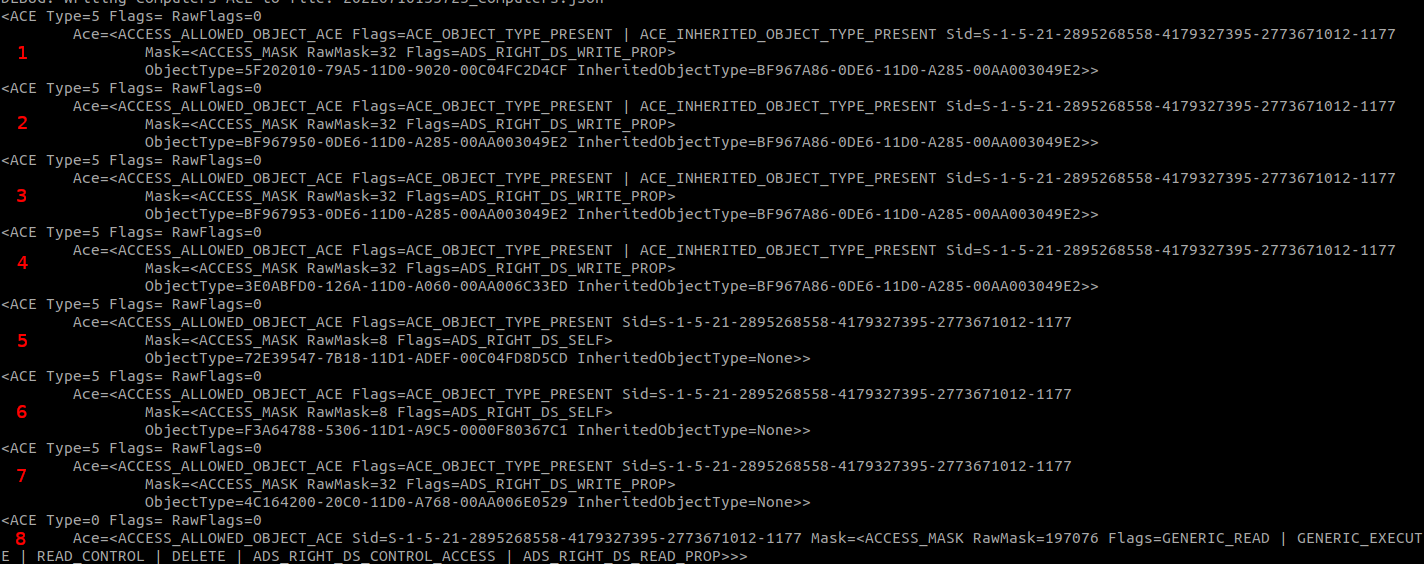
The ACEs can be separated by type, which is based on the flags of the ACE. ACE numbers 1-4 and 7 have the flag ADS_RIGHT_DS_WRITE_PROP, which indicates that this ACE controls access for writing to a property, indicated by the GUID in ObjectType. ACE number 5 and 6 have the ADS_RIGHT_DS_SELF flag, which is a bit confusing name for a validated write according to the documentation. Validated writes also allow you to write to a property, but the write is subject to additional validation. An example is ACE number 5, which is the validated write to the DNS hostname with restrictions. ACE number 8 is a simpler ACE not restricted to a specific property but with the ADS_RIGHT_DS_CONTROL_ACCESS flag. This flag controls extended rights, and since there is no specific extended right specified, this ACE grants the “all extended rights” permissions that Oddvar wrote about in his blog.
Ignoring these leaves us with a few ACEs to inspect, each of which grants write access to a specific property. The property IDs are mapped to names in the Active Directory schema, but we can also put the GUIDs in Google to find the corresponding property in the Microsoft documentation. This gives the following properties:
5F202010-79A5-11D0-9020-00C04FC2D4CF: User-Logon property set.BF967950-0DE6-11D0-A285-00AA003049E2: Description attribute.BF967953-0DE6-11D0-A285-00AA003049E2: Display-Name attribute.3E0ABFD0-126A-11D0-A060-00AA006C33ED: SAM-Account-Name attribute.- Validated write to DNS host name (I’ve written about this right before).
- Validated write to service principal name.
4C164200-20C0-11D0-A768-00AA006E0529: User-Account-Restrictions property set.
The above pages give us several attributes, but none that make it clear why we have the rights on the msDS-AllowedToActOnBehalfOfOtherIdentity attribute. For this, we have to dig deeper into numbers 1 and 7, which are property sets instead of single attributes.
Property sets in Active Directory
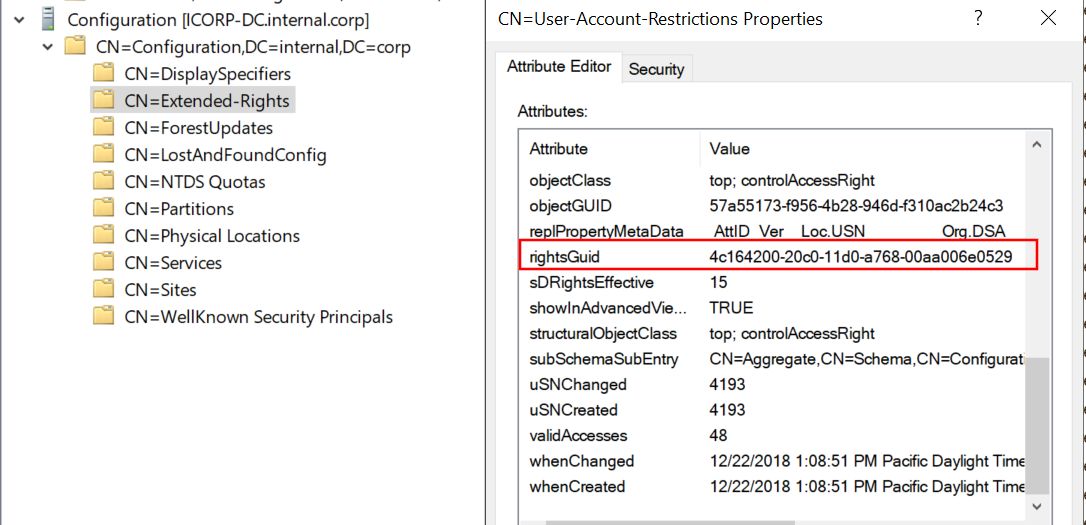
If you don’t know what property sets are or how exactly they work, don’t worry, I didn’t either before diving into this. Some searching in the documentation teaches us that a property set maps to multiple properties, so you don’t have to create an ACE for every single property you want to grant access to. Unfortunately, the documentation for the property sets linked in the list above is not updated beyond Server 2012, so it doesn’t tell us what properties are included in these sets on more modern OS versions. Back to querying this from the AD schema, where all these properties are defined. When we look at the properties of the msDS-AllowedToActOnBehalfOfOtherIdentity attribute, we see that it references attributeSecurityGUID 4C164200-20C0-11D0-A768-00AA006E0529:
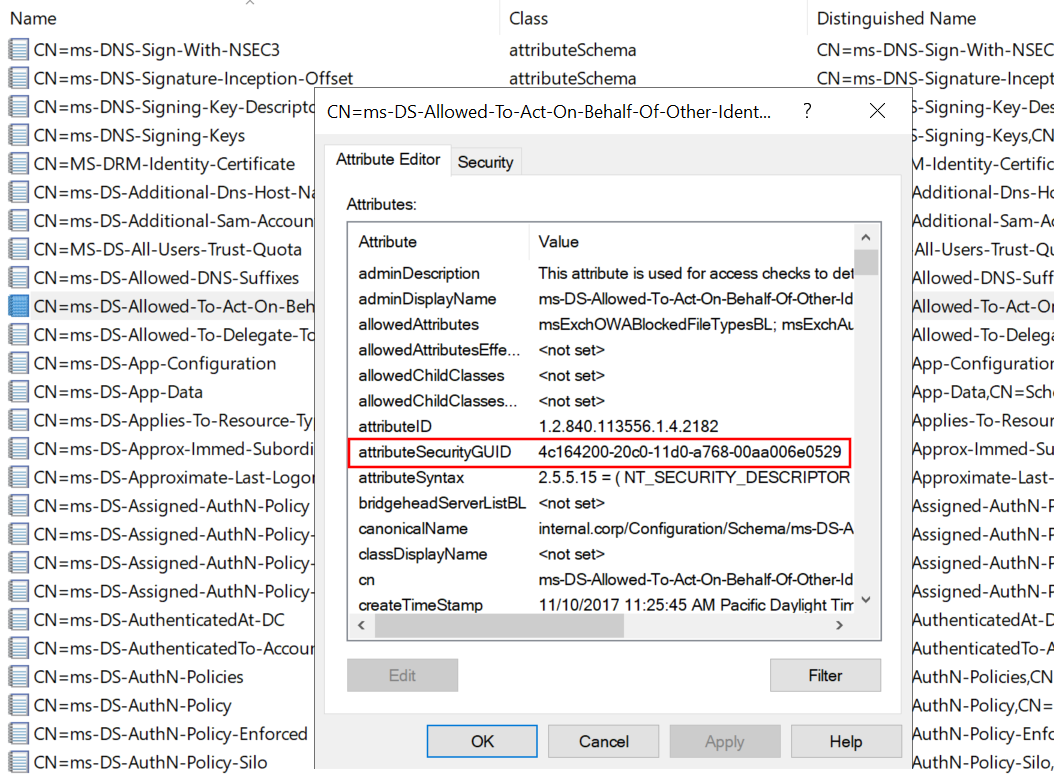
This is the same GUID as we saw for “User-Account-Restrictions” that we saw for ACE number 7 above. A look at the Extended Rights configured in the Configuration partition of AD shows us the same GUID for the User-Account-Restrictions property set.
We can use this information to reconstruct all the property sets and the properties they contain in the default AD schema by creating a mapping between the properties and their set (if any). I’ve written a short python script that does just that, which gives us all the attributes contained in the User-Account-Restrictions property set, including msDS-AllowedToActOnBehalfOfOtherIdentity.
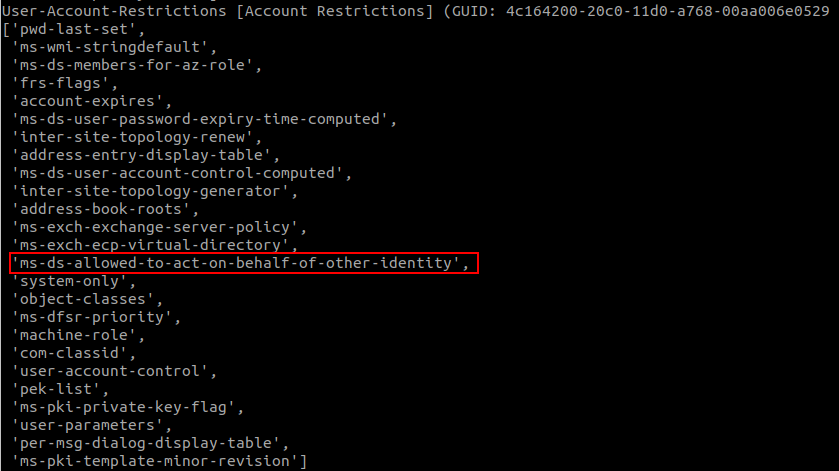
With this, we can conclude that it’s ACE number 7 that gives us the rights to modify the msDS-AllowedToActOnBehalfOfOtherIdentity attribute, which allows us to configure Resource-Based Constrained Delegation.
Abusing the “Everyone” case and more abuse options
To go back to our original idea, when an admin adds a computer to the domain and gives “everyone” or “authenticated users” the permission to join the computer to the domain, these groups also get the permission to configure RBCD. If we add this extra logic to the BloodHound data collector and run it again, we will see these new “AddAllowedToAct” edges showing up in our data. There is a second case in which these permissions get set, which is when a computer object is created via LDAP, in which case the user that created the account will get the permissions that allow them to configure RBCD. This may be another lateral movement opportunity in case an attacker compromises an account that is commonly used to join machines to the domain.
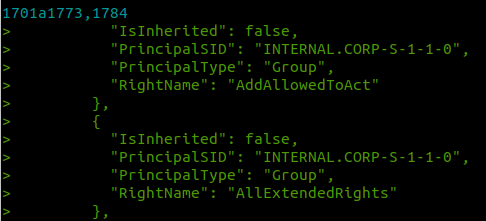
After adding the new ACL property logic to BloodHound.py, and diffing the output with SharpHound, we see the extra AddAllowedToAct edges showing up:
Loading this data into BloodHound, we can use the following query to find our nice new edges. Note: the edge was renamed to WriteAccountRestrictions after merging into the main BloodHound code. Both SharpHound and BloodHound.py now report this as WriteAccountRestrictions, so the query changes from the naming used above:
MATCH p=(g)-[:WriteAccountRestrictions]->(c:Computer) WHERE NOT g.highvalue RETURN p
Or to focus on cases exploitable from any authenticated user, the following query is useful:
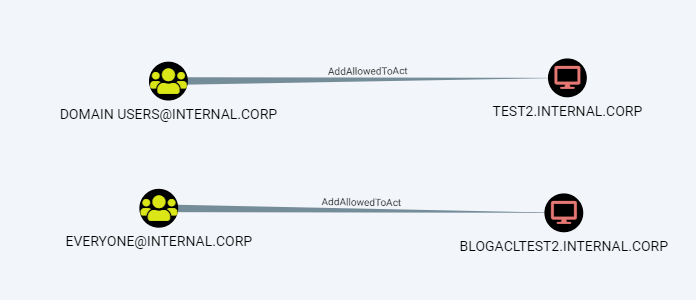
MATCH p=(g)-[:WriteAccountRestrictions]->(c:Computer) WHERE g.objectid ENDS WITH "S-1-1-0" OR g.objectid ENDS WITH "-513" OR g.objectid ENDS WITH "S-1-5-11" OR g.objectid ENDS WITH "-515" RETURN p
This shows the following result in my test lab, since I added a computer with the “everyone” permissions to the domain:
We can configure RBCD by modifying the object over LDAP, for example by using rbcd.py from impacket. As a general reminder: to exploit this, you would need access to a computer account in most cases, which you can either do by dumping the credentials of an existing host from the registry, or by registering a new computer object in AD if that is allowed (which it is by default). In this case, I’m abusing ICORP-W10 as an account for which I dumped the password.

As the last step, we can obtain a service ticket impersonating a Domain Admin account to access the victim host:

If this was a real computer instead of only a pre-created account, we could use this ticket to login in over SMB and for example run secretsdump.
Mitigating and monitoring
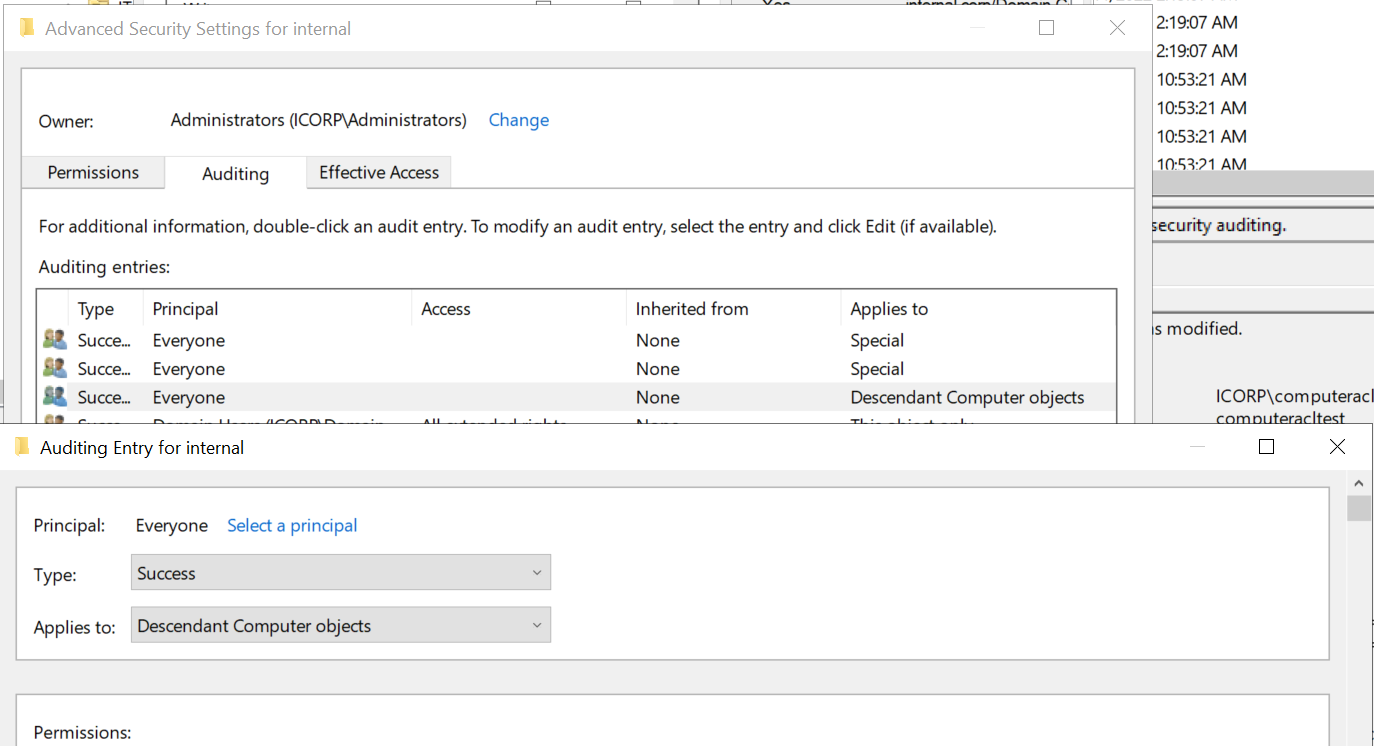
If you’re on the blue side, you can perform the same BloodHound queries to identify misconfigured computer objects. For the actual mitigation, remove the vulnerable ACEs on these objects. I recommend removing any ACE that was set to allow the specific user or group to domain join the computer, which are similar to the screenshot in the beginning of this blog and are all scoped to that user/group and set to “This object only”. At the minimum, remove the Write account restrictions and the Special (which means “All extended rights” in this case) ACEs.
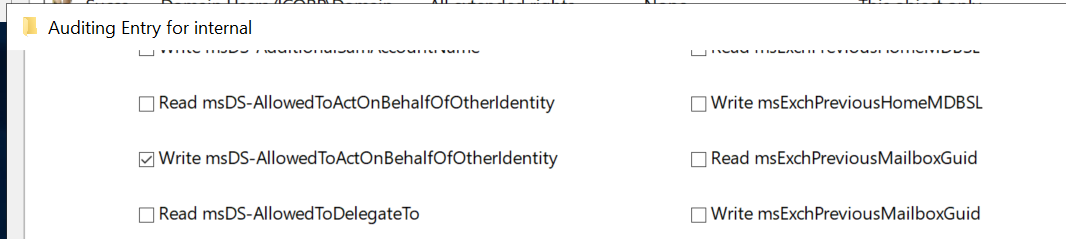
Modifying the msDS-AllowedToActOnBehalfOfOtherIdentity attribute is not monitored by default in AD. Assuming you already have “Audit Directory Service Changes” audit logging enabled, an auditing entry (SACL) needs to be added to monitor changes to this attribute. You could configure this on the domain root or on all OUs/containers that contain computer objects. It should apply to “Descendant computer objects” and the property to monitor is Write msDS-AllowedToActOnBehalfOfOtherIdentity as shown below:
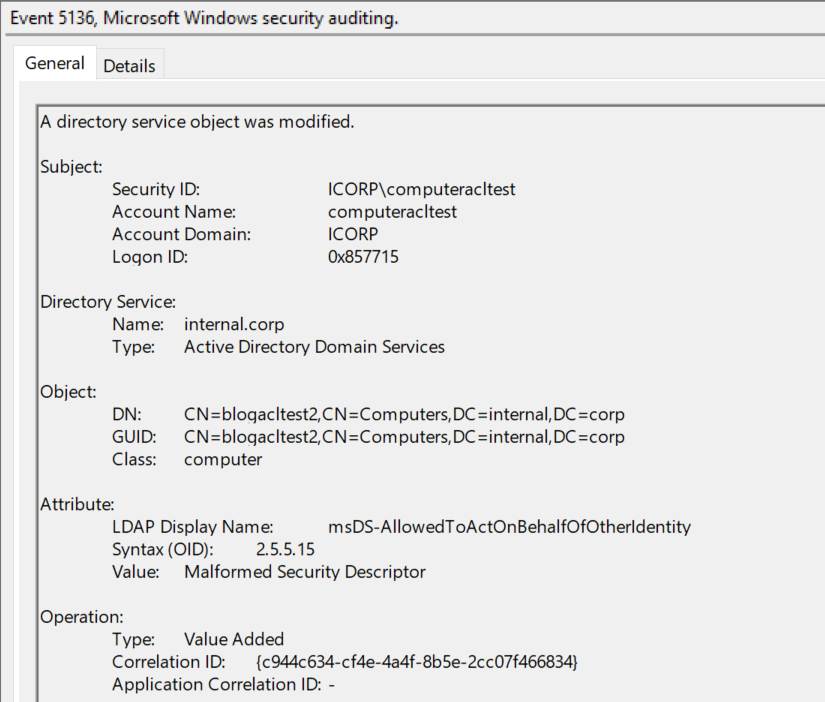
Once this is set up, event ID 5136 will be logged whenever RBCD is changed on a computer object, which should rarely occur since I’ve yet to hear from someone using this legitimately.
Other changes to BloodHound.py
This feature is now present in version 1.3.0 of BloodHound.py which is available from GitHub or via PyPi. There have been other improvements/optimizations that are included in this release:
- Session enumeration via the HKU registry hive is now supported thanks to @itm4n.
- BloodHound.py will automatically chunk large JSON files to prevent huge files in large networks that the GUI crashes on while ingesting.
- When doing DCOnly collection, BloodHound.py will use its memory more efficiently and not cache everything when not needed.
- You can now supply a file with computer hostnames for session/loggedon/etc enumeration that will restrict enumeration to only those computers.
- Connections to LDAP that time out/are lost during data gathering are automatically re-established if possible.
- A new tool
createforestsidcache.pyis available that creates a cache of all objects in the entire forest. This creates massive speedups for multi-domain AD environments with a lot of cross-domain privileges. - Bugfixes and general improvements.
- Python 2 support is dropped, only Python 3 is supported now.
Something that is not quite new but was not publicly announced before is BloodHound.py’s capabilities to gather information about credentials stored on hosts in scheduled tasks or as part of services. While this method requires administrator privileges to collect, it does gather credentials that could be recoverable from hosts that aren’t always gathered using other session collection methods. You can activate these collection methods by adding experimental to your list of collection methods.
Tools
The new ACL edge has been added to both BloodHound.py and the official BloodHound and it’s SharpHound data collector. The edge was renamed to WriteAccountRestrictions for clarity. If you have the latest version of BloodHound it should support this out-of-the-box without additional requirements. I think this kind of attack pattern may be common in the wild, but I don’t have any solid data on it, so if you find some instances of it when this is configured in real environments (either from the red side or the blue side), please let me know!